


· By Boat Juice Team
How to Pressure Wash Your Boat for Pro-Level Results
Before you pull the trigger on that pressure washer, let's talk prep. A little groundwork is the secret to getting a perfect, streak-free shine on your boat. You'll want to gather your gear, find a good spot out of the sun, and give the hull a quick rinse to knock off the easy stuff like loose salt and grit. Trust me, skipping this part is how you end up with tiny scratches and a dull finish.
Your Pre-Wash Checklist for a Perfect Clean

Think of this as your pre-flight check before you start the job. Getting these simple things right from the start makes the whole process smoother and safer, and gives you much better results. Rushing this stage is a common mistake that leads to a less-than-perfect clean.
First, let's talk about the sun—it's not your friend when washing a boat. If you can, pull your boat into a shaded spot or wait for an overcast day. Washing in direct sunlight causes the soap and water to bake onto the surface, leaving ugly water spots and a filmy residue. You need the cleaning solution to sit and do its work, not evaporate in seconds.
Set Up Your Workspace
Once you've found a good spot, get all your gear laid out and ready to go. Having everything within arm's reach means you won't have to stop and hunt for something mid-wash. A few minutes of organization here will save you a ton of hassle later.
Here’s what you’ll want handy:
- Your pressure washer, with all its hoses and cords.
- Safety gear. At a minimum, wear safety glasses to protect your eyes and some good non-slip shoes.
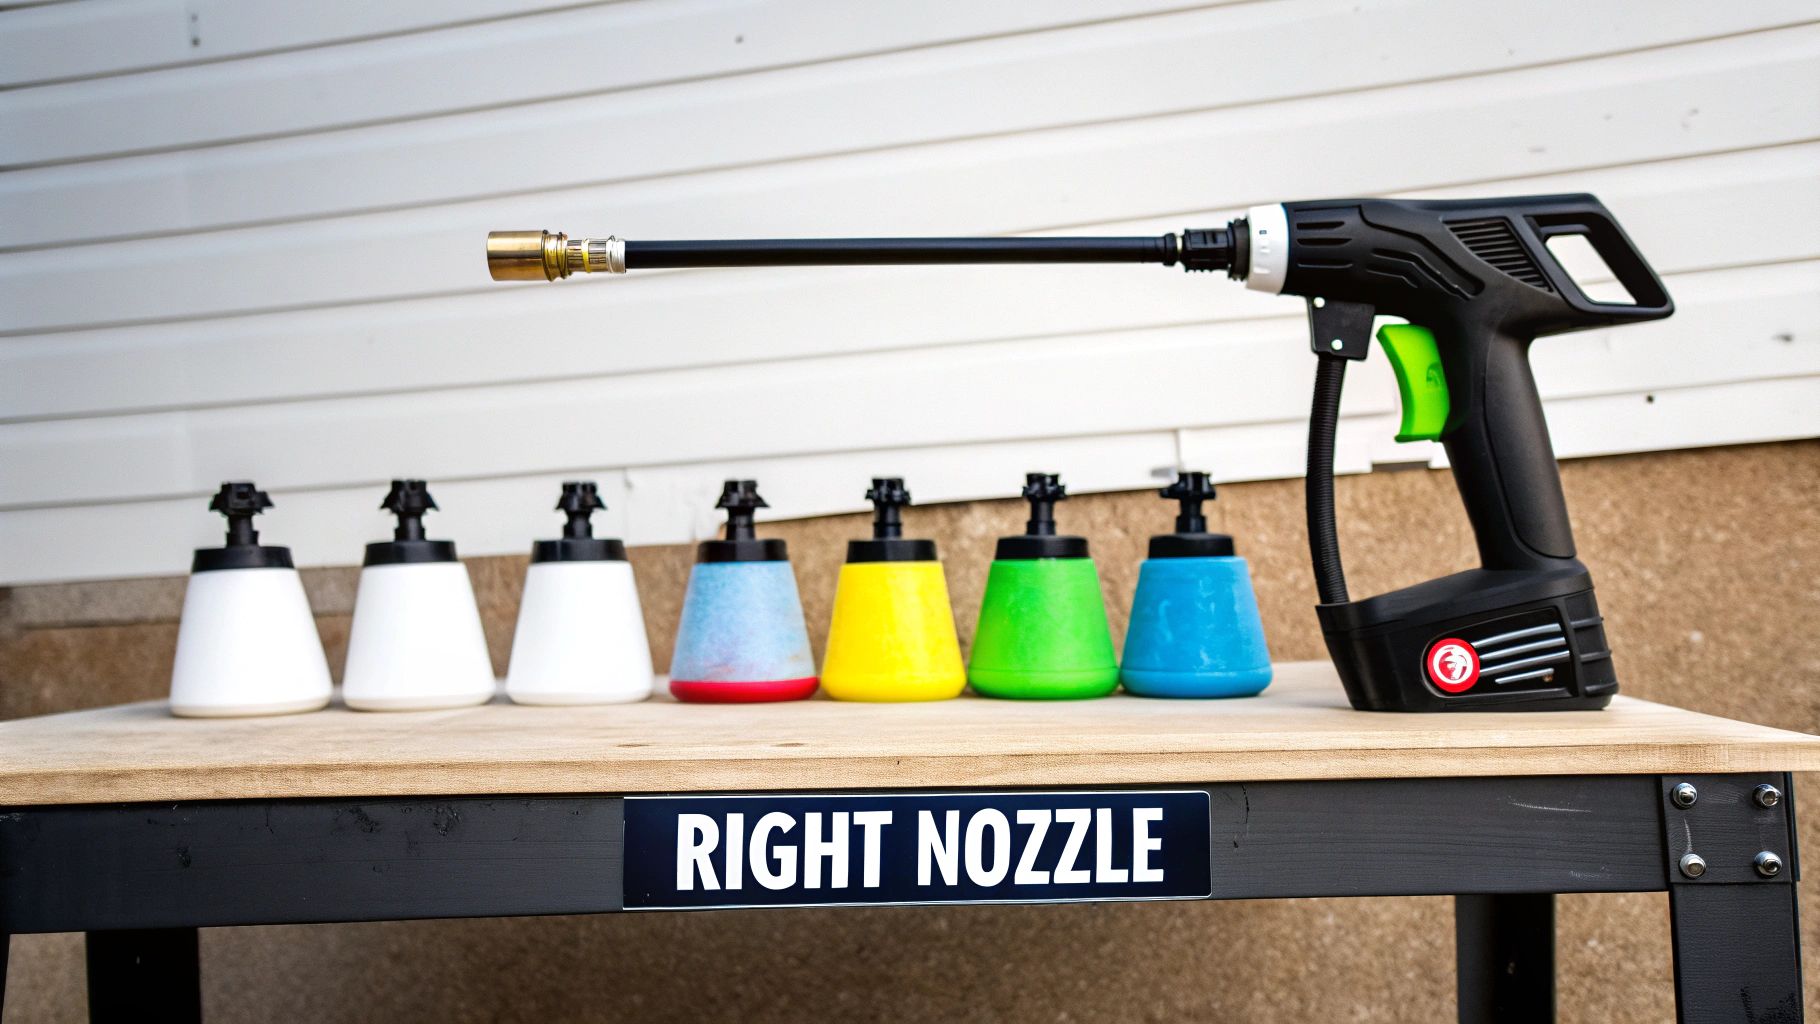
- The right nozzles. We’ll get into the specifics later, but have your white (40°) and green (25°) nozzles ready.
- A quality boat soap and a foam cannon attachment if you have one.
This is also the time to consider where your soapy runoff is going. Many marinas and local areas have strict rules about what can go into the water. Using biodegradable products, like many of the best boat cleaning products on the market, is a smart way to minimize your environmental impact and comply with local regulations.
The All-Important Pre-Rinse
With your station set, it's time for a quick but thorough pre-rinse. Use a standard garden hose for this, not the pressure washer. Your goal is simple: gently wash away all the loose stuff—salt crystals, dust, sand, and other light debris.
Why is this step non-negotiable? Those tiny particles are basically fine-grit sandpaper. Blasting them with high-pressure water is like sandblasting your gelcoat, which creates a web of micro-scratches that dull your boat's finish over time. A good pre-rinse gives your boat soap a clean surface to work on, allowing it to get straight to breaking down the stubborn, stuck-on grime.
Choosing the Right Pressure Washer and Nozzles
Let's talk gear. Picking the right pressure washer for your boat is crucial—going too big can cause a world of hurt. The wrong setup can easily blast away your decals, chew up your gelcoat, or force water past seals, turning a quick wash into a major repair headache.
The two numbers that matter most are PSI (Pounds per Square Inch) and GPM (Gallons Per Minute). PSI is the "punch" of the water, while GPM is the "flow" that carries away dirt. For most recreational boats with fiberglass and gelcoat, you absolutely do not need a fire-breathing, gas-powered beast.
An electric pressure washer in the 1300-1800 PSI range with a GPM between 1.3 and 1.5 is the sweet spot for DIY boat cleaning. This is more than enough power to lift away tough grime without being aggressive enough to damage your boat's delicate finish.
Electric vs. Gas: What's Best for Your Boat?
Gas-powered washers can crank out 3000 PSI or more. That's fantastic for stripping a deck but wildly overkill for your boat. Stick with an electric model—they're lighter, quieter, and provide the control you need to clean safely and effectively.
Battery-powered pressure washers are also becoming very popular with boaters. As the fastest-growing segment of the market, their cordless design means no more tripping over power cords on the dock. You can learn more about pressure washer market trends to see why these portable options are a great fit for life at the marina.
Decoding the Color-Coded Nozzles
Your pressure washer's nozzles are arguably the most critical part of your setup. They control the spray pattern and force of the water, and grabbing the wrong one is the fastest way to cause expensive damage. Thankfully, the industry uses a universal color code to make it easy.
Here’s a quick cheat sheet to help you pick the right nozzle for each part of your boat, ensuring you clean effectively without causing any harm.
Quick Guide to Boat-Safe Pressure Washer Nozzles
| Nozzle Color and Angle | Best Use on Your Boat | Important Warning |
|---|---|---|
| White (40°) | Your go-to nozzle for 90% of the job. Perfect for rinsing large hull areas, vinyl seats, and non-skid surfaces. | Gentle, but still maintain a safe distance from delicate decals and pinstriping. |
| Green (25°) | Great for tackling tougher spots like waterline stains, bird droppings, or scuff marks on the hull. | Provides more focused power. Keep the wand moving and stay at least 18-24 inches away from the surface. |
| Yellow (15°) | Use with extreme caution. Should only be used for cleaning heavily stained, unpainted metal trailers or concrete. | Can be too aggressive for gelcoat and will likely damage vinyl or decals. Avoid using on the boat itself. |
| Red (0°) | Never use this on your boat. It creates a single, high-pressure jet that will cut through materials like a blade. | This nozzle has no place in boat cleaning. Put it in a drawer and forget you own it. |
For nearly all your boat washing, you'll be switching between the white and green nozzles. The yellow and red ones are best left in the toolbox when you're working on your pride and joy.
The Foam Cannon: Your Secret Weapon
If you want to step up your boat washing game, get yourself a foam cannon. This attachment clicks onto the end of your pressure washer wand and turns your boat soap into a thick, shaving-cream-like foam. This is far more effective than just spraying soapy water.
The rich foam blanket clings to the surface, giving the cleaning agents in a quality soap, like Boat Juice Wash & Shine, critical "dwell time" to break down salt and grime. The foam gently lifts contaminants off the surface so you can rinse them away with minimal scrubbing, which drastically reduces the risk of scratching your finish.
Mastering Your Washing Technique
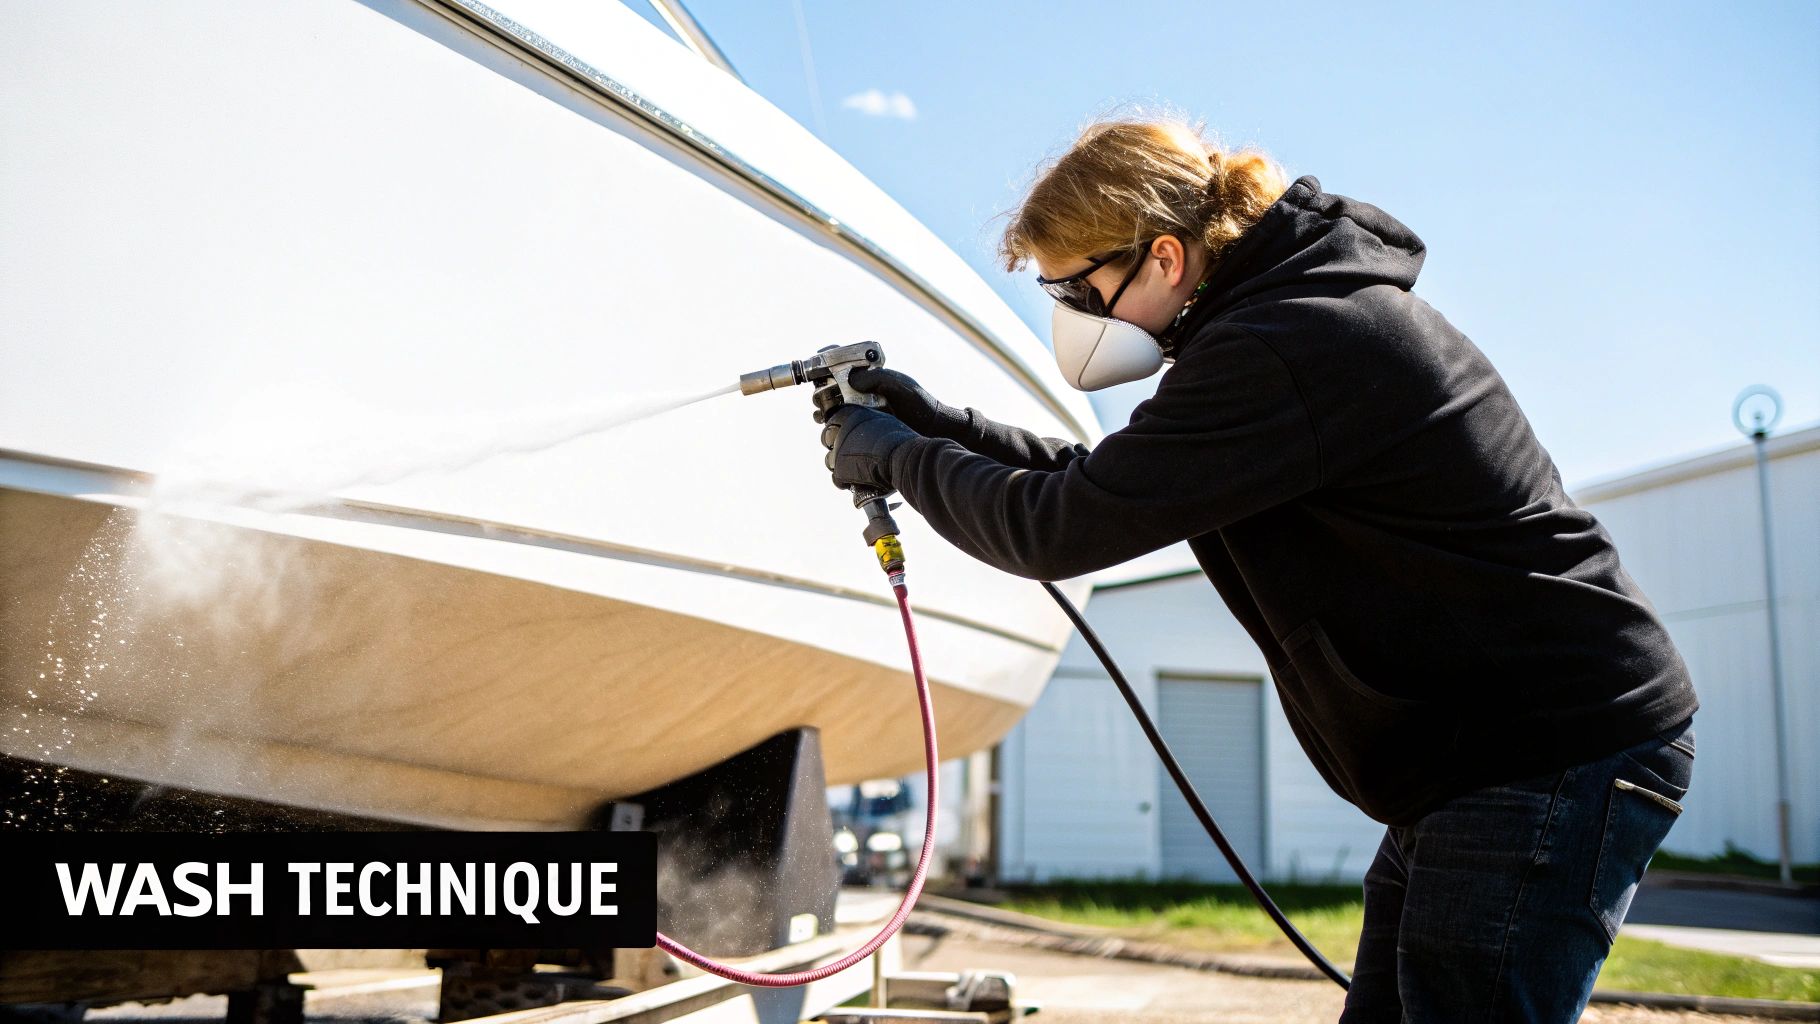
Alright, your boat is prepped and your equipment is ready—now for the main event. Your technique will be the difference between a job that looks okay and one that looks truly professional. There’s a proven method that works with gravity, not against it, to deliver a deep, streak-free clean every time.
The core principle is simple but incredibly effective. It’s a two-part process that prevents ugly clean streaks that can ruin an otherwise perfect wash.
The Bottom-Up and Top-Down Rule
If you take one thing away from this guide, let it be this mantra: apply soap from the bottom up, then rinse from the top down. This is an absolute game-changer for getting an even, consistent clean across your entire boat.
Why does this work? When you start soaping from the bottom of the hull and work your way up, you prevent the soap from creating clean streaks as it runs down a dry, dirty surface. Working bottom-to-top ensures the whole area gets an even coat of cleaner before anything has a chance to run.
Once the boat is fully lathered and the soap has had a minute to work, you simply reverse the process. Start rinsing from the highest point—the cabin, tower, or gunwales—and work down. Gravity becomes your best friend here, pulling all the dirt and soap residue down and away from the surfaces you just cleaned.
Foam Cannon Technique for a Deeper Clean
Using a foam cannon attachment makes this whole process more efficient and much safer for your boat's finish. A good, pH-balanced marine soap is transformed into a thick, clinging blanket of suds that sticks to vertical surfaces, giving the cleaning agents critical dwell time to break down salt, grime, and gunk.
This foam gently lifts the contaminants away from the gelcoat, so you can rinse them away without aggressive scrubbing. This drastically reduces the risk of putting swirl marks or fine scratches into your finish. For great results, load your foam cannon with a dedicated boat soap like Boat Juice Wash & Shine; its formula is designed to create a rich foam that cleans effectively without stripping off your wax or sealant.
Washing Different Boat Surfaces Safely
Remember, your boat is made of multiple materials, so you need to adapt your technique, nozzle choice, and distance for what you're cleaning. The same pressure that works wonders on the hull can destroy more delicate areas.
Key Areas and How to Approach Them:
- Gelcoat/Fiberglass Hull: This is your workhorse surface. You can confidently use a white (40°) or green (25°) nozzle here. Keep a steady distance of about 18-24 inches and use wide, overlapping horizontal strokes, almost like you're spray painting. Keep that wand moving!
- Non-Skid Decks: The texture on these decks is a dirt magnet. Use the white (40°) nozzle and come in at a wider angle to lift the grime out of the crevices without being too harsh. Letting the foam sit for an extra minute here makes a huge difference.
- Vinyl Seats and Upholstery: Be extremely careful here. A pressure washer can shred vinyl stitching and force water deep into the foam cushions, which is a recipe for mildew. Use the white (40°) nozzle only, back off to at least 3 feet, and use a very light touch just to rinse.
- Decals and Pinstriping: Treat these areas like they’re made of glass. High pressure can easily get under an edge and lift the adhesive. Stick with the white (40°) nozzle, stay several feet back, and always spray at a shallow angle—never hit the edge of a graphic head-on.
Pro Tip: When you pressure wash your boat, always feather the edges of your spray pattern. Overlap each pass by about 50% to ensure you don’t leave any "tiger stripes" or missed lines on the hull. This methodical approach is what separates a quick rinse from a true detailing job.
By understanding how to adjust your approach for each part of your boat, you’ll get a fantastic clean while protecting your investment. For a deeper dive, check out our guide on how to clean fiberglass boats for more expert tips.
Dealing With Stubborn Stains and Mildew
You’ve given your boat a solid wash, but a few stubborn spots are still hanging around. This is normal. The most common culprits are ugly black mildew specks on your vinyl and the chalky, white water spots that make your gelcoat look dull.
Blasting these with more pressure is not the answer—in fact, it's a fast track to causing damage. Mildew thrives in dark, damp spots, while hard water spots are mineral deposits left behind when water evaporates. A regular boat soap can't break this stuff down, so you need a targeted solution.
Getting Mildew Off Your Vinyl Seats
Seeing mildew on your vinyl seats makes you want to hit it with the pressure washer on a high setting. Don't do it. High pressure will shred the stitching and force moisture deep into the foam, creating a perfect breeding ground for even more mildew later on.
The right tool for this job is a specialized cleaner, not more power. A product like Boat Juice Mildew Stain Remover is your best bet, as it's formulated to kill mildew at the source without using harsh chemicals that can dry out and crack your vinyl.
Here’s the simple, safe way to handle it:
- Spray the Cleaner: Apply it directly and liberally onto the mildew spots.
- Let It Work: This is the key. Let it sit for a few minutes. You'll actually see the stains start to fade as the cleaner does its job.
- Wipe & Rinse Gently: Use a clean microfiber towel to wipe the residue away. Then, use your pressure washer with the white 40° nozzle from a safe distance of 3-4 feet to gently rinse the area.
Wiping Out Tough Water Spots
Hard water spots are a pain, especially on darker hulls. You can't just blast them off with high PSI without risking damage to your gelcoat. For these, you need a cleaner with a mild acid that can chemically dissolve the mineral deposits. Boat Juice Extreme Water Spot Remover is designed for exactly this purpose.
The secret to fighting water spots isn't force, it's chemistry. A good water spot remover breaks the mineral bonds that soap can't touch, letting you simply wipe them away to reveal that deep gloss underneath.
Just spray the remover on a small section of the hull, let it dwell for 30-60 seconds, and then gently wipe it off with a clean microfiber. It’s amazing how easily the spots disappear. For more tips on this, check out our guide on finding the best mildew remover for boats.
The Final Rinse and Protecting Your Hard Work

You've done the heavy lifting and your boat is looking fantastic. But don't pack up just yet. These last steps are what separate a good wash from a great one, locking in that shine and making your next cleanup much easier.
A thorough final rinse is non-negotiable. Any soap residue left behind acts like a magnet for fresh dirt and can dry into a dull, hazy film, undermining all your hard work.
Getting the Final Rinse Just Right
Pop on your white 40-degree nozzle and rinse from the top down. Just like with the initial wash, let gravity be your friend, pulling all leftover suds down and away. Be methodical and get into all the nooks and crannies—around cleats, window frames, and hardware where soap loves to hide.
Smart Drying for a Spotless Finish
Letting your boat air dry is a surefire recipe for water spots. As water evaporates, it leaves mineral deposits behind, creating chalky blemishes that dull your finish. You need to dry your boat, and you need to do it quickly.
Here are a couple of pro-level methods to get it done right:
- Plush Microfiber Towels: Use large, high-quality microfiber drying towels. They are incredibly absorbent and won't scratch your gelcoat. Work in sections, gently patting and wiping the surface dry.
- The Electric Leaf Blower: This is a game-changer. An electric leaf blower is perfect for chasing water out of tight spots like railings, non-skid decks, and engine vents. It also makes drying large sections of the hull incredibly fast.
Pro Tip: Whatever you do, never use a regular bath towel or an old t-shirt to dry your boat. The fibers are too coarse and will create a web of micro-scratches on your gelcoat. Stick to quality microfiber—it’s worth it.
Applying a Protective Sealant
After all that effort, leaving your boat unprotected is like going out in the rain without a jacket. You need to apply a protective barrier. This final step adds a ridiculous amount of gloss and shields your gelcoat from the elements.
A modern spray sealant is the fastest and easiest way to go. A quality product creates a slick, hydrophobic surface that does more than just look good. This layer of protection provides huge benefits like UV protection and makes future cleanups much easier because grime has a harder time sticking.
Application is simple. Just mist a light coat onto a section of the clean, dry hull and wipe it to a brilliant shine with a fresh microfiber towel. This is the crucial final step that keeps your boat looking amazing week after week.
Common Mistakes to Avoid When You Pressure Wash a Boat
Learning from another boater's mistakes is always cheaper than making them yourself. When you pressure wash your boat, a few simple errors can lead to costly damage. Let's walk through the most common pitfalls so you can wash with confidence.
The biggest mistake is getting the nozzle too close to the hull. Think of that water stream as liquid sandpaper. If you hold it just a few inches away, you can permanently etch or "burn" your gelcoat, leaving a fuzzy-looking scar that requires professional repair.
Right behind that is using way too much pressure. Blasting your boat with 2000+ PSI can shred your vinyl decals, peel off pinstriping, and force water past window seals or into sensitive electrical connections. The goal is to clean, not to strip the finish clean off.
Using the Wrong Tools and Cleaners
It's tempting to grab whatever is handy, but the wrong choices here can create more work for you. To protect your investment, steer clear of these common shortcuts.
- Household Detergents: Dish soap is designed to strip grease, which means it will also strip every last bit of wax or sealant you've applied. This leaves your gelcoat exposed to UV damage.
- Skipping Safety Gear: A high-pressure jet of water can easily launch debris or chemicals back at you. Always wear safety glasses to prevent a serious injury.
- Forgetting to Cover Electronics: Water and electronics don't mix. Before you spray, take a minute to cover your navigation screens and switch panels with plastic and painter's tape.
The most expensive boat cleaning mistake is often one that seems harmless at first. Using the wrong soap or getting too close with the nozzle can cause gradual damage that dulls your finish and degrades your boat’s value over time.
Rushing the Process
Finally, trying to speed through the job is a surefire way to get a poor result. Failing to do a thorough final rinse will leave a dull, hazy film of soap residue that immediately starts attracting fresh dirt and grime.
Likewise, not drying your boat properly will leave mineral deposits all over the place, creating a new layer of stubborn water spots. Taking an extra 15-20 minutes to rinse completely and then dry everything is what separates an amateur wash from a professional-looking detail job.
Answering Your Top Boat Pressure Washing Questions
Got a few more questions? That's completely normal. Let's tackle some of the most common things boat owners ask, so you can move forward with confidence.
Is It Safe to Pressure Wash My Outboard Engine?
You can, but you must be incredibly careful. Think of it more as a gentle rinse than a full-on blast. The absolute rule is to never spray water directly into the air intake, exhaust, or any electrical components. Use your widest fan nozzle (the 40-degree white tip) and keep a good distance to just knock off salt and surface grime from the cowling.
How Often Should I Pressure Wash My Boat?
This depends on how you boat. If you're in saltwater, a quick rinse-down after every trip is a great habit, followed by a more thorough wash every few weeks to keep corrosive salt from setting in. For freshwater boaters, you can stretch it to once a month during peak season.
The key is to stay ahead of the grime. The two most important times to pressure wash your boat are at the start of the season as part of your spring prep, and again at the end of the season before you put it away for winterization. A clean boat is far easier to inspect for issues and protect properly.
Will a Pressure Washer Strip Off My Boat's Wax?
It absolutely can, and that’s a mistake you want to avoid. Blasting the hull with too much pressure or using a harsh detergent is a surefire way to strip off that protective wax layer you worked so hard to apply. This is why it's so important to use a lower PSI setting and a quality, pH-balanced soap designed specifically for marine finishes.
Now that you know the proper technique, your next step is to grab the right supplies. A great wash starts with a great boat soap.