


· By Boat Juice Team
How to Polish an Aluminum Boat and Make It Shine Like New
Bringing your aluminum boat back to its original mirror finish is one of the most satisfying jobs you can tackle as a boat owner. It's about more than just a quick clean; it's a full restoration that strips away the dull, chalky oxidation that naturally builds up over time. This process involves a few key stages—cleaning, deoxidizing, and buffing—to restore that head-turning gleam and protect your investment.
Why Polishing Your Aluminum Boat Is Worth the Effort
Aluminum boats are tough, no doubt about it. But constant exposure to sun, water, and air eventually takes its toll. That chalky film you see isn't just grime; it's oxidation, the natural result of the metal reacting with oxygen. While this layer does offer some protection to the aluminum underneath, it makes your boat look old and neglected.
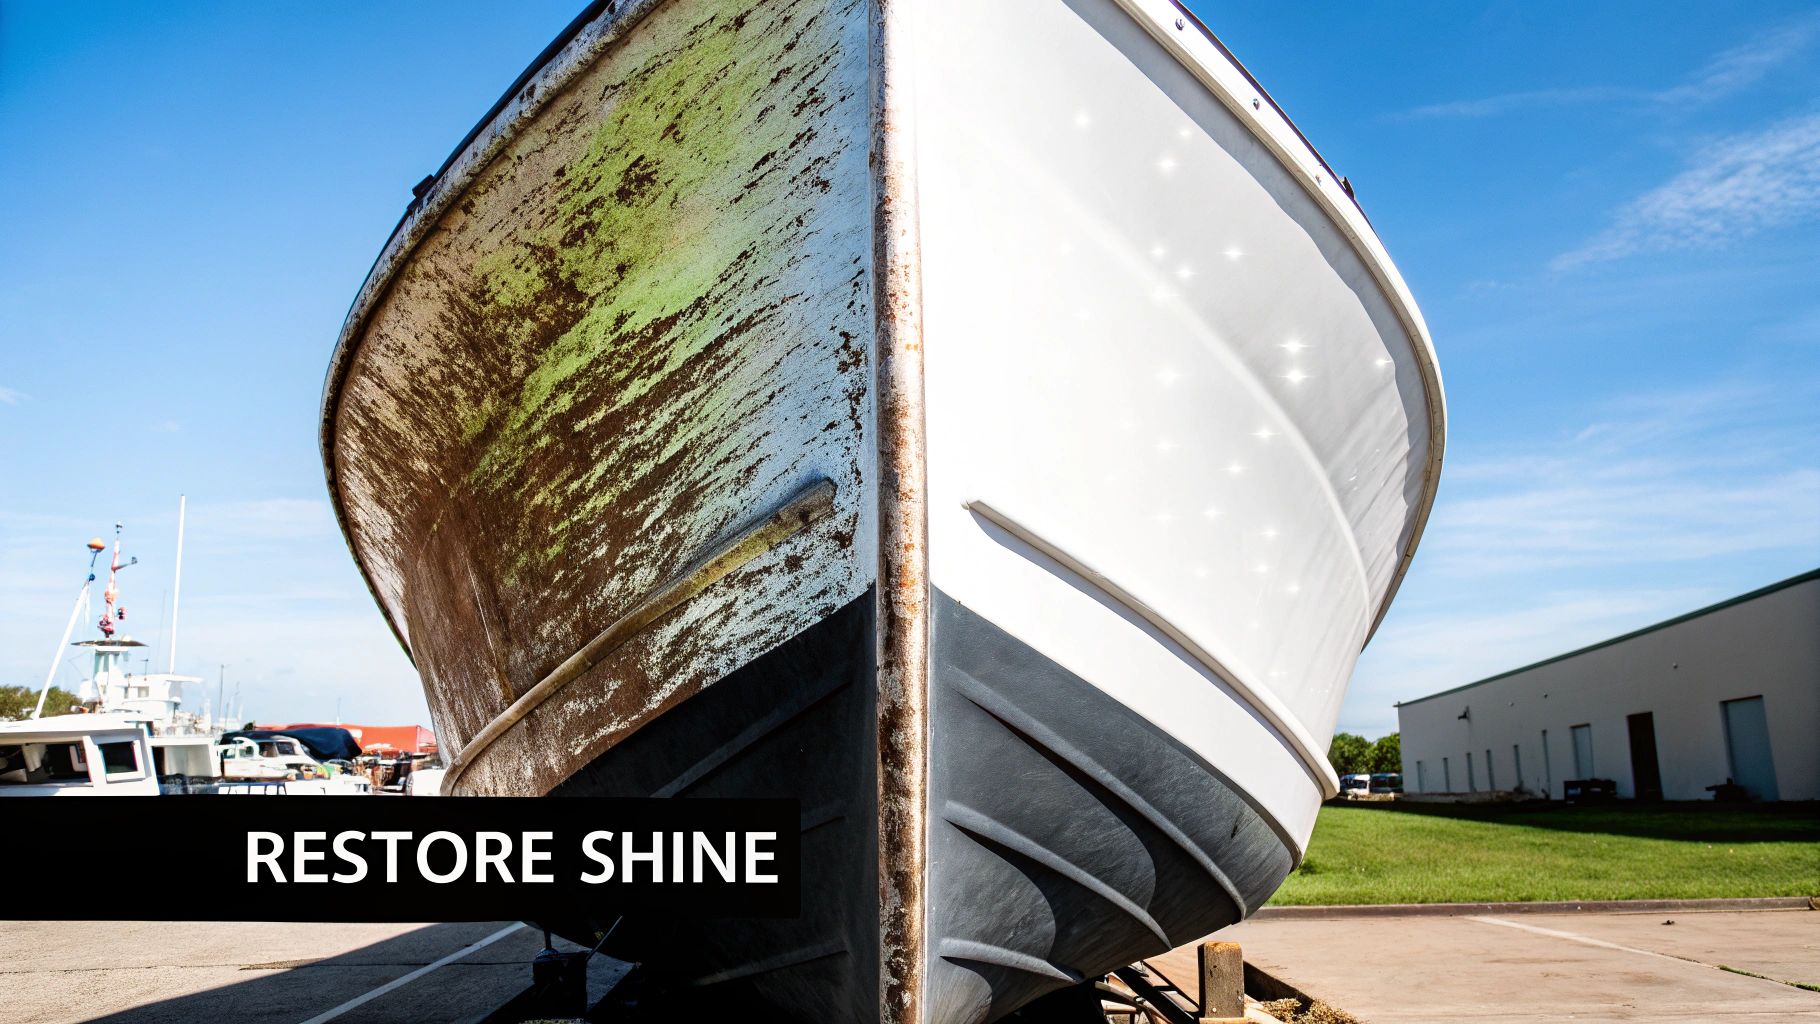
Taking the time to properly polish your boat is about more than just making it look good. The results go way beyond a simple shine, and honestly, the before-and-after is incredibly rewarding.
The Real Benefits of a Good Polish
When you get down to polishing, you're not just buffing up the surface for your next trip out on the water. You're actively investing in your boat's long-term health and value. A good polish cuts through that oxidized top layer, revealing the fresh, smooth metal underneath.
This has a few huge advantages:
- Easier Cleaning: Think of it like waxing your car. A smooth, polished surface gives dirt and grime nothing to cling to. Algae, water spots, and stains slide right off, making your regular wash-downs so much faster.
- Increased Value: Let's be real, a gleaming boat just looks better. It shows pride of ownership, and if you ever decide to sell, a well-maintained hull will always command a higher price. It tells potential buyers you’ve taken good care of it.
- Corrosion Prevention: By stripping away the existing oxidation and sealing the surface, you're creating a strong barrier against the elements. This is a crucial step in preventing more serious pitting and corrosion from getting a foothold later on.
There's no question that aluminum boats are here to stay. The global market for them is expected to jump from USD 6.15 billion in 2024 to an incredible USD 9.67 billion by 2035. As more of these boats hit the water, keeping yours looking sharp is what will make it stand out. If you're curious, you can learn more about the growth of the aluminum boat market and what it means for boat care.
Prepping Your Boat for a Flawless Finish
You wouldn’t wax a dirty car, right? The same logic applies here. Trying to polish an aluminum boat that’s still caked with grime is a fast track to a cloudy, swirl-filled disaster. You’ll just end up grinding all that grit right into the metal. A truly mirror-like shine starts with a squeaky-clean surface.
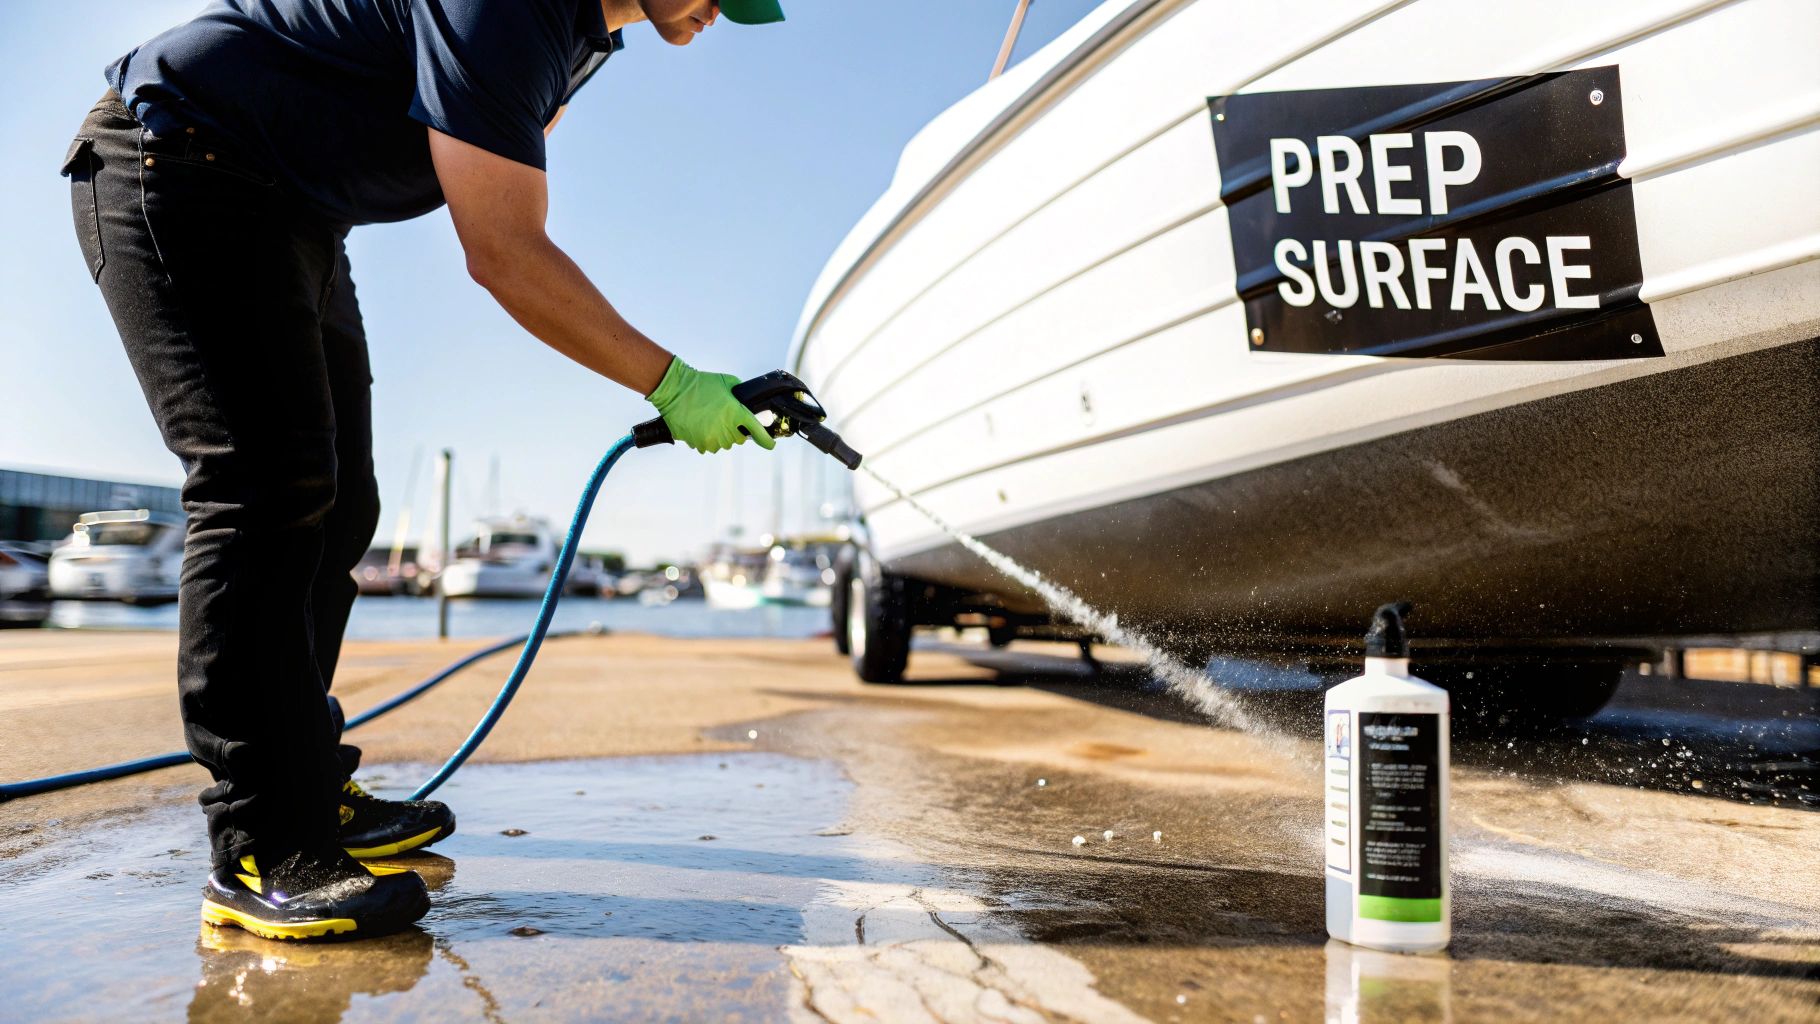
The first wash is all about getting the loose stuff off—think dust, bird droppings, algae, and that general film of dirt that accumulates. A pressure washer is your best friend for this part, as it can blast away a season's worth of buildup in minutes. Just be mindful around sensitive areas like decals or electronics. If you're new to using one on your boat, our guide on how to safely pressure wash your boat is a great place to start.
Decontaminating the Surface
After that initial rinse, you're probably looking at a dull, chalky film and stubborn water spots that didn’t budge. That's oxidation, and your standard boat soap isn't going to cut it. This is where the real prep work begins. You need something that can break down those mineral deposits without damaging the aluminum.
Pro Tip: Steer clear of household cleaners that are highly acidic or alkaline. They might seem like a quick fix, but they can easily etch or stain the aluminum, leaving you with a bigger problem than you started with. Stick to products formulated specifically for marine metals.
A dedicated, pH-balanced cleaner is what separates a decent job from a great one. Something like Boat Juice Extreme Water Spot Remover is built to dissolve the tough mineral bonds that cause those frustrating spots and the chalky haze. You just spray it on, give it a minute to work, and wipe it away. This step handles the chemical decontamination, saving you a ton of elbow grease later.
This is so effective because the formula specifically targets the calcium and magnesium deposits from hard water, lifting them off the surface instead of requiring you to scrub them off. This means you're working with pure, raw aluminum before your polisher even touches the hull. Taking the time to do this right is what makes the difference between a frustrating afternoon and a brilliant, pro-level shine that actually lasts.
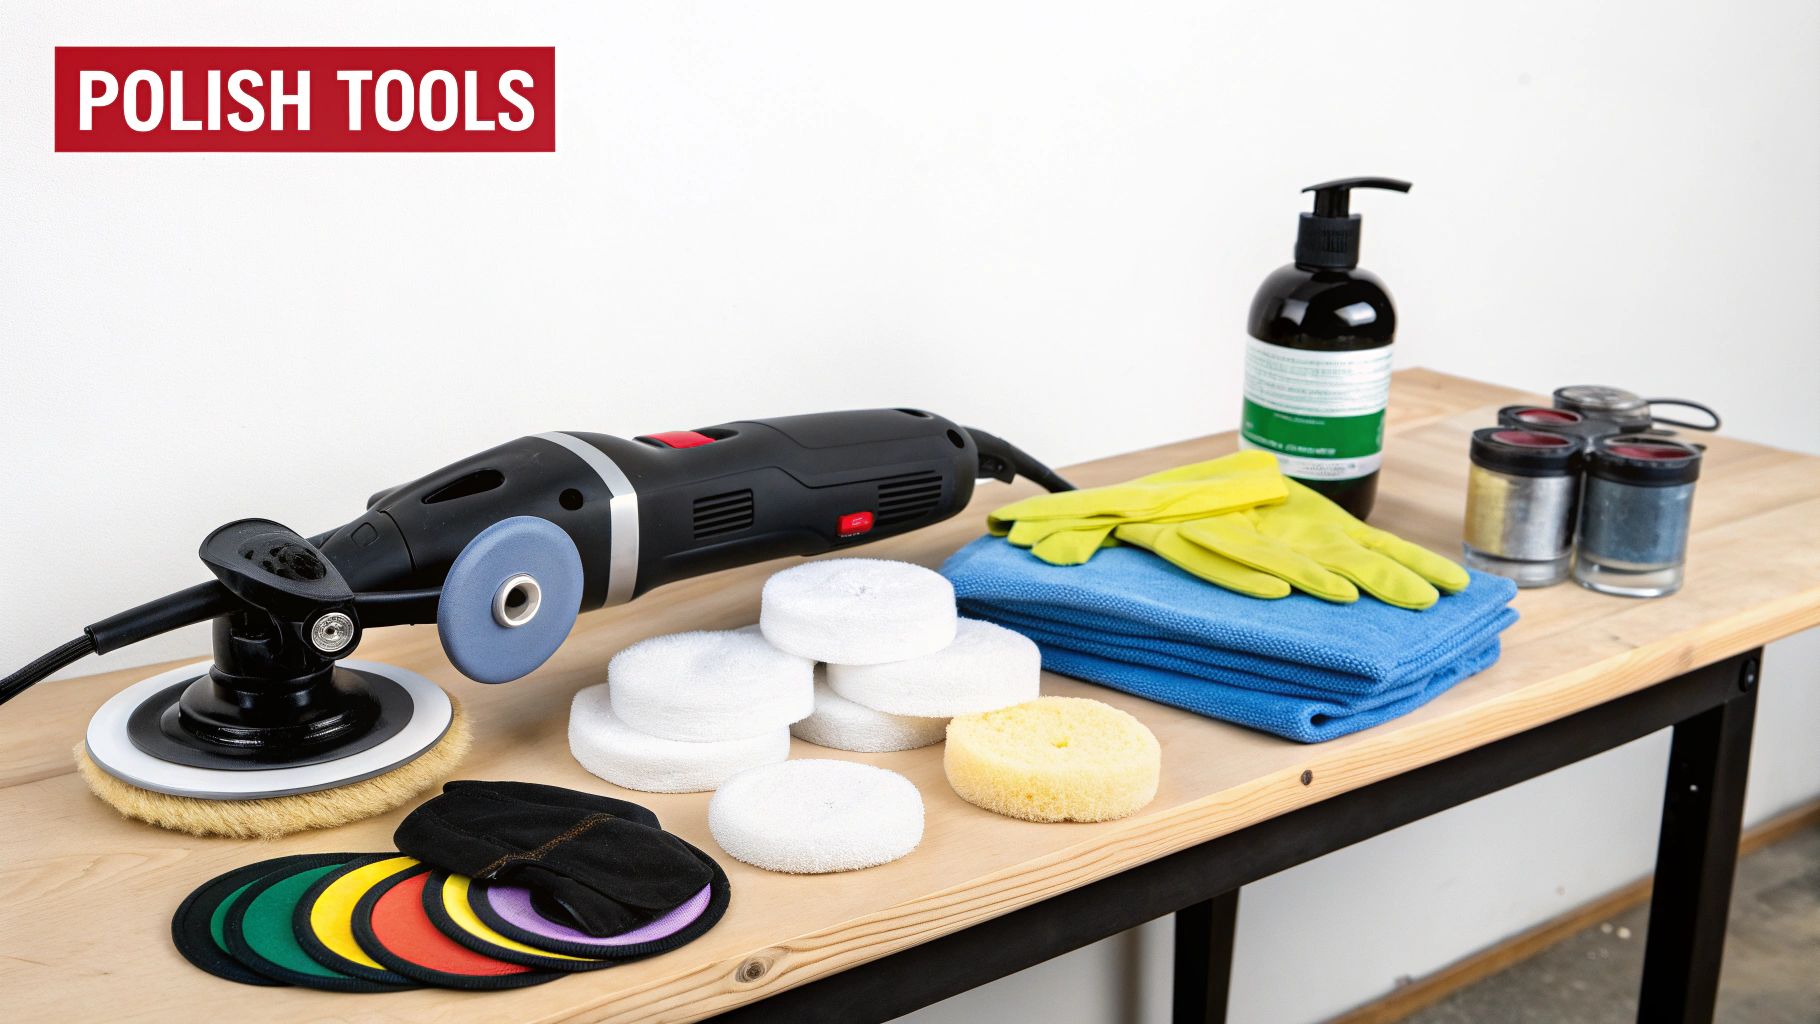
Gathering Your Arsenal of Polishing Tools and Supplies
Having the right gear is what turns a long, frustrating chore into a surprisingly satisfying project. When you set out to polish your aluminum boat, success really hinges on having a complete toolkit ready to go before you even start. Think of this as your shopping list for achieving that perfect, mirror-like shine.
Before you buy a single product, it’s worth noting just how much the boat care market has exploded. In North America alone, boat polish sales topped USD 299 million in 2023 and are on track to climb past USD 474 million by 2031. For DIYers like you, that growth is a good thing—it fuels the creation of better, more effective products. If you're curious, you can dig into the numbers in this boat polish market research report.
Choosing Your Polisher: Machine vs. Hand
Look, you can polish a small spot by hand, but tackling an entire hull that way is a monumental task. A good power polisher delivers the consistent speed and pressure needed to break down polishing compounds and slice through oxidation evenly.
You've really got two main options here:
- Rotary Polisher: This is the heavy hitter. It spins on a single axis, which generates a lot of heat and cutting power. It’s fantastic for chewing through deep oxidation in a hurry, but it absolutely requires a skilled hand. One wrong move and you can create swirl marks or "holograms" in the finish.
- Dual-Action (DA) Orbital Polisher: For most boat owners, this is the way to go. It spins and oscillates at the same time, creating a random pattern that's way more forgiving. It’s less aggressive than a rotary, making it much safer for beginners, but it still has more than enough muscle to restore a brilliant shine.
Demystifying Compounds and Pads
Polishing compounds are essentially abrasive liquids that level the aluminum surface on a microscopic scale. They come in different "cuts," from heavy to fine. The pads you pair them with are just as critical, as they dictate how aggressively that compound works on the surface.
The best way to think about it is like sandpaper. You start with a coarser grit to knock down the big stuff (heavy oxidation) and then move to a finer grit to make the surface perfectly smooth (that mirror shine).
Key Takeaway: Always aim to use the least aggressive combination necessary to get the job done. Starting with a super aggressive combo when you don't need it can remove more metal than necessary and just create more finishing work for yourself.
Polishing Compound and Pad Pairing Guide
Matching the right compound to the right pad is the secret sauce for getting professional results. This table should help you choose the perfect combo based on the condition of your boat's aluminum.
| Hull Condition | Recommended Compound | Recommended Pad | Why It Works |
|---|---|---|---|
| Heavy Oxidation & Pitting | Heavy-Cut Compound | Wool Pad | The aggressive wool fibers and coarse compound work together to quickly slice through years of buildup and level out minor pitting. |
| Moderate Dullness & Chalkiness | Medium-Cut Polish | Firm Foam Pad | This combo offers a great balance of cutting power and finishing ability, perfect for boats that are dull but not severely damaged. |
| Light Haze & Swirls | Finishing Polish | Soft Foam Pad | The fine abrasives and soft pad gently refine the surface, removing any leftover haze or swirl marks to create that deep, liquid shine. |
Getting the right pairing from the start will save you a ton of time and frustration.
Finally, don’t forget the essentials. You’ll need a big stack of clean microfiber towels for wiping away residue, some painter's tape to protect decals and trim, and proper safety gear. A good pair of gloves, safety glasses, and a dust mask are non-negotiable—polishing aluminum can get pretty messy.
The Polishing Process: A Step-by-Step Guide
Okay, your boat is clean, deoxidized, and ready for the main event. This is where the real transformation happens—turning that clean-but-dull aluminum into a brilliant, mirror-like finish. The secret here isn't speed; it's patience and working methodically.
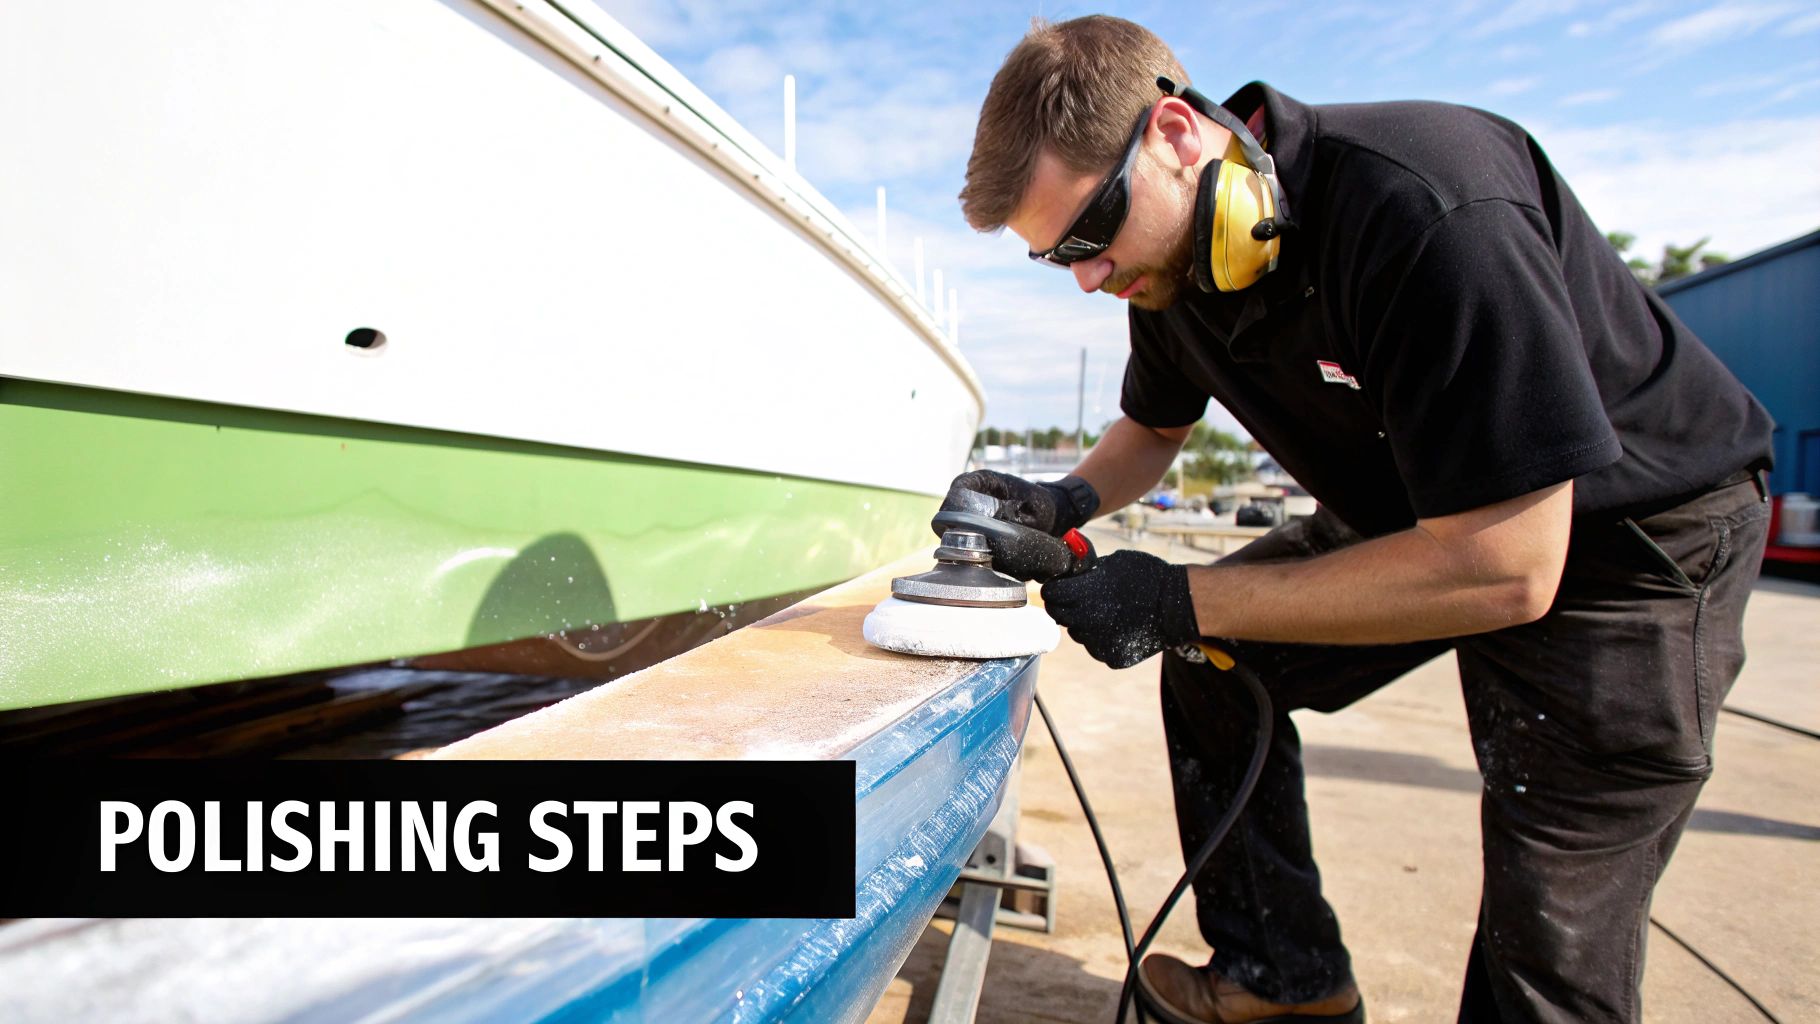
Don't even think about tackling the whole boat at once. Instead, break it down into small, manageable squares, maybe two-by-two feet. Working in these small sections is crucial because it keeps the polishing compound from drying out before you've had a chance to work it in properly. Trust me, trying to buff off dried, caked-on polish is a nightmare and can leave you with a hazy mess.
Step 1: Apply Polish and Spread
Time to grab your polisher. A dual-action (DA) orbital is a great choice here because it’s effective yet forgiving. Dab 3-4 pea-sized dots of your aluminum polish or compound directly onto the pad. Place the polisher pad flat against the hull before you turn it on. This simple move prevents the machine from slinging compound all over you and the boat.
Step 2: Work the Polish in a Cross-Hatch Pattern
Start the machine on a low speed setting (around a 1 or 2) to spread the product evenly across your two-by-two-foot workspace. Once you have a thin layer, crank the speed up to a medium setting (a 4 or 5). This is your "working speed," where the real magic happens.
Move the polisher in a deliberate cross-hatch pattern. That means working side-to-side across the section, then switching to an up-and-down motion, overlapping each pass by about 50%. This methodical approach ensures you get even coverage and consistent results. Let the machine do the work; all you need to apply is gentle, steady pressure to guide it.
Why the Cross-Hatch Pattern Works: This technique stops you from accidentally putting too much pressure in one area, which is a classic way to create swirl marks or burnish the aluminum. By polishing every inch from multiple directions, you achieve a much more uniform and flawless finish.
Pay attention to how the polish looks as you work. It will start as a wet, opaque paste and gradually break down into a thin, almost translucent film. This is your signal that the tiny abrasives in the polish have done their job. Once you see that haze, you’re ready for the next step.
Step 3: Wipe Off and Inspect
Switch the polisher off before you lift it from the hull. Grab a clean, plush microfiber towel and gently wipe away the hazy residue with one side. Now, flip the towel over to a fresh, clean side for a final buff. This is the moment of truth!
Take a step back and inspect your work. Use a flashlight or move your head around to catch the light from different angles. If it's not quite perfect yet, don't sweat it. You might just need a second pass with the same compound, or maybe it’s time to switch to a finer finishing polish. If you notice some stubborn corrosion stains, our guide on choosing an effective aluminum corrosion cleaner has some targeted advice.
Once you’re happy with that first section, move right next to it, overlapping your work area slightly to blend everything together seamlessly. It’s not a race. It’s about patiently bringing that dazzling shine back to life, one small section at a time.
Locking In That Shine for Long-Lasting Protection
You’ve put in all that hard work, and your aluminum boat looks absolutely incredible. Don't stop now. This next step is the most important one for making sure that mirror-like shine actually lasts. The polishing process stripped away all the old oxidation, but it also opened up the microscopic pores of the aluminum, leaving it pristine but vulnerable.
Think of it like freshly sanded wood—it’s smooth and beautiful, but you’d never leave it outside without a protective clear coat. Sealing your polished aluminum is non-negotiable if you want that gleam to last for months instead of just a few weeks. It creates a crucial barrier that keeps oxygen and moisture from starting the oxidation process all over again.
Sealing Your Shine From the Elements
When it comes to protecting that finish, you have a few options, but modern synthetic sealants are the way to go. They form a much more durable chemical bond with the metal compared to traditional waxes, which just don't have the staying power to survive a harsh marine environment.
This is more important than ever. The global market for aluminum fishing boats is projected to explode, growing by over USD 1.1 billion in annual revenue by 2030. With so many new boats hitting the water, the need for effective, long-lasting protectants is pushing companies to innovate. You can dig into the numbers on the expanding aluminum boat market to see just how fast things are changing.
For a solution that's both powerful and easy to use, a modern spray sealant is a total game-changer. A product like Boat Juice Protection Spray, for instance, was made specifically for this job. A sealed surface is hydrophobic, meaning it actively repels water. You'll see water bead up and roll right off, taking dirt and grime with it, which drastically cuts down on new water spots.
Your Final Step: How to Protect Your Polish
Applying a spray sealant couldn't be simpler. After your final polishing wipe-down, just give the surface a light mist, gently spread it with a clean microfiber towel, and then flip the towel to a dry side for a quick final buff. That’s it.
This process adds maybe 15 minutes to your project, but it can extend the life of your shine by months. That slick barrier does more than just stop oxidation, too.
- Makes Cleaning Effortless: Future wash-downs will be a breeze. Often, a simple rinse and wipe is all you'll need.
- Blocks UV Rays: It adds a layer of protection against the sun's damaging rays, which are a primary cause of dulling.
- Enhances Gloss: It actually deepens the shine, adding a final layer of gloss that makes your hard work pop.
By sealing the surface, you're not just finishing the job—you’re buying an insurance policy for that shine. If you want to get into the details on different products, our guide on choosing the best spray wax for boats explains the science behind today's protectants. This last, simple step is the secret to enjoying that brilliant finish all season long.
Common Questions About Polishing an Aluminum Boat
Alright, you've got the process down, but maybe a few "what ifs" are still on your mind. Getting the details right is what separates a good job from a great one. Let's clear up some of the most common questions we hear from boat owners just like you.
How often should I polish my aluminum boat?
This really depends on how you use and store your boat. If it lives in saltwater and bakes in the sun, you’ll likely need to do a full polish every year as part of your spring prep. For a freshwater boat that’s stored in a garage, you might get away with a major polish every two or three years. The key is what you do in between. A quick wipe-down with a protective spray after each outing makes a world of difference and keeps new oxidation from gaining a foothold.
Can I polish over anodized or painted aluminum?
No, you should never take an abrasive aluminum polish to an anodized or painted finish. Anodizing is a thin, protective coating that's fused to the aluminum, and a gritty polish will chew right through it, leaving the raw metal exposed and vulnerable. For these surfaces, stick to a gentle boat soap and a proper wax or sealant made specifically for coated finishes. When in doubt, always test your product on a small, hidden spot first.
Is hand polishing as good as using a machine?
For a tiny spot, you can get away with polishing by hand. But for the entire hull, a machine polisher is essential. Your arms can't deliver the consistent speed and steady pressure needed to properly break down the abrasives in the polishing compound. It’s what delivers that flawless, mirror-like finish across the entire boat. A machine isn’t just a nice-to-have; it's the right tool for getting pro-level results.
Why does my boat still look hazy after polishing?
This is a classic—and super frustrating—problem. It usually means you either didn't work the compound long enough for its abrasives to fully break down, or you let the residue dry on the surface for too long before buffing it off. It can also happen if your last compound was too aggressive, leaving behind microscopic scratches that show up as a haze. The solution is simple: go back over the hazy area with a fine finishing polish and a fresh, soft foam pad using light pressure. This gentle final pass will buff out those tiny imperfections and bring out that deep, crystal-clear shine you've been working for.
Now that your boat is polished to perfection, your next step is to protect that shine. Boat Juice Protection Spray creates a slick, ceramic-infused barrier that repels water and grime, keeping your aluminum looking fantastic for the whole season. Check out our full line of boat care products today!