


· By Boat Juice Team
How To Use Aluminum Corrosion Cleaner and Restore Your Boat's Shine
If you've spent any time on the water, you've seen it: that chalky, white film that dulls your aluminum trim, towers, and railings. That's not just grime—it's the first warning sign of corrosion. The only real way to get rid of it and bring back that original shine is with a dedicated aluminum corrosion cleaner, a formula designed to stop that chemical reaction in its tracks.
What Is That Chalky Stuff On Your Boat's Aluminum?
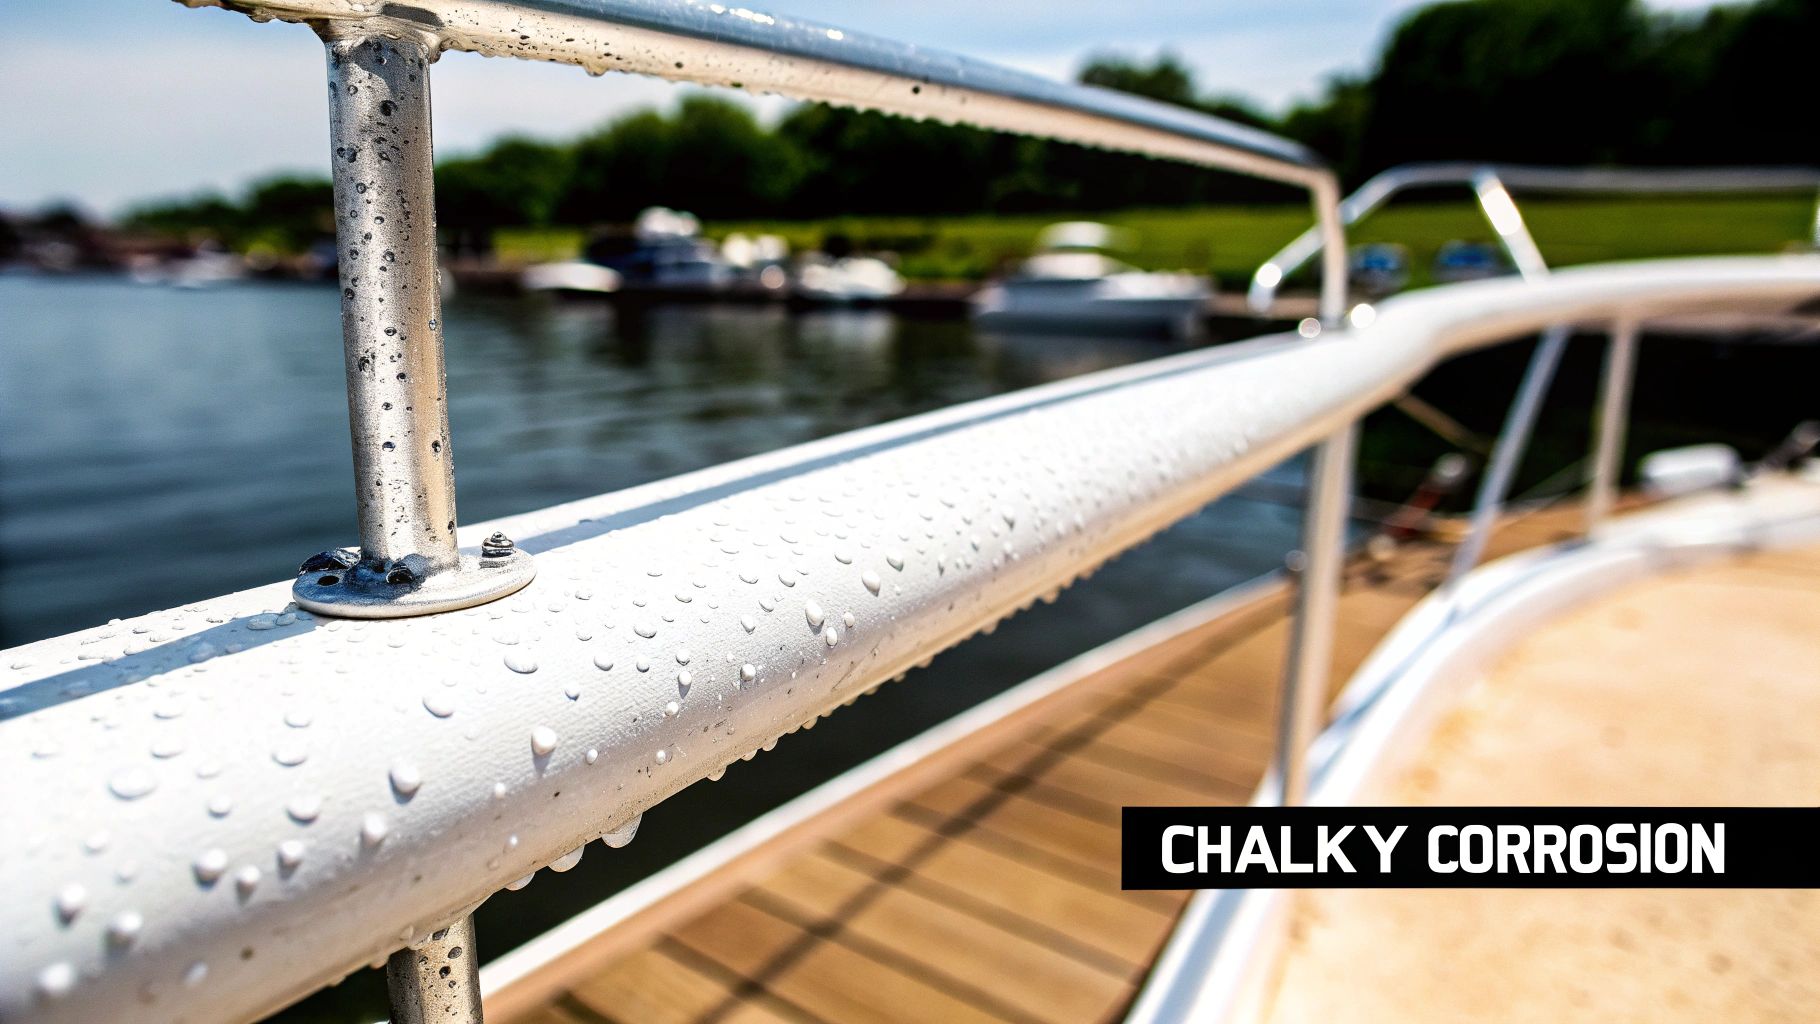
That dull, pitted texture creeping across your boat's railings, T-top, or pontoon tubes is aluminum corrosion in action. It's a constant battle, especially if you boat in saltwater, but knowing your enemy is half the fight. Knowing what it is and why it happens will help you defeat it for good.
Aluminum is a go-to material for boats because it's both strong and light. It also has a neat trick: it naturally forms a super-thin, hard layer of aluminum oxide when exposed to air. This layer is supposed to act like a shield, protecting the raw metal underneath from the elements.
The problem is, the marine environment—especially with all its salt and moisture—is hell-bent on breaking that shield down. This is where your maintenance efforts become critical to preserving your boat's appearance and structural integrity.
The Science Behind The Grime
When saltwater sits on your aluminum, the chloride ions in it are like tiny wrecking balls hammering away at that protective oxide layer. Once they break through, they start an electrochemical reaction with the raw aluminum. This process creates what we see as aluminum oxide hydrate—that ugly, chalky, white powder that makes your boat look old and tired.
Basically, the original oxide layer is a thin coat of armor. Saltwater finds the chinks in that armor and creates a rust-like problem. If you let it go, it's not just an eyesore; it can lead to deep pitting that weakens critical parts of your boat like towers and railings. This is why a simple wash-down doesn't work; you aren't actually stopping the chemical reaction.
Recognizing Different Stages of Corrosion
Not all corrosion is created equal. Figuring out how bad it is will tell you exactly how to attack it. Catching it early will save you a ton of work later on.
- Light Oxidation: This looks like a dull, milky haze on the aluminum. The metal still feels mostly smooth, but it’s lost its shine. This is the easiest stage to fix.
- Chalky Buildup: Now things are getting more serious. You can wipe a white, powdery residue off with your finger, and the metal underneath feels a bit rough to the touch.
- Pitting: This is advanced-stage corrosion. You’ll see tiny, dark pits or holes speckling the surface. This means the corrosion is literally eating into the metal and needs more aggressive treatment.
Knowing the difference between light oxidation and deep pitting is crucial. Pitting is a sign that the metal's integrity is at risk, turning an aesthetic issue into a potential safety problem for components like T-top supports or railings.
Once you understand what's causing this chalky mess, it's clear why a specialized aluminum corrosion cleaner is non-negotiable. It's built to chemically dissolve the buildup and neutralize the reaction—something your all-purpose soap just can't handle. And while you're focused on your aluminum, don't forget the rest of the boat! Check out our guide on how to clean fiberglass boats to keep your entire vessel looking sharp.
Choosing The Right Aluminum Corrosion Cleaner
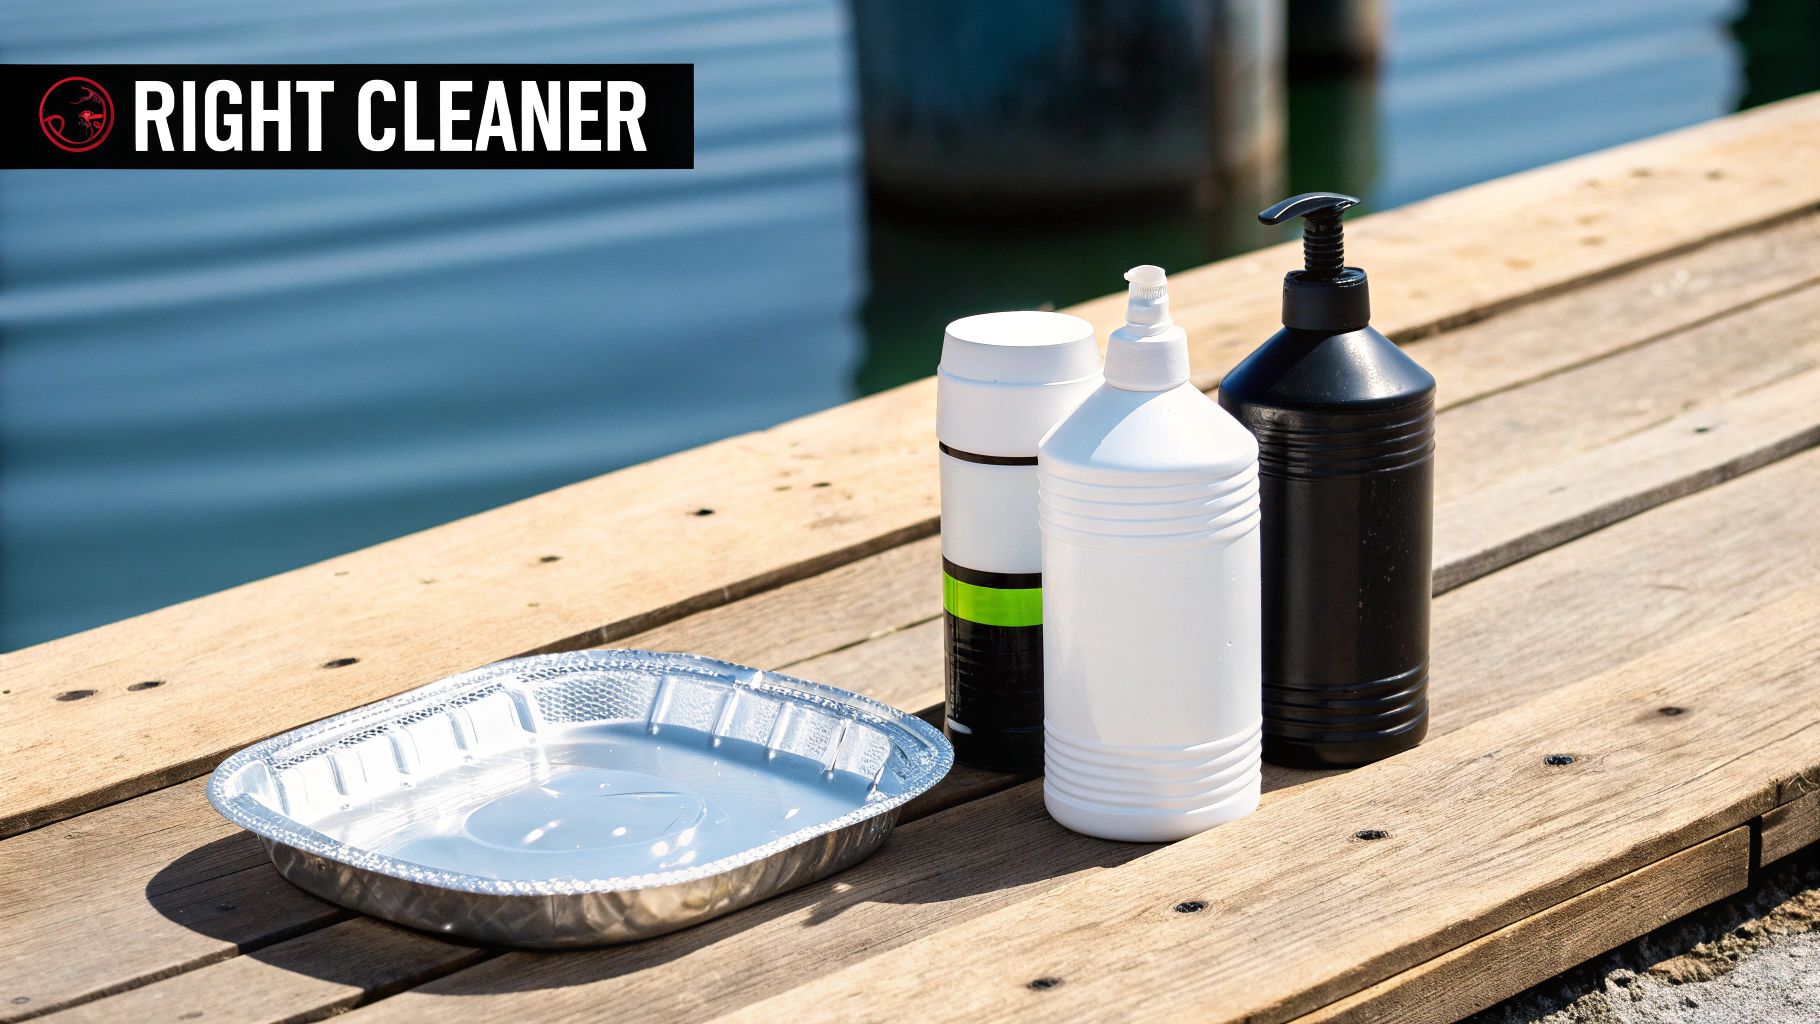
Walking into a marine supply store can be overwhelming. The cleaning aisle is a wall of promises, with dozens of bottles all claiming to be the miracle fix for your dull, chalky aluminum. But here's the deal: grabbing the wrong aluminum corrosion cleaner can do more harm than good. I've seen it happen—the wrong product can eat through gelcoat, stain vinyl, or even permanently damage the aluminum finish you're trying to save.
To make a smart choice, you need to understand what you're working with. Most cleaners fall into one of three camps: acid-based, alkaline, or pH-neutral. Each one has a specific job, and knowing the difference is what separates a beautiful restoration from a costly mistake.
Acid-Based Cleaners For Heavy Corrosion
Acid-based cleaners are the heavy artillery. We're talking about products with ingredients like hydrofluoric or phosphoric acid that chemically melt away heavy oxidation, deep stains, and that stubborn, crusty buildup. If your pontoon tubes look like they’ve been sitting in a field for a decade, this is probably where you need to start.
Why do they work so well? The acid goes to war with the aluminum oxide, breaking it down in a way that no amount of scrubbing ever could. But that power comes with a huge warning label. These cleaners are aggressive and can easily damage gelcoat, paint, vinyl decals, and even the galvanized steel of your trailer if you aren't extremely careful.
Use an acid-based cleaner when:
- You're tackling severe, long-term oxidation and heavy pitting.
- You're cleaning large, unpainted aluminum surfaces like pontoon logs.
- You have the time to carefully mask off and protect every other nearby surface.
This is non-negotiable: Always wear full personal protective equipment (PPE)—I’m talking chemical-resistant gloves, splash-proof goggles, and even a respirator. The fumes are no joke, and a single splash can cause a nasty chemical burn.
Alkaline and pH-Neutral Cleaners
Think of alkaline cleaners, those with a high pH, as the middle ground. They are fantastic at cutting through grease, oil, and moderate oxidation without the raw, stripping power of a strong acid. They’re like a heavy-duty degreaser that also handles light corrosion.
Then you have your pH-neutral cleaners. These are your go-to for regular maintenance and light-duty cleaning. They’re the safest and most gentle option by far. They won’t strip your wax or other protective coatings and are safe to use around just about any material on your boat. If you’re just trying to brighten things up or get rid of a little powdery oxidation, a pH-neutral formula is your best friend.
For example, if you're just dealing with some minor dull spots that show up mid-season, a good all-purpose cleaner like Boat Juice Exterior Cleaner often has enough muscle to lift that light oxidation without launching a full-blown chemical assault. It’s the perfect tool for those routine wipe-downs that prevent heavy buildup from ever getting a foothold.
Making The Smart Choice For Your Boat
Picking the right product is only getting more important. The global aluminum cleaner market was valued at $1,900 million and is expected to rocket to $3,500 million by 2035. For boaters, this means more choices but also more risk. Ignoring corrosion for a few years can lead to repairs averaging $5,000-$10,000, while a simple cleaning routine can extend your aluminum's life by up to 40%. You can explore more about these market trends and their impact on marine maintenance.
To make it easier, here's a quick breakdown of what to grab and when.
Comparing Aluminum Cleaner Types For Marine Use
This table should help you zero in on the right type of cleaner for your specific situation.
| Cleaner Type | Best For | Pros | Cons / Cautions |
|---|---|---|---|
| Acid-Based | Heavy pitting and severe oxidation on pontoons and unpainted aluminum. | Very effective on tough, neglected corrosion. | Can damage gelcoat, paint, vinyl, and trailers. Requires full PPE. |
| Alkaline | Moderate oxidation, grease, and grime. | Strong cleaning power with less risk than acids. | Can still be harsh on sensitive surfaces; test first. |
| pH-Neutral | Light oxidation and routine maintenance. | Safe on most surfaces, including gelcoat and vinyl. Won't strip wax. | Not strong enough for heavy corrosion or deep pitting. |
Ultimately, the right choice always depends on the job in front of you. Be honest about how bad the corrosion is. For a full-on restoration project on neglected pontoons, an acid wash might be the only way. But for 90% of your seasonal maintenance, a less aggressive alkaline or pH-neutral cleaner is the smarter, safer bet every time.
Your Game Plan for Tackling Aluminum Corrosion
Alright, let's get down to business and bring that dull, chalky aluminum back to life. With the right technique and a bit of patience, you can get a pro-level finish right in your own driveway or marina slip. This isn’t about brute force; it's about working smarter with a proven method that chemically dissolves the corrosion without harming the metal underneath.
Think of it like refinishing an old piece of furniture. You wouldn't just slap new varnish over a cracked, peeling finish, right? You’d carefully prep the surface, strip off the old gunk, and then get it ready for a fresh protective coat. We're going to bring that same methodical approach to your boat's aluminum.
Gearing Up and Prepping Your Workspace
Before you even think about popping the cap on a bottle of cleaner, let's talk prep. This is easily the most important part of the job. Rushing it is how accidents happen and how you end up with unintended damage to other parts of your boat.
Find a well-ventilated spot to work, ideally outside. Try to stay out of direct, blazing sun, as it can make your cleaners evaporate way too fast and leave you with a streaky mess.
Here’s your essential toolkit:
- Safety First: Don't even start without chemical-resistant gloves and a good pair of splash-proof safety glasses. This stuff can irritate your skin and eyes, so take it seriously.
- The Cleaner: Have your chosen aluminum corrosion cleaner ready to go.
- Application Tools: A simple spray bottle is perfect for covering large areas like pontoon tubes or a T-top. For smaller hardware, a sponge or cloth will do the trick.
- Agitation Tools: A couple of non-abrasive brushes are your best friends here. A medium-bristle nylon brush is your workhorse, but a softer brush or microfiber towel is great for more delicate spots. Stay away from steel wool or anything super stiff that will scratch the aluminum.
- Rinsing: A garden hose with a decent nozzle is all you need. Just make sure you have a reliable source of clean water.
- Drying: Grab a stack of clean, dry microfiber towels. They're essential for avoiding water spots after the final rinse.
Once your gear is laid out, take five minutes to protect the surrounding areas. If you're cleaning a railing right next to your gelcoat or vinyl seats, cover them up with some plastic sheeting and painter's tape. Overspray from an aluminum cleaner, especially the acidic kind, can leave permanent stains on those surfaces.
Applying the Cleaner and Letting It Do the Work
With everything prepped, it's time to apply the cleaner. The golden rule here is to work in small, manageable sections. Don't get ambitious and spray down an entire 25-foot pontoon log at once. A 3x3 foot area is perfect. This strategy ensures you can scrub and rinse that section well before the cleaner has a chance to dry on the surface.
Apply a liberal, even coat to your first section. You're not just misting it; you want the surface completely wet. Now, let the product sit and work its magic for the time recommended on the label, usually somewhere between 2 to 5 minutes.
This dwell time is everything. It’s when the active ingredients are chemically breaking down that stubborn aluminum oxide. Rinse too soon, and it won't have time to work. Let it sit too long, especially in the sun, and you risk etching the metal itself.
You’ll probably see some light fizzing or bubbling. That's a great sign—it means the cleaner is reacting with the corrosion and lifting it right off the surface.
Agitation: The Secret to a Flawless Finish
After the cleaner has had a few minutes to dwell, it’s time to give it a little help. This is the agitation step, and it’s what separates a "good enough" job from a truly restored, like-new finish.
Using your medium-bristle nylon brush, start scrubbing the area with a consistent motion. If you're working on a long pontoon log, use straight, overlapping strokes. You're not trying to muscle the corrosion off; you're just helping the cleaner lift away what it has already loosened. Firm, steady pressure is all it takes. For really stubborn pitted areas, a smaller detail brush can help you work the cleaner deep into those spots.
Let's imagine you're cleaning a wakeboard tower. Those round tubes and welded joints are notorious for being tricky. You’d spray one section of a vertical tube, let it dwell, and then use a brush that can hug that curve. For the joints where corrosion loves to hide, a toothbrush-sized detail brush is the perfect tool for the job.
The All-Important Rinse and Dry
As soon as you finish agitating a section, rinse it immediately and thoroughly with clean water. Don't be stingy with the hose! You need to flush away every last trace of both the loosened corrosion and the cleaner itself. Any chemical residue left behind can keep reacting with the aluminum.
Right after rinsing, dry the section completely with a clean microfiber towel. This is non-negotiable if you want to prevent water spots, which can be just as ugly as the corrosion you just spent all that time removing. Once that first section is sparkling clean and dry, you're ready to move on to the next, overlapping just a bit with the previous area to ensure a seamless finish.
Mariners have been fighting aluminum corrosion for decades. In fact, historical data shows that pitting corrosion from saltwater alone can eat away at unprotected aluminum by 0.5-2 mm per year. Post-WWII studies on naval ships found that untreated aluminum fittings corroded a staggering 300% faster than steel parts, a discovery that directly spurred the development of the specialized cleaners we rely on today. You can dive deeper into the history of these essential products and their market. Learn more about the history and development of metal cleaners.
By following this methodical process—prep, apply, dwell, agitate, rinse, and dry—you're not just cleaning your boat. You're doing a proper restoration that will bring back that factory shine. Of course, the next step is protecting that fresh surface so all your hard work actually lasts.
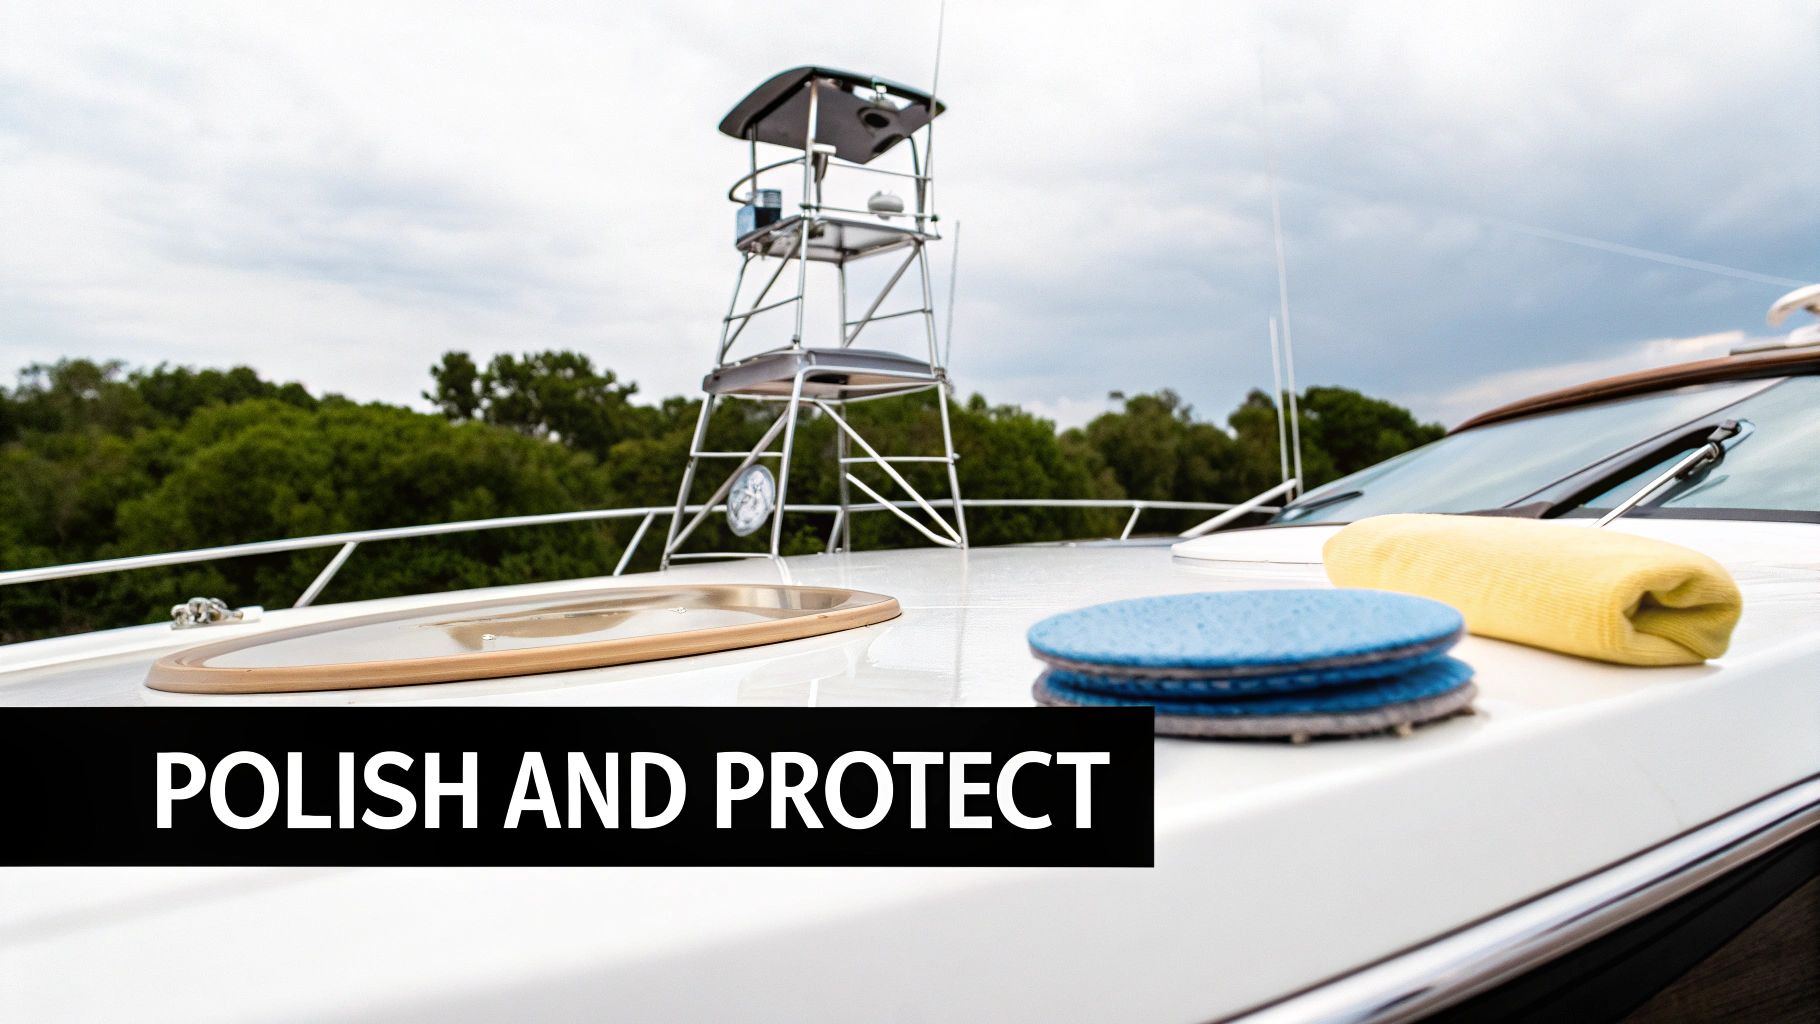
How To Polish and Protect Your Renewed Aluminum
So you’ve put in the elbow grease, and that chalky, pitted corrosion is finally a thing of the past. That's a huge win. But you might be looking at the aluminum now and thinking it looks clean, but not exactly new. It probably has a flat, almost hazy appearance. Don't worry, that's completely normal. An aluminum corrosion cleaner is built to strip away the oxidation, not to leave a brilliant shine in its wake.
Think of it like sanding a piece of wood. Your first pass with coarse sandpaper gets rid of the old, gnarly finish, but it leaves the surface looking dull. You need that finer grit to smooth everything out before you can even think about staining. Polishing is your fine-grit step, and it’s what will bring back that head-turning, mirror-like finish you’re after.
Bringing Back the Shine with Polish
Polishing is essentially a gentle abrasive process. Unlike the chemical stripping you just did, polishing physically smooths out all the microscopic peaks and valleys left on the aluminum’s surface. This is what allows light to reflect evenly, creating that deep, brilliant shine we all love.
Picking the right polish is crucial. You'll want a product specifically formulated for marine aluminum, as it will contain finer abrasives that won’t gouge or scratch the relatively soft metal. From there, you have two main options for getting it done: by hand or with a power tool.
- Hand Polishing: For smaller jobs like cleats, railings, or random bits of hardware, hand polishing is the way to go. Just apply a small dab of polish to a microfiber applicator pad and work it into the metal using firm, circular motions. Tackle it in small sections until the polish turns into a dark haze, then grab a clean microfiber towel and buff it off.
- Machine Polishing: If you're facing down large areas like pontoon logs or a wakeboard tower, a power polisher is your best friend. It will save your arms and give you a much more uniform finish. Use a foam polishing pad on a dual-action (DA) polisher. Apply a few pea-sized drops of polish to the pad, spread it over a 2x2 foot section on a low speed, then crank it up to work the polish in until it's nearly clear.
A classic mistake I see all the time is using way too much polish. A little really does go a long way. Piling on extra product just makes it a beast to buff off and doesn't actually improve the shine. Three to four pea-sized drops on your applicator is plenty for a small section.
After a good polish, your aluminum should look incredible. But if you stop now, all your hard work could be undone in just a few months. That freshly polished surface is raw and completely vulnerable to the salt and moisture that will immediately try to start the corrosion process all over again.
The Final Step: Sealing and Protecting
This is, without a doubt, the most important step for making your results last. You have to create a barrier between that pristine aluminum and the harsh marine environment. This protective layer will block oxygen and moisture from ever reaching the metal, effectively stopping corrosion before it can even get a foothold.
Traditional waxes can work, but modern polymer sealants and ceramic-based sprays offer vastly superior durability and water-repelling properties. They create a slick, non-porous shield that water and salt just slide right off of. For a simple and ridiculously effective option, a product like Boat Juice Protection is a fantastic choice. You just spray it on a clean microfiber towel, wipe it onto the surface, and then flip the towel to buff it to a perfect, streak-free shine.
This isn't just about looking good; it's about protecting your investment and saving yourself future headaches. In the massive $15.8 billion metal cleaning chemicals market, the marine industry plays a huge role. Left untreated, marine aluminum can lose 10-15% of its structural integrity in as little as five years. A quality protective spray can form a barrier that repels salt 60% more effectively than wax alone, which can slash your future cleaning and maintenance time by up to 40%. You can discover more insights about the metal cleaning chemicals market on openpr.com to learn how advanced formulas are changing boat care.
For a deeper dive into the different types of polishes and applicators out there, and to see which one might be best for your boat, check out our guide on aluminum polish for boats. It’s packed with tips to help you get that perfect mirror finish every time.
By following this clean, polish, and protect method, you’re not just making your aluminum look good for the next trip out. You’re setting up a long-lasting defense that will keep it looking brilliant all season long.
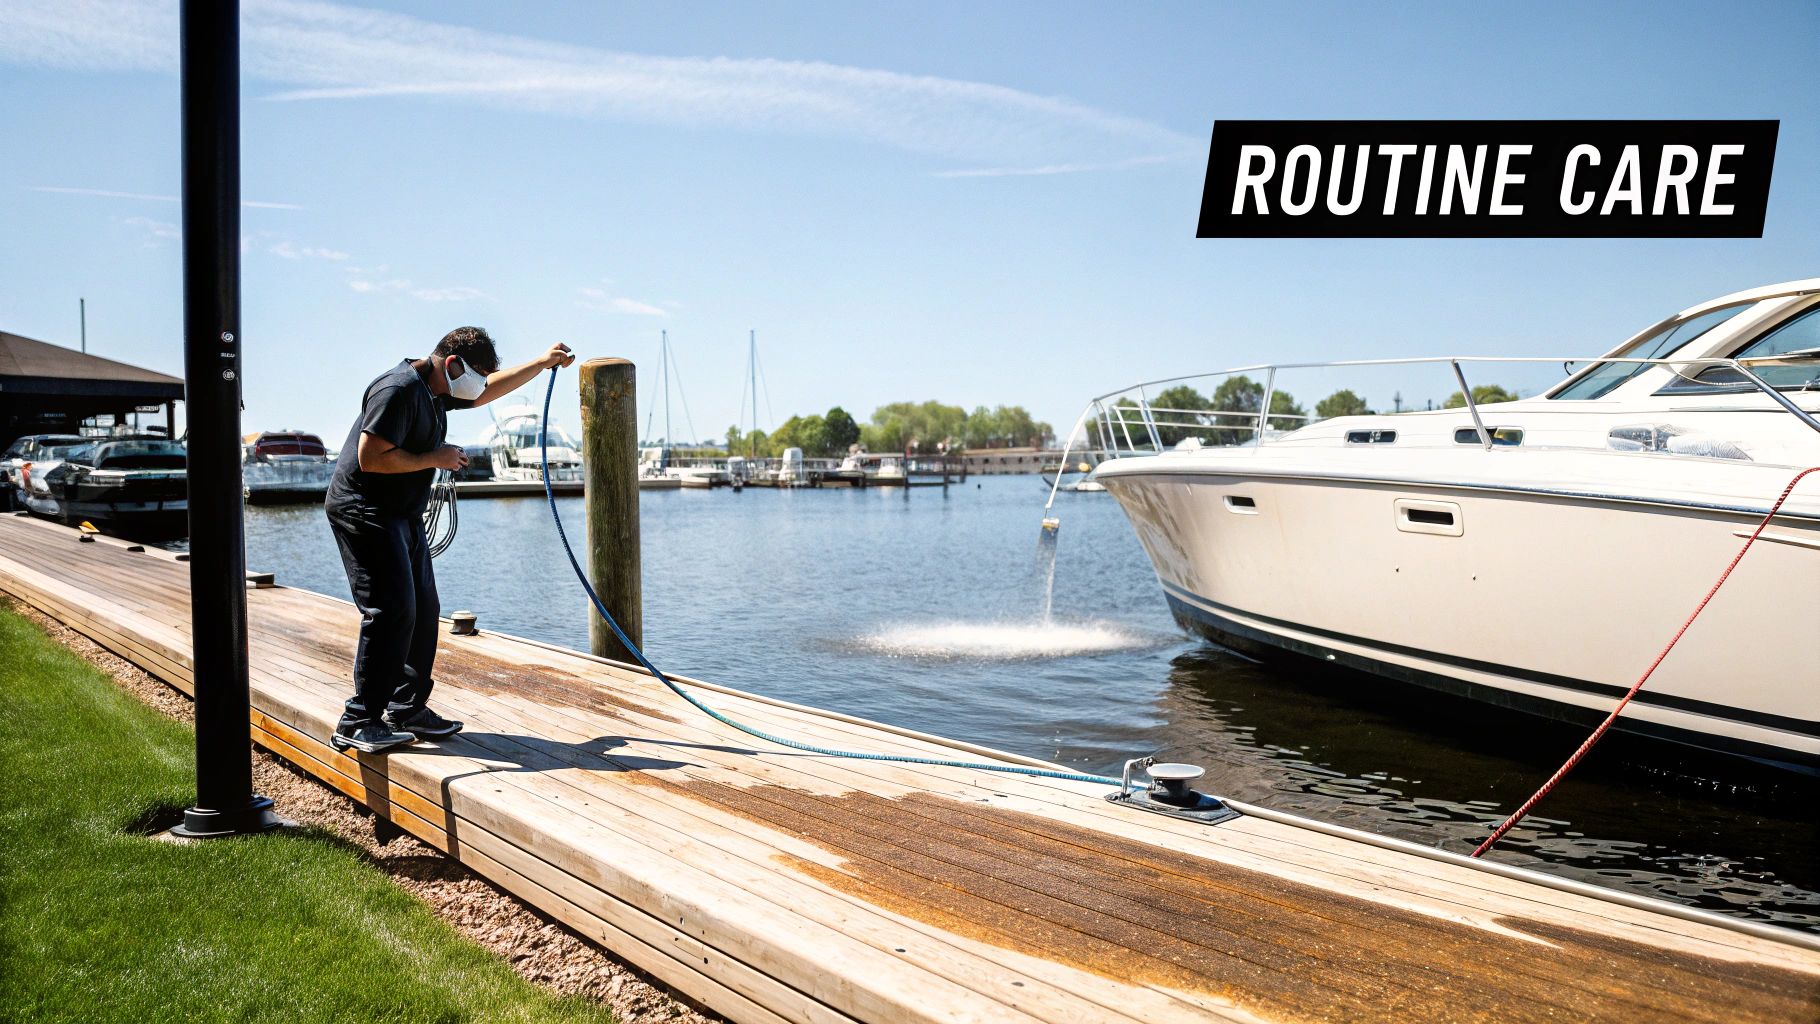
A Simple Routine To Keep Corrosion Away for Good
After all that elbow grease, the last thing you want is to see those chalky white spots creeping back in a few months. When it comes to aluminum, an ounce of prevention is absolutely worth a pound of cure. A simple, consistent maintenance routine is your secret weapon, stopping corrosion before it ever gets a foothold and saving you from another major weekend overhaul.
This isn’t about adding another huge chore to your list. It’s about building a few small, smart habits that make a massive difference. The whole idea is to keep your aluminum clean and protected so that corrosive culprits like salt and moisture never get a chance to attack the metal.
The Most Important 5 Minutes After Every Trip
If you only remember one thing from this guide, let it be this: rinse your boat with fresh water after every single trip. This is non-negotiable, especially if you're in saltwater. Salt is the archenemy of aluminum. When saltwater evaporates, it leaves behind abrasive salt crystals that aggressively eat away at the metal's protective oxide layer.
Think of those salt crystals as tiny sponges, pulling moisture from the air and holding it right against your aluminum. A quick, thorough freshwater rinse is all it takes to flush them away before they can get to work. Make sure to hit your T-top, railings, and any other aluminum hardware where salty spray loves to settle.
Your Seasonal Maintenance Cadence
While a quick rinse is your daily defense, you’ll still need to do a more thorough cleaning and reapply a protectant from time to time. How often really depends on where you do your boating. There's no one-size-fits-all answer here, so you'll have to tailor your schedule to your environment.
A good maintenance schedule might look something like this:
- Saltwater Boaters: You’ve got to be more vigilant. Plan on a deep clean with a gentle, pH-neutral aluminum corrosion cleaner followed by a fresh coat of protectant every 2-3 months. The constant salt exposure demands it.
- Freshwater Boaters: You have it a bit easier. For most of us in freshwater, a deep clean and protectant application at the start of the season and another when you winterize is plenty. Maybe add a mid-season touch-up if you notice things starting to look a little dull.
The key is to be proactive. Don't wait until you see that familiar chalky buildup reappear. By cleaning and protecting your aluminum on a regular schedule, you're just maintaining a barrier, not fighting an invasion.
Making It Easy on Yourself
This routine doesn't have to be a drag. Honestly, if you keep up with it, each cleaning session gets faster and easier because you're doing light maintenance, not a heavy-duty restoration. For those quick in-between cleanings, a quality multi-purpose exterior cleaner can usually handle light grime and water spots, keeping your aluminum looking sharp.
Finding the right tools for the job is half the battle. If you're looking for recommendations, you can explore a range of great options in our guide to the best boat cleaning products.
Ultimately, this simple routine of rinsing, cleaning, and protecting is your best strategy. It protects your boat's value, keeps your hardware strong and reliable, and saves you from countless hours of future scrubbing.
Your Top Questions About Cleaning Boat Aluminum, Answered
Even with the best plan, you'll probably have a few questions pop up once you start tackling the aluminum on your boat. Let's get ahead of them. Here are the most common things we get asked, with some straight-up advice to help you get the job done right.
Can I Use These Cleaners on Anodized or Painted Aluminum?
You have to be incredibly careful here. Think of anodized aluminum as having a special clear coat from the factory. Hitting it with a strong acid or a heavy-duty alkaline cleaner is a recipe for disaster—it will strip that protective layer right off, leaving you with a dull, splotchy finish that's a real pain to fix.
The same goes for painted or powder-coated aluminum. A harsh cleaner can easily cause the paint to fade, discolor, or even start peeling away. For these kinds of surfaces, stick with a simple, gentle, pH-neutral cleaner.
Pro Tip: When in doubt, always test it out. Find a small, hidden spot—like the underside of a railing or the back of a cleat—and apply a little cleaner. See what happens before you go all-in on a visible area.
How Often Should I Be Cleaning My Boat's Aluminum?
Honestly, it all depends on where you do your boating. Saltwater is a whole different beast than freshwater, and your cleaning schedule needs to match.
- Saltwater Boaters: Rinsing your boat with fresh water after every single trip isn't optional; it's mandatory. Beyond that, you should plan on a full deep clean with a dedicated aluminum corrosion cleaner and a fresh coat of protectant every 2-3 months.
- Freshwater Boaters: You can definitely relax a bit. A thorough cleaning and protection job at the beginning of the season, and another before you put the boat away for winter, is usually plenty.
What's the Minimum Safety Gear I Need?
Don't ever skimp on safety. Even if you're using a milder, eco-friendly cleaner, you should still be wearing waterproof gloves and a solid pair of safety glasses. Splashes happen, and you don't want this stuff on your skin or in your eyes. That's the bare minimum.
Now, if you're breaking out a more serious acid-based cleaner, a respirator is a very good idea, especially if you're working in an enclosed space like a garage. Fumes from these products can be nasty. Good ventilation is key, so always try to work outside if you can.
My Pontoon Tubes are a Mess. Will One Pass Be Enough?
For pontoons with years of built-up gunk, heavy water stains, and pitting? Nope, one round is almost never enough. It's more of a two-step process. Your first application with a medium-bristle brush will knock off the worst of the surface oxidation and grime.
Rinse it off, take a look, and you'll almost certainly see some stubborn spots that need a second round. A more targeted application usually does the trick. Once you've got them completely clean, know that heavily oxidized pontoons will need a good polishing to bring back that shine before you seal them up. It's a bit of work, but the before-and-after is always worth it.
Ready to give your boat's aluminum the attention it deserves? The Boat Juice exterior line has everything you need to clean, polish, and protect your investment, keeping it looking incredible all season long. From our powerful Exterior Cleaner to our long-lasting Protection spray, we make it easy to achieve professional results.