


· By Boat Juice Team
Your Guide to a Lasting Shine With Aluminum Polish for Boats
That incredible shine on your boat's aluminum isn't just for looks—it's the hallmark of a healthy, well-protected vessel. Getting into a regular polishing routine is one of the most important things you can do. Think of it less like a chore and more like preventative medicine that safeguards your investment for years of fun on the water.
Why Polishing Your Boat Is a Must-Do Task

You bought your boat to enjoy yourself, not to wage a constant war against corrosion. But the marine environment is brutal. Every single trip out, your boat’s aluminum parts—from pontoons and wakeboard towers to handrails—are getting hammered by the elements.
The main villain in this story is oxidation. It’s a chemical reaction between aluminum and oxygen that water and grime kick into overdrive. This is what creates that chalky, dull white film that makes an otherwise great boat look old and neglected. It’s more than just ugly; it's the first sign that trouble is brewing.
The Real Threats to Your Aluminum
So what's really causing all this damage? A few key culprits are working against you every time you're on the water:
- Salt Spray: If you’re a saltwater boater, this is public enemy number one. Salt crystals trap moisture against the metal, putting corrosion on the fast track.
- Hard Water Minerals: Lake water is often full of minerals like calcium. When the water evaporates, it leaves these crusty deposits behind, which can actually etch into the aluminum's surface over time.
- UV Rays: The sun is relentless. It doesn't just fade your vinyl seats; it breaks down any protective coatings on the metal, leaving the raw aluminum exposed and vulnerable.
- Acid Rain & Pollutants: All that gunk in the air has to land somewhere. When it settles on your boat, it creates a corrosive film that quietly eats away at the finish.
If you let that oxidation go unchecked, it eventually turns into pitting—tiny little cavities that form in the metal. Pitting is permanent damage. It compromises the structural integrity of the aluminum and is a whole lot harder (and more expensive) to deal with than just a dull finish.
Aluminum boats are a huge part of the boating world, and unpolished hardware can lose up to 50% of its shine in just one season. A little proactive polishing can extend its lifespan by 2-3 years. That’s a big deal, especially when you consider that aluminum makes up over 20% of new recreational boats. If you're curious, you can explore more data on the aluminum vessel market to see just how fast it's growing.
When you use a good aluminum polish, you're doing more than just making your boat sparkle. You’re physically removing that corrosive layer of oxidation and putting a protective barrier back on the metal. It’s a simple step that stops damage before it starts, keeping your boat looking its best and preserving its value for the long haul.
How to Assess Your Aluminum Before Polishing
Alright, before you dream of grabbing that buffer, let’s take a good, hard look at your boat. A proper assessment is the secret to getting a pro-level shine without wasting your whole weekend. The condition of your aluminum—from pontoon logs to that T-top—is going to tell you exactly what products you need and how much elbow grease you’re in for.
Take a slow walk around your boat and get up close with the aluminum surfaces. What you're looking for are the clues that tell the story of what your boat's been through. A hazy film from years of sun exposure is a completely different beast than the stubborn, chalky waterline left from sitting in mineral-heavy water.
What Kind of Oxidation Are We Talking About?
First, you need to figure out how much oxidation you're up against. This is the most common headache for boat owners, and nailing down the severity is critical. A light haze needs a much gentler touch than a thick, chalky disaster.
You'll usually see one of two things:
- Light Oxidation: This looks like a dull, milky film over the metal. The aluminum has lost that mirror-like reflection but still feels pretty smooth. This is typical for newer boats or ones that see regular upkeep.
- Heavy Oxidation: We're talking a thick, white, chalky coating that you can feel. Rub it with your finger, and you’ll get a white powder on your hand. This completely kills any shine and calls for a more aggressive polish and probably a deoxidizing pre-cleaner to cut through it.
My Go-To Trick: The "finger swipe test" tells you a lot. If a quick wipe through the grime shows a hint of shine underneath, you’re probably looking at light to moderate oxidation. If it just smears a thick white paste around, settle in—you've got a bigger job ahead of you.
Looking for Pitting and Nasty Stains
Beyond the general dullness, you need to be on the hunt for more serious issues like pitting and deep-set stains. Think of pitting as the next stage after heavy oxidation, where the corrosion has actually started to eat tiny holes into the metal itself.
Run your bare hand over the surface. If you feel little rough or grainy spots, that’s the early warning sign of pitting. Catching it now is huge, because deep pitting is permanent damage. Those spots are going to need some special attention before you even think about bringing in the polish.
Also, keep an eye out for distinct lines or discolored patches. That dark, stubborn waterline stain, for instance, is from minerals and gunk literally baking onto the aluminum. You’ll need to hit it with a targeted cleaner to lift the stain before you polish the whole surface.
Aluminum Condition Assessment Guide
Use this table to identify the condition of your boat's aluminum and determine the right course of action.
| Condition | Visual Cues | Recommended Action |
|---|---|---|
| Good (Light Oxidation) | Dull, hazy, or milky appearance. Lacks reflectivity but feels smooth. | A one-step cleaner polish like Gator Guard's Gator-Brite will work perfectly. |
| Moderate (Heavy Oxidation) | White, chalky surface that comes off on your hand. No shine is visible. | Start with a deoxidizer or acid-based cleaner, then follow up with a heavy-duty polish. |
| Poor (Pitting & Stains) | Rough, grainy texture. Tiny pinholes are visible. Deep, dark waterlines or spots. | Treat stains with a targeted cleaner. Use a heavy-duty polish, but understand that deep pitting is permanent. |
Once you’ve got a clear picture of what you’re dealing with, you’re ready to choose your weapons and get to work.
The Prep Work That Guarantees a Perfect Finish
Here’s a secret the pros know well: the mirror shine you're chasing comes from the prep work, not just the final polish. Skipping this stage is the number one reason DIY polishing jobs fall flat.
Think of it like painting a room—you wouldn't just slap paint over dirty, cracked walls. You have to create a perfectly clean and smooth canvas for the aluminum polish for boats to do its job. This groundwork is what separates an okay job from a truly stunning, head-turning finish.
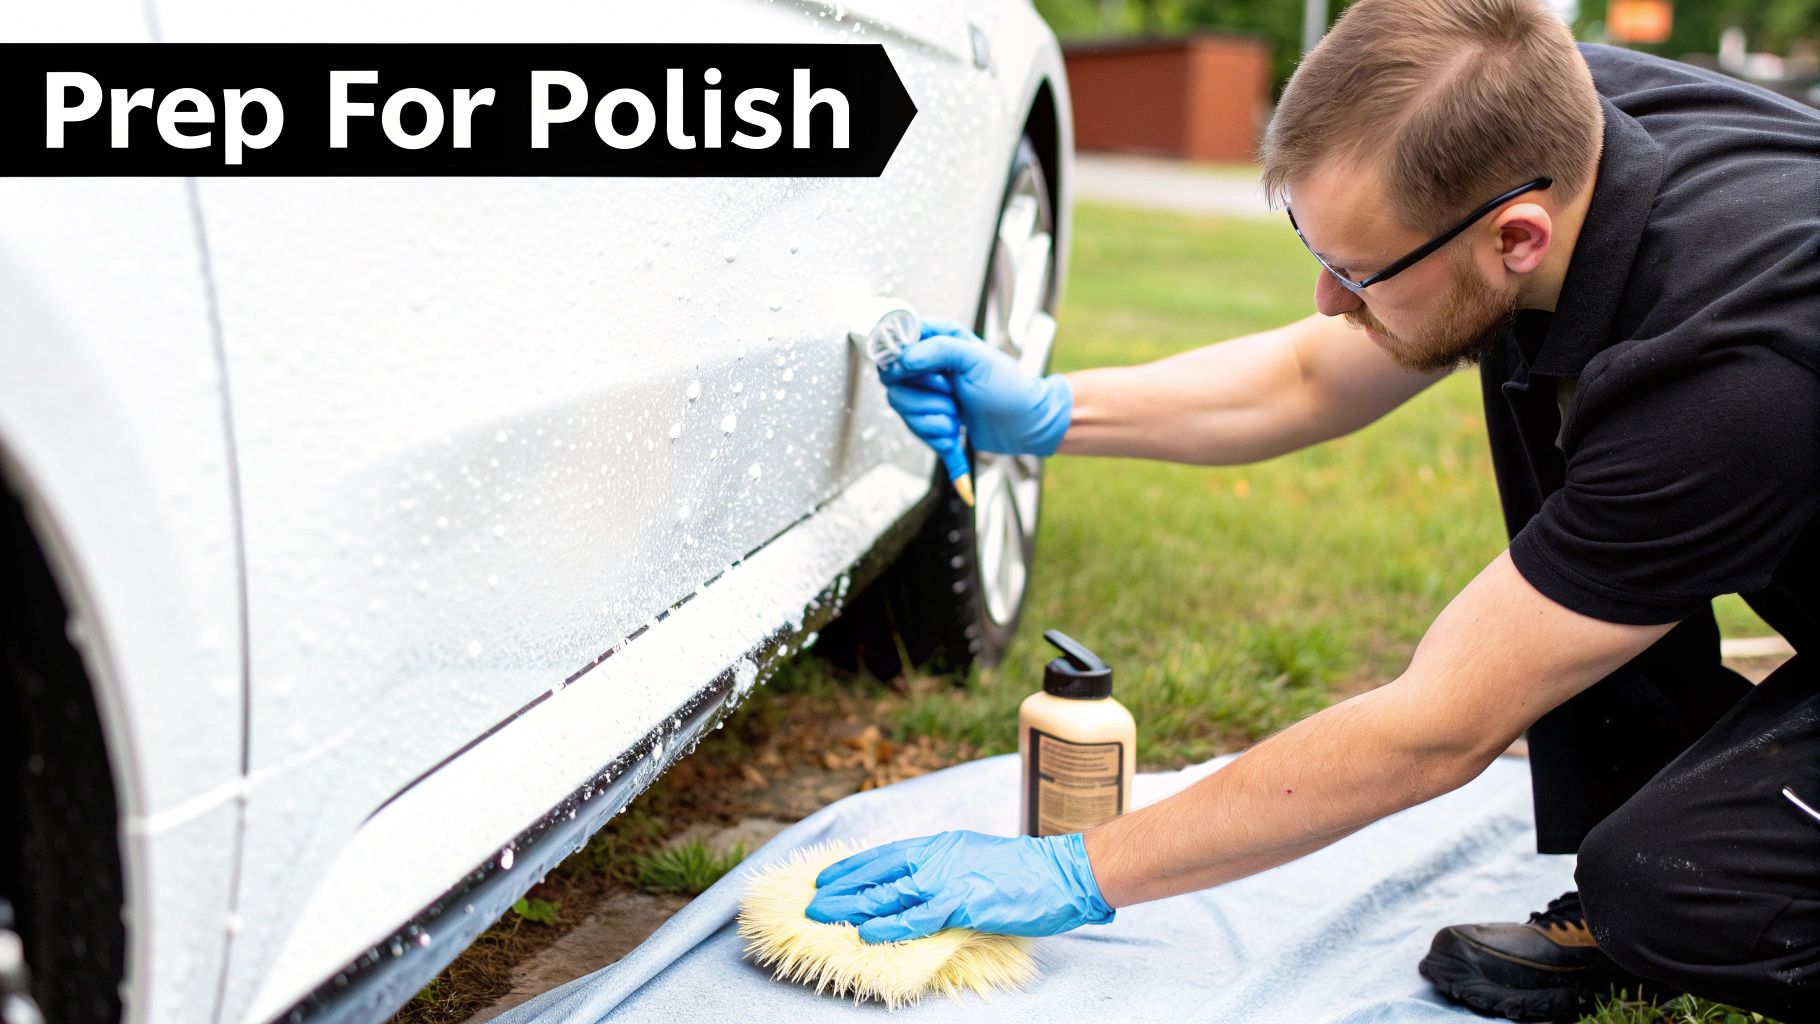
Start With a Deep Clean
Before you even think about oxidation, you've got to get rid of all the surface-level gunk. We're talking loose dirt, grime, bird droppings, and those stubborn hard water spots. Polishing over this debris is like grinding sandpaper into your aluminum—it just creates more scratches and stops the polish from ever reaching the metal.
Your first move is a thorough wash. For this initial clean, you should use a pH-neutral cleaner. Why? Because harsh, acidic, or alkaline soaps can actually react with the aluminum, causing streaks or discoloration before you even begin.
A quality, gentle cleaner like Boat Juice Exterior is perfect for this task. It’s made to safely lift away all that surface crud without stripping any existing protection. Just spray it on, wash gently with a soft brush or microfiber mitt, and rinse everything off completely with fresh water. Make sure you dry the surface thoroughly with a clean microfiber towel to prevent new water spots.
Need more help with those pesky mineral deposits? Check out our guide on finding the best water spot remover for boats.
Pro Tip: Always wash your boat in the shade or on a cool, overcast day. If you try to do it in direct sun, the soap and water will evaporate way too fast, leaving behind a residue you’ll just have to clean off all over again.
The Critical Deoxidation Stage
With the surface grime gone, it's time to tackle the real enemy: oxidation. That dull, chalky layer needs to be chemically dissolved and removed. A standard aluminum polish can handle light hazing, but for anything more serious, you'll need a dedicated deoxidizer or a mild acid wash designed for marine aluminum.
These products are specifically formulated to break down that tough outer layer of aluminum oxide, which is way harder than the raw metal underneath. This one step does the heavy lifting, saving you hours of exhausting buffing later on.
Here’s your action plan for a safe and effective deoxidation:
- Choose the Right Product: Look for a marine aluminum cleaner that specifically says it removes oxidation. Some are acid-based, so read the label carefully.
- Safety First: This is non-negotiable. Wear chemical-resistant gloves and safety glasses. These cleaners can cause serious skin and eye irritation.
- Work in Small Sections: Apply the cleaner to a manageable area, like a 3x3 foot section of your pontoon. Don't try to cover the whole boat at once.
- Gentle Agitation: Use a soft-bristled brush to gently scrub the surface. You’ll see the white, chalky film start to loosen and dissolve. Let the chemical do the work; you don’t need brute force.
- Rinse Immediately and Thoroughly: Do not let the cleaner dry on the surface. As soon as you're done with a section, hit it with plenty of fresh water to stop the chemical reaction.
This process reveals the cleaner, brighter aluminum underneath and gives your polish a much better starting point.
Addressing Minor Pitting and Blemishes
While you were cleaning, you might have noticed some minor pitting—those tiny, rough spots where corrosion has started to eat into the metal. Deep pitting is pretty much permanent, but you can definitely improve the look of light pitting before you start polishing.
After deoxidizing, you can gently go over these areas with a very fine-grade abrasive. Think #0000 steel wool or a fine-grit synthetic finishing pad. The goal isn't to remove the pits completely, but to smooth their edges so they blend into the surrounding surface.
Work the abrasive in a gentle, circular motion with very light pressure. This will knock down the high points and create a more uniform surface. Once you’re done, give the area one last rinse and dry it completely. Now, your aluminum is truly prepped and ready for that show-stopping shine.
Hand Polishing vs. Machine Polishing: Choosing Your Weapon
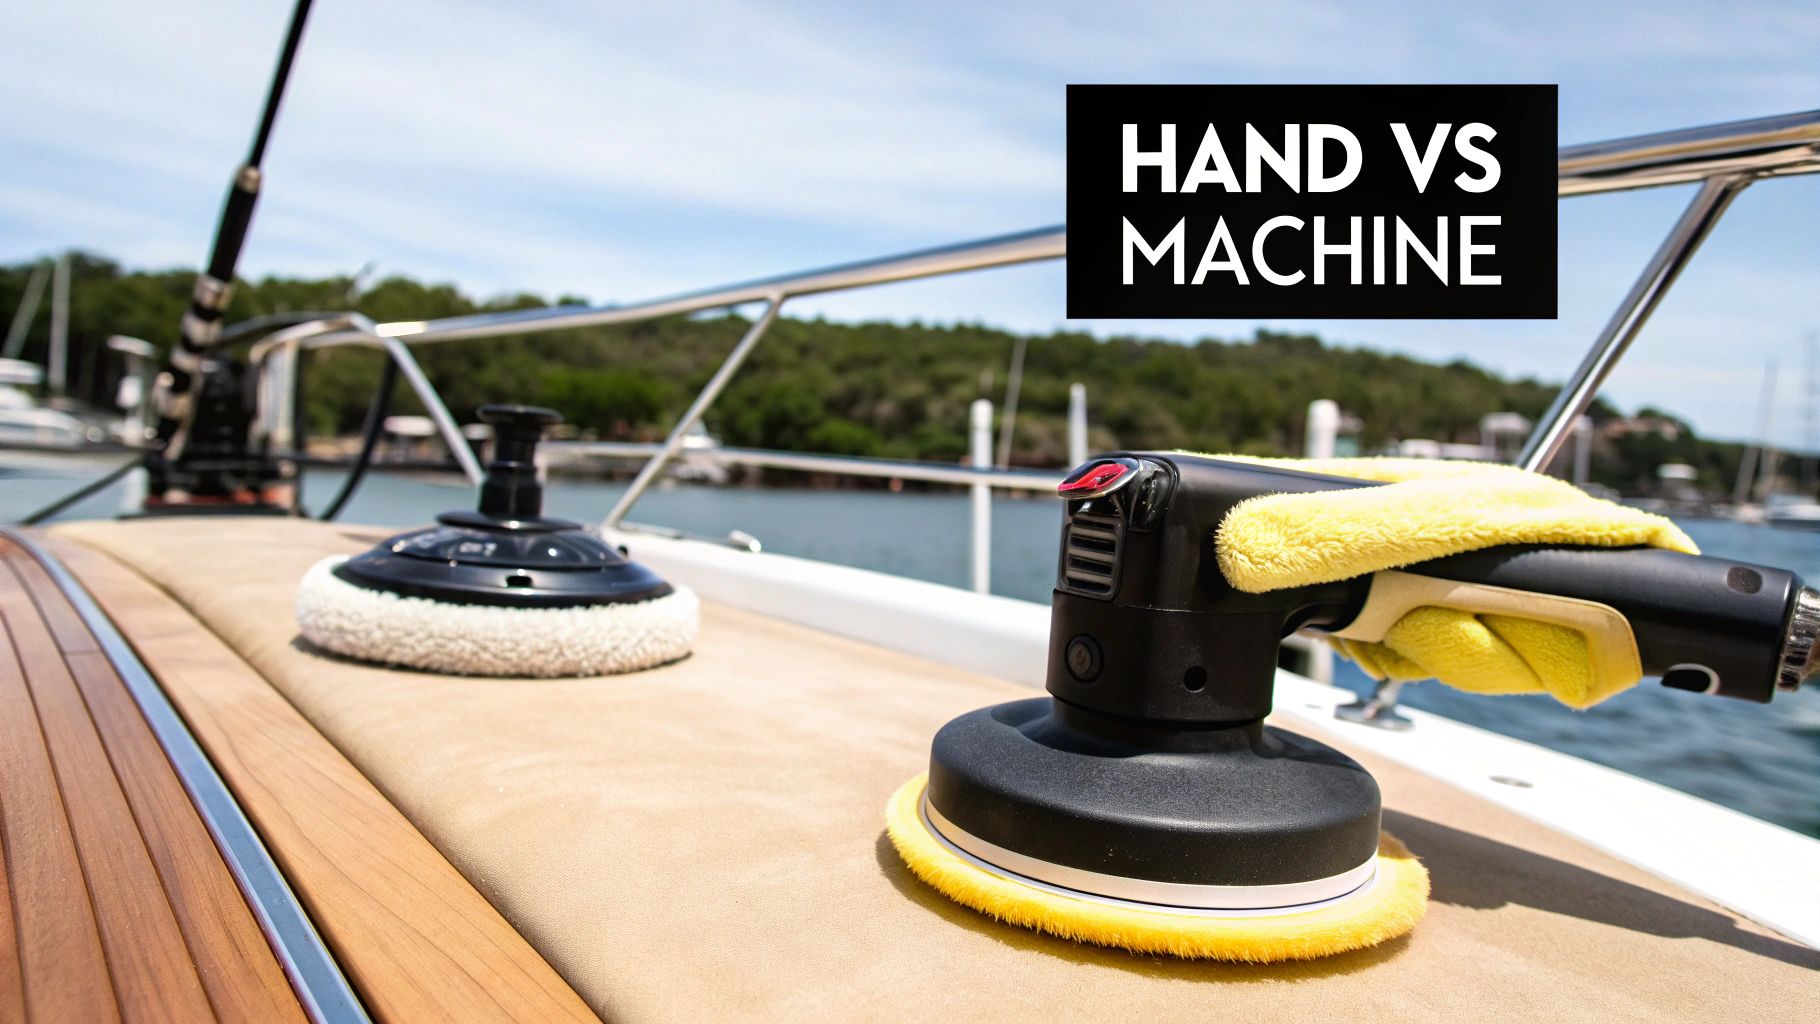
Alright, your aluminum is prepped and ready for the main event—making it shine. This brings us to the big question: do you tackle this by hand, or is it time to bring in the power tools? Honestly, there’s no single right answer. It’s all about the job in front of you, the finish you're chasing, and how much elbow grease you’re willing to spend.
Think of it as a trade-off between precision and power. Both hand and machine polishing can deliver stunning results, but each has its moment to shine. Let's break down where each method excels so you can build the right game plan for your boat.
When to Polish by Hand
Hand polishing is your go-to for all the detailed, tricky spots where a bulky machine just can't—and shouldn't—go. For these areas, working by hand isn't just an option; it's the only way to get a clean finish without scuffing up the surrounding surfaces. It gives you absolute control over pressure and lets you feel the metal as you work.
Hand polishing is perfect for things like:
- Rails and Cleats: These have all sorts of curves and sharp edges that need a delicate touch.
- Window Trim: You can get right up to the glass and seals without making a mess or causing damage.
- Wakeboard Towers: It allows you to navigate all the joints, welds, and mounting hardware with total precision.
- Quick Touch-Ups: It’s ideal for hitting a small spot that’s starting to cloud up mid-season.
For hand application, all you need is a quality microfiber applicator or a soft terry cloth towel. Squeeze a small amount of aluminum polish onto your cloth and work it into the metal with firm, overlapping circular motions. It’s simple, effective, and gives you a connection to the work you just don't get with a machine.
When a Machine Is a Game Changer
For those big, wide-open surfaces, a machine polisher is an absolute lifesaver. If you're staring down the entire length of a pontoon log or a big aluminum fish box, trying to do it by hand is a recipe for a sore arm and a streaky, inconsistent finish. This is where you let the machine do the heavy lifting.
A good polisher delivers consistent speed and pressure that's nearly impossible to match by hand. The result? A deeper, more uniform shine in a fraction of the time. This is especially true when you’re using a high-quality aluminum polish for boats, as the machine works the polish's abrasives perfectly to get that professional-grade gloss.
A machine polisher doesn't just save your arms; it saves you hours. A job that could take an entire afternoon by hand might only take an hour with a good buffer, and the final result will be a deeper, more consistent gloss.
The good news is that great tools are more accessible than ever. The global boat polish market is now valued at around USD 145 million, with easy-to-use liquid polishes making up 55% of sales. And with a 25% jump in retail sales over the last five years, pro-level gear is well within reach for the dedicated DIYer. You can dig into more stats about the growing boat polish market on datahorizzonresearch.com.
Picking the Right Polisher and Pads
If you've decided a machine is the right move, you have a couple of options. For most boat owners, a dual-action (DA) polisher is the way to go. It oscillates in a random orbit, which makes it incredibly forgiving compared to a high-speed rotary buffer. That random pattern nearly eliminates the risk of burning through the metal or leaving behind those dreaded swirl marks.
The pad you choose is just as important as the polisher itself. Pads come in different materials and levels of aggressiveness, and you'll want a few in your arsenal.
- Wool Pads: These are the heavy hitters. They’re more aggressive and are fantastic for cutting through serious oxidation fast.
- Foam Pads: These come in a range of "cuts." You’ll use a firmer cutting foam pad to remove oxidation and then swap to a softer finishing foam pad to refine the surface and really bring out that mirror shine.
A good rule of thumb is to start with the least aggressive pad you think you’ll need. You can always step it up if you're not getting the results you want. With the right machine and a few different pads, you’ll be set to tackle any polishing job with confidence.
Bringing Out That Mirror Shine: Your Polishing and Finishing Technique
Alright, the prep work is done. This is the moment we've been waiting for—the part where all that elbow grease transforms dull, hazy aluminum into a head-turning, mirror-like finish. This is where your patience really pays off, so let's get into the right way to apply your aluminum polish for boats and get a flawless, swirl-free shine that looks like a pro did it.
The secret to a perfect finish is control. Don't try to tackle the entire pontoon in one go. The trick is to break the job down into small, manageable sections. This prevents the polish from drying out prematurely and helps you apply consistent pressure for an even result.
Work in Small, Focused Sections
Always stick to a small area, roughly 2x2 feet at a time. This keeps you focused and stops the polish from drying on the surface, which is a nightmare to get off later. By concentrating on one small patch, you can be sure you've worked the polish in properly and hit that level of clarity you're after before moving on.
Think of it like mowing a lawn—you work in organized, overlapping stripes. This systematic approach ensures you hit every single inch and that the final shine is uniform across the entire surface. This is especially critical on big, flat areas like pontoon logs.
Nailing Your Machine Polishing Technique
If you’re using a machine polisher, your technique is everything. A sloppy approach will leave you with ugly buffer trails and a blotchy finish. But get the motions right, and you'll achieve a spectacular shine you could never replicate by hand.
Here's your step-by-step guide to a perfect pass:
- Apply Polish to the Pad: Dab 3-4 pea-sized dots of aluminum polish directly onto your foam or wool pad. Touch the pad to your 2x2 section in a few spots before you even turn the machine on to prevent slinging product everywhere.
- Start Slow to Spread: Turn the polisher on its lowest speed setting. This spreads the polish evenly across your section without making a mess.
- Speed Up and Apply Light Pressure: Bump the speed up to a medium setting (usually a 3-4 on a DA polisher). Apply just enough pressure to keep the pad flat against the surface. Let the machine do the work—you’re just there to guide it.
- Use Overlapping Passes: Move the polisher in a slow, deliberate cross-hatch pattern. Go side-to-side across the section, overlapping each pass by about 50%. Then, switch to an up-and-down pattern, again overlapping by half.
- Work It Until It’s Clear: As you work, you'll see the polish go from a thick, opaque haze to a thin, almost see-through film. That's your cue that the polish's abrasives have fully broken down and done their job.
This method guarantees total coverage and allows the polishing agents to work properly, which is crucial for getting that maximum gloss.
A common rookie mistake is moving the buffer way too fast. Slow, deliberate movements are your best friend here. Aim for a speed of about one inch per second. This gives the polish enough time to really work its magic and cut through any leftover haze.
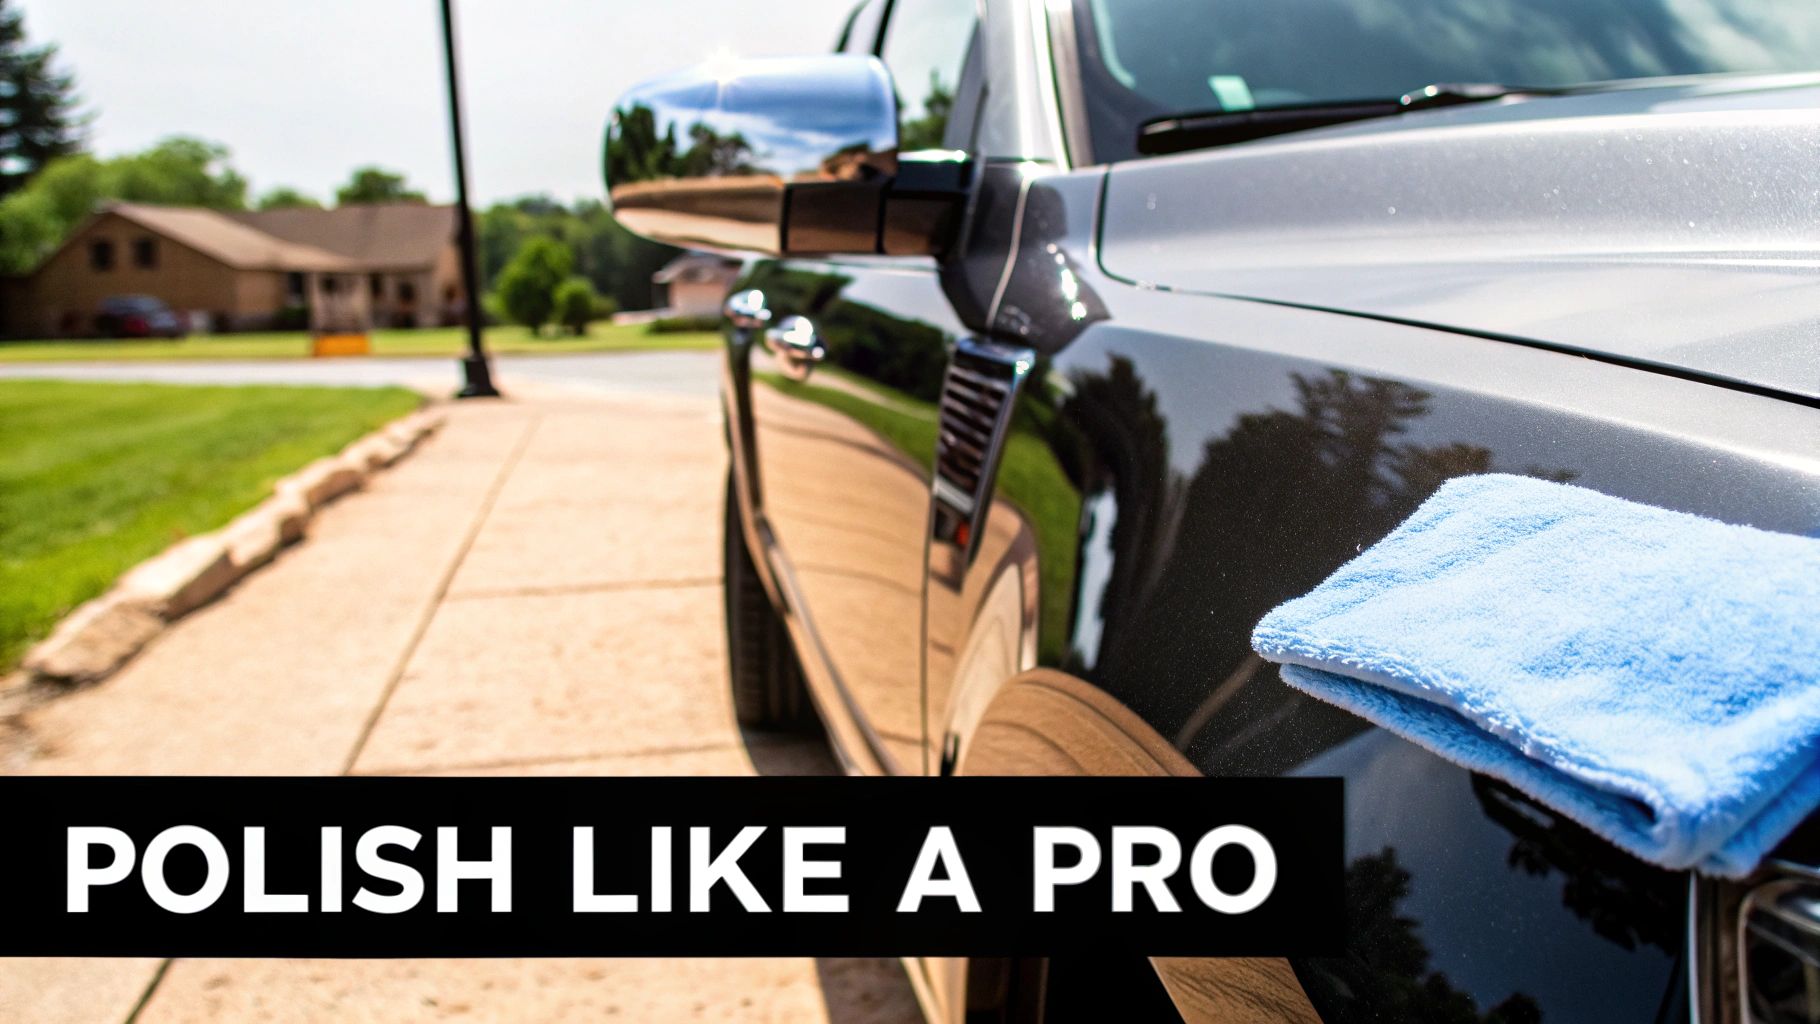
The Final Buff and Residue Removal
Once you've worked a section and the polish has turned clear, turn the machine off while it's still on the surface. Now for the big reveal. Grab a clean, dry, high-quality microfiber towel to wipe away the residue.
Here's a pro tip: fold your towel into fourths. Use one side to gently wipe away the bulk of the polish residue. Then, flip to a fresh, clean side for the final buff. This two-wipe method ensures you’re actually lifting the oily residue off the surface instead of just smearing it around.
You should be looking at a brilliant, highly reflective shine. If you still spot some haziness, you might need to make one more pass with the polisher or use a little less product on your next section. This process is very similar to how professional detailers finish automotive paint. If you want to dive deeper, our guide on boat compounding and polishing has some great tips that translate well to aluminum work.
Finishing Touches for That "Wow" Factor
You're so close! A couple of extra steps can take your shine from great to absolutely breathtaking. First, grab a bright LED work light or even your phone's flashlight. Holding it at an angle will expose any faint polish haze or light swirls you'd miss in the daylight.
For that final pop, consider using a finishing glaze or a super-fine finishing polish on a fresh, soft foam pad. This isn't about cutting anymore; it's purely about boosting gloss and clarity. Think of it as the top coat that makes the aluminum look dripping wet. This step adds that extra 10% of perfection that will make your boat stand out at the dock.
Protecting Your Shine for the Long Haul
You've put in the elbow grease and now your aluminum has that incredible, mirror-like shine. So, how do you keep it that way? The whole point of polishing is to strip away the dull, oxidized layer, but that leaves the fresh metal underneath exposed to the very elements that caused the problem in the first place.
This is where the real magic happens: protection. If you skip this final step, all your hard work could be undone in just a few weeks of sun and spray. You need to seal that surface to create a shield that locks in the shine and keeps corrosive elements out.
Sealing and Protecting Your Polished Aluminum
A good marine-grade sealant is your best friend here. It creates a tough, invisible barrier over the polished aluminum, acting as the first line of defense against UV rays, salt spray, and grime. This is how you stop oxidation before it even gets a chance to start.
For a ridiculously easy and effective option, something like Boat Juice Protection Spray is a game-changer. It goes on in minutes and leaves behind a hydrophobic layer. In plain English, that means water beads up and rolls right off instead of sitting on the surface and leaving nasty mineral deposits. This one simple step will make your future cleanups a breeze.
Think of a protective sealant like a clear coat for your aluminum. It takes all the abuse from the environment so the perfectly polished metal underneath stays pristine. A few minutes of protection can save you hours of re-polishing down the road.
Creating a Simple Maintenance Routine
Protection isn't a one-and-done deal, but it doesn't have to be a chore. Once you've got a good sealant on there, maintaining that brilliant shine is quick and easy. You definitely don't need to break out the polisher every weekend.
Here's your simple routine for year-round shine:
- After Every Trip: Give your polished aluminum a quick rinse with fresh water. This is crucial for washing away any salt or grime. Follow it up with a quick wipe-down using a clean microfiber towel to prevent water spots from forming.
- Monthly Check-Up: Once a month, wash the surfaces with a pH-neutral boat soap. This is also the perfect time to re-apply a layer of spray protection like Boat Juice. If you want to dive deeper into protectants, check out our guide on the best spray wax for boats.
Sticking to this simple schedule will dramatically extend the life of your polish job. You'll keep your aluminum looking its best all season long with surprisingly little effort.
Got Questions About Polishing Aluminum? We've Got Answers.
Still have a few things you're wondering about? You're not alone. Getting into aluminum polishing for the first time always brings up a few questions. Let's tackle the most common things boat owners ask so you can move forward with confidence.
How Often Do I Really Need to Polish My Boat's Aluminum?
Honestly, there's no single magic number here. The real answer depends entirely on where you boat and how you store your vessel.
If you’re a saltwater boater, that harsh environment means you’ll probably be doing a full, heavy-duty polish once or twice a year, like during your spring prep and end-of-season winterization. For those of you on freshwater, you can usually get away with a deep polish at the beginning of the season to keep things looking sharp.
The real trick is what you do in between. A quick freshwater rinse and wipe-down after every trip, plus a good wash once a month, will make a world of difference. This simple routine can seriously extend the life of your polish job, meaning less heavy lifting for you down the road.
My rule of thumb is simple: Polish it when it looks like it needs it. If you notice the shine is fading or that chalky white film is creeping back, it's time to break out the polish. Consistent, light cleaning will always beat infrequent, back-breaking restoration.
Can I Polish Anodized Aluminum?
Okay, this is a big one. Be extremely careful here. Anodizing is a protective coating that's baked on at the factory to create a durable finish. If you take a standard aluminum polish for boats to an anodized surface, you’ll strip that coating right off. This can leave you with a blotchy, permanently damaged finish that’s impossible to fix.
Most of the trim on newer boats, especially anything with a matte or satin look, is anodized. If you're not sure, always test your polish on a tiny, hidden spot first. If you see the finish change color or get hazy, stop immediately. For anodized aluminum, just stick to gentle soaps and specialized protectants.
What If My Shine Just Isn't Perfect?
Not getting that flawless mirror finish you were hoping for? I can almost guarantee it comes down to one of two things: prep work or technique. If the surface wasn't spotlessly clean and fully deoxidized before you started, the polish simply can't do its job and deliver maximum gloss.
The other classic mistake is not working the polish long enough. You have to keep buffing until that black, hazy residue turns clear. That's the sign that the tiny abrasives in the polish have fully broken down and refined the surface. If you wipe it off too soon, you're leaving a lot of shine on the table.
Ready to protect that shine and make your next cleanup a breeze? Your next step is to lock in your hard work. Grab our Boat Juice Protection Spray to create a durable shield that keeps your aluminum gleaming all season long.