


· By Boat Juice Team
A DIY Guide to Using Boat Buffing Compound for a Perfect Shine
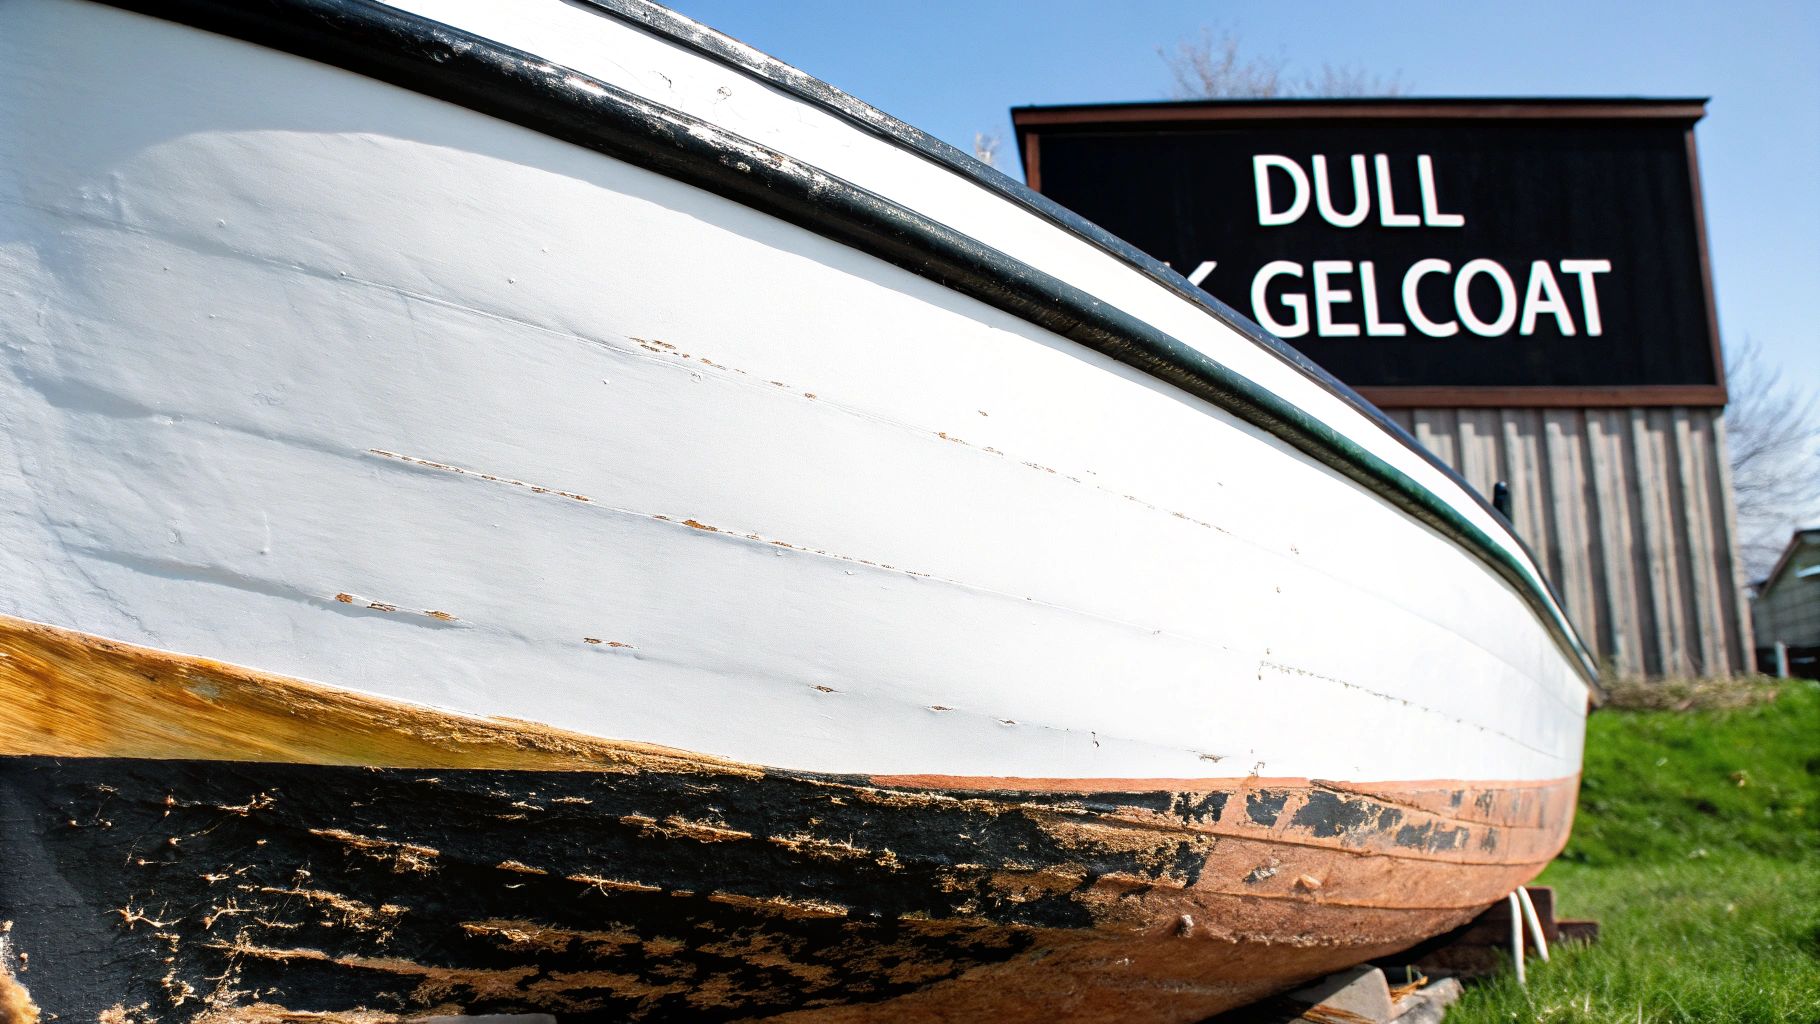
When your boat’s vibrant shine has faded to a dull, chalky mess, a simple wash just isn't going to fix it. We’ve all been there. The real enemies here are oxidation and harsh UV rays, which relentlessly break down your boat's protective gelcoat. This is exactly where a quality boat buffing compound becomes your best friend. Think of it as a specialized exfoliant for your boat, designed to gently remove that damaged top layer and reveal the fresh, glossy surface hiding underneath.
Understanding Why Your Boat's Finish Looks Dull
Ever feel that frustration when your boat looks faded halfway through the season, while your neighbor's still gleams like new? You’re not alone, and it’s probably not because they’re washing it more often. It all comes down to what happens to the surface between washes.
Your boat's gelcoat is a tough, resin-based finish that acts as its first line of defense. But constant exposure to sunlight, saltwater, and pollutants triggers a chemical reaction called oxidation. This process breaks down the gelcoat's polymers, creating a microscopic layer of rough, chalky residue. That's the dullness you’re seeing.
The Real Problem with Oxidation
If you let oxidation go, it does a lot more than just make your boat look old. That chalky surface becomes porous, trapping dirt, grime, and water spots, which makes your boat a real pain to keep clean. More importantly, a compromised gelcoat offers less protection for the fiberglass underneath, potentially leading to much bigger problems down the road.
Bringing back that showroom shine isn't just about looks. It’s about protecting your investment and even improving performance with a smoother, faster hull.
Why a Simple Wash Isn't Cutting It
Many boat owners grab whatever is handy—dish soap, even bleach—to get their boat clean. Sure, these things might remove surface dirt, but they are often harsh cleaners that strip away any wax or sealant you've worked so hard to apply. This leaves the gelcoat totally exposed and actually speeds up the oxidation process. It's a frustrating cycle: you clean your boat, but you're accidentally making it more vulnerable.
This is where a boat buffing compound changes the game. It’s not a cleaner; it's a restorer. The micro-abrasives in the compound physically scrub away that thin, dead layer of oxidized gelcoat. You aren't just covering up the problem—you are removing it for good to reveal the vibrant, undamaged finish underneath.
The principle is similar across different restoration projects. Just like a boat's finish, other surfaces can lose their luster over time. For instance, learning how to buff wood floors to a brilliant shine involves the same core idea: carefully removing a damaged top layer to reveal a pristine surface.
The bottom line is that restoring your boat’s shine requires correcting the surface, not just cleaning it. We have a whole guide on the basics of how to clean fiberglass boats to make sure you start with a perfectly prepped surface. Now, let’s get into choosing the right compound and tools to get this job done right.
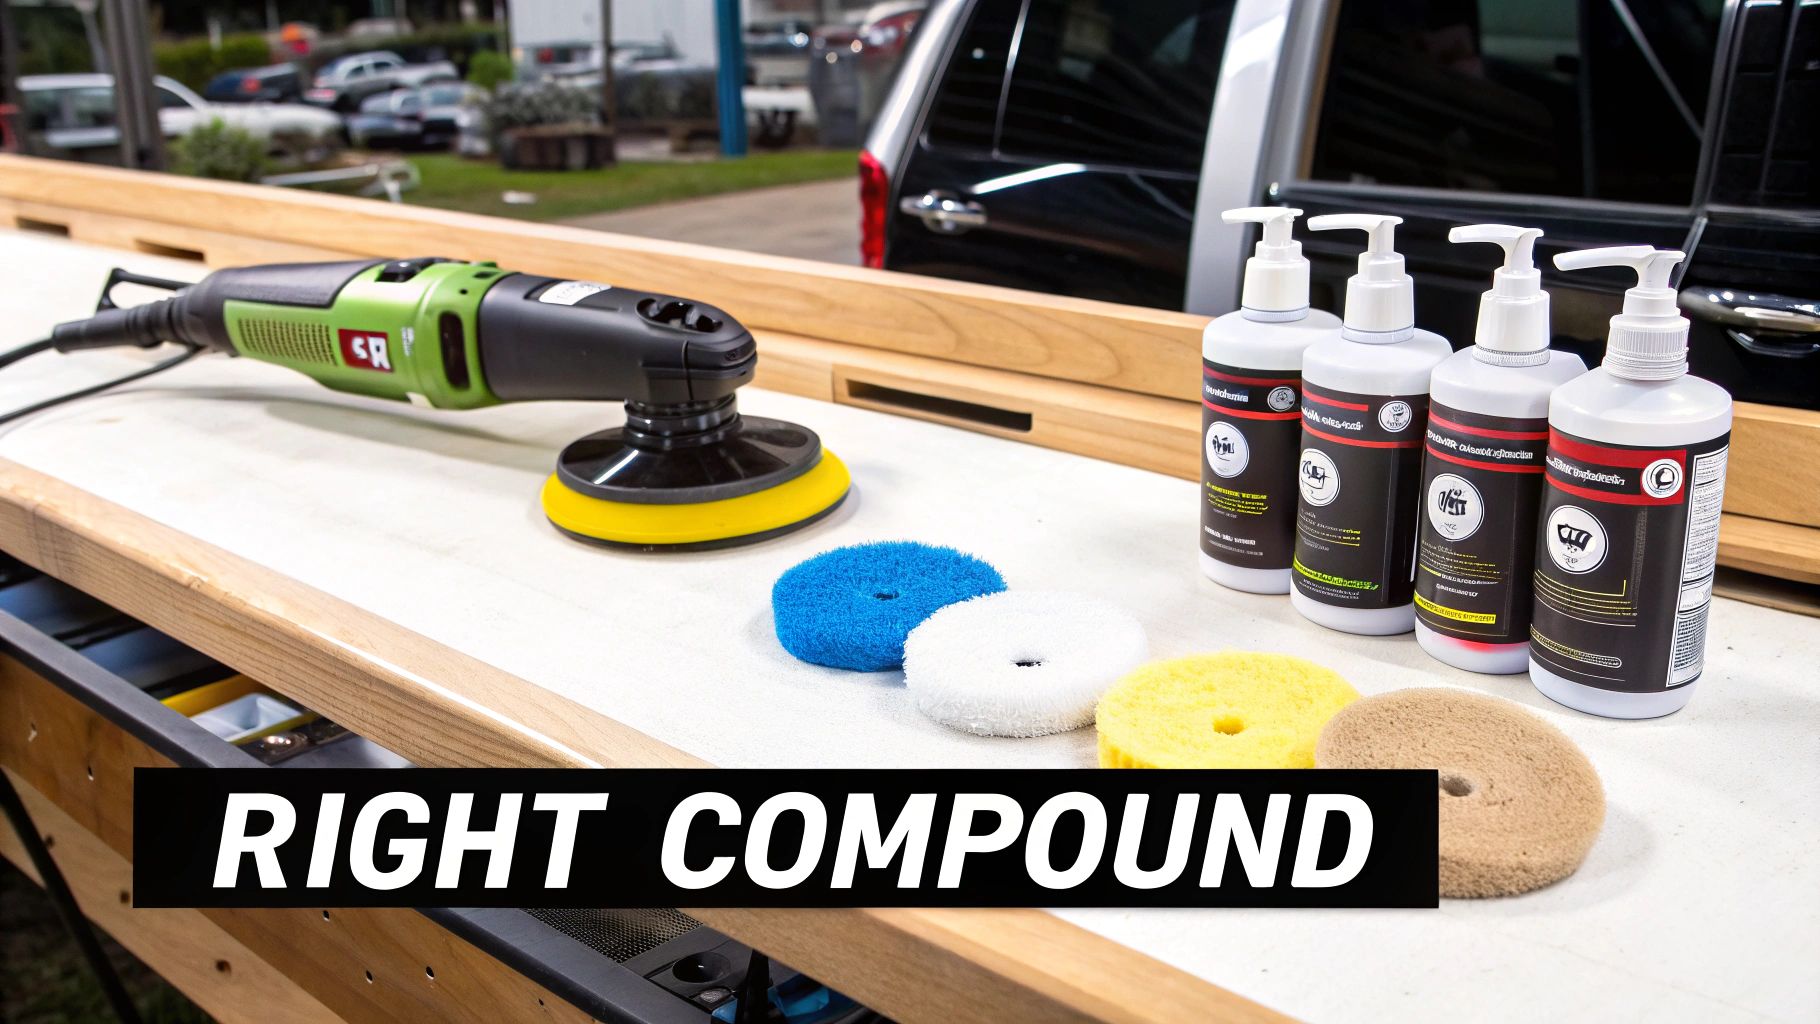
Picking the Right Compound, Polisher, and Pads for Your Boat
Walking into a marine supply store and staring at the wall of compounds can feel a bit overwhelming. You'll see products labeled "heavy-cut," "one-step," and "fine polish," all promising a mirror finish. The secret to cutting through the noise is simple: match the product to the problem.
First things first, you need to give your gelcoat an honest assessment. Is it so oxidized that it feels chalky to the touch and the color is completely faded? Or are you just trying to get rid of some light haze and water spots? Grabbing a compound that’s way too aggressive for the job can chew through precious gelcoat, while using one that's too light is just a frustrating waste of your time.
Selecting the Right Boat Buffing Compound
The easiest way to think about buffing compounds is to compare them to sandpaper. A heavy-cut compound contains larger, more aggressive abrasives designed to make quick work of severe oxidation and deeper scratches. It’s the muscle you need for a boat that's been sitting neglected for a few seasons.
On the other hand, a medium or fine-cut compound uses much smaller abrasives. These are perfect for tackling moderate oxidation, annoying swirl marks left over from a previous buffing job, or just bringing a dull finish back to life.
Here's a key piece of advice from the pros: always start with the least aggressive method that gets the job done. If a fine-cut polish isn't cutting it, you can always step up to something heavier. You can’t put gelcoat back on.
Use this quick guide to select the right boat buffing compound and pad based on how oxidized your gelcoat is.
Matching Compound to Gelcoat Condition
| Gelcoat Condition | Recommended Compound | Recommended Pad |
|---|---|---|
| Heavy Oxidation (Chalky, faded color) | Heavy-Cut Rubbing Compound | Twisted Wool Pad |
| Moderate Oxidation (Dull, hazy finish) | Medium-Cut Compound | Wool/Foam Blended Pad |
| Light Haze & Swirls (Loss of gloss) | Fine-Cut Polish or One-Step | Foam Polishing Pad |
This table should get you pointed in the right direction, but remember to always do a small test spot first!
Rotary vs Dual-Action Polishers: The DIYer’s Choice
Once you’ve got your compound, you need the right machine to apply it. The two big players in the polisher game are rotary and dual-action (DA). While you'll see a lot of pros using rotary polishers for their sheer power and speed, they carry a huge risk for anyone who's not using one every day.
A rotary polisher spins the buffing pad on a single axis at incredibly high speeds. This generates a ton of heat and friction, which is fantastic for leveling heavy oxidation quickly. The downside? Hold it in one spot for a split second too long or at the wrong angle, and you can permanently burn right through your gelcoat. That’s a very expensive mistake.
For any DIYer, a dual-action (DA) polisher is your best friend. This machine spins the pad in a circle while also oscillating in a random orbital pattern. This unique motion dramatically cuts down on heat buildup, making it virtually impossible to burn your gelcoat. It’s a much safer, more forgiving machine that delivers amazing, swirl-free results, even if it's your first time picking one up.
For any recreational boat owner, a dual-action (DA) polisher is hands-down the safest and most effective tool for getting professional results without the risk. It gives you peace of mind and an incredible shine.
Matching Pads to Your Project
The final piece of the puzzle is the buffing pad itself. You'll mainly see two types: wool and foam, and each has a specific role to play.
- Wool Pads: Think of these as the aggressive, heavy-lifters. They are almost always paired with heavy-cut compounds. The natural fibers work with the compound to slice through severe oxidation and get the surface flat and uniform.
- Foam Pads: These come in a whole range of densities, from more aggressive "cutting" pads to soft "finishing" pads. A foam polishing pad is the perfect partner for a fine-cut polish or a one-step product, designed to remove any remaining haze and really bring out that deep, wet-looking gloss.
Nailing the right combination of compound, polisher, and pad is the most important part of the entire job. It really sets the foundation for a successful finish. While this guide is all about gelcoat, it's always good to know how to tackle other surfaces; for instance, you can learn more about how to polish an aluminum boat in our other articles.
With your gear selected, you're ready to get to the fun part.
The Complete Boat Buffing Process From Start to Finish
Alright, you've got your compound, polisher, and pads lined up. This is where the magic happens and all that prep work really starts to pay off. The key to getting a professional, swirl-free shine—the kind that looks like you paid a boatyard a small fortune—is all about being methodical.
Resist the urge to just jump in and start slinging compound everywhere. A little patience right now will save you a ton of headaches later. The real success of any buffing job is locked in before the polisher even buzzes to life. As you get started on bringing your boat's finish back from the dead, understanding paint correction on a deeper level can give you some great background on what you're actually accomplishing.
Prepping Your Boat for a Flawless Finish
First thing's first: the boat has to be spotlessly clean. Any speck of dirt, salt, or grime left behind will get trapped under your buffing pad and act like sandpaper, carving a whole new set of scratches into your gelcoat. Give it a proper wash using a good pH-balanced boat soap—never use dish soap, as it's designed to strip away waxes and sealants.
Once the boat is completely dry, it's time to break out the painter's tape. You'll want to carefully mask off every area you don't want the polisher to even think about touching. This means:
- Decals and Graphics: The edge of a spinning pad can grab a decal and rip it right off before you even know what happened.
- Non-Skid Surfaces: Trust me, you do not want to try and remove dried compound from the texture of a non-skid deck. It’s a nightmare.
- Hardware: Protect your cleats, vents, and other bits of metal or plastic trim from getting scuffed up.
- Rub Rails: Taping the rub rail is a classic pro move. It keeps the pad from catching the edge and prevents it from getting covered in compound sling.
This part can feel a bit tedious, but it’s absolutely non-negotiable for a clean, professional job.
Mastering Your Buffing Technique
Now for the main event. Before you start on the hull, you need to "prime" your buffing pad. Just put a few pea-sized drops of your boat buffing compound on the pad and work it in with your finger. This gets the pad saturated and ready to go to work from the first second.
Always work in small, manageable sections, about 2 feet by 2 feet. This is critical. If you try to bite off too much at once, the compound will dry out before you can work it in properly, leaving you with a hazy, inconsistent mess. Focusing on a small square gives you total control.
Pro Tip: Never, ever start the polisher while it's in the air. Place the pad flat against the hull first, then turn it on. This one simple habit will keep compound from flying all over you, the boat, and everything within a ten-foot radius.
Get your dual-action (DA) polisher set to a medium speed, usually around a 3 or 4 on the dial. You don't need crazy high speeds here. What you need is consistent movement and just enough pressure to keep the pad flat, letting the weight of the machine do most of the work.
The Perfect Cross-Hatch Pattern
The real secret to an even, mirror-like finish is mastering the cross-hatch pattern. This technique ensures you cover every bit of the surface from multiple directions, which is how you effectively level out the imperfections.
Here's the rhythm:
- Guide the polisher slowly from left to right across your 2'x2' area, making sure to overlap each pass by about 50%.
- After you've covered the area horizontally, repeat the process, this time moving up and down.
- That's a single "pass." Keep this pattern going until the compound starts to look clear or "break down."
You'll see the compound start out as a milky, opaque film. As you work it, the tiny abrasives inside break down and it will become more translucent. That’s your sign that the compound has done its job.
Wiping and Inspecting Your Work
Once a section is done, turn the polisher off before lifting it away from the surface. Grab a clean, soft microfiber towel and gently wipe away the residue. Now, take a step back and look at it from a few different angles. Use a flashlight if you have to.
You should see a huge difference in gloss. Run the back of your hand over it; it should feel slick and smooth. If you still see some light haze or oxidation, no sweat. It might just need one more pass to get perfect.
This inspect-as-you-go approach is vital. It lets you fix any issues on the spot and guarantees the whole boat looks consistent. Plus, it breaks a huge job down into a series of small, satisfying wins.
Keeping Your Pads Clean
As you move along, your buffing pad is going to get loaded up with spent compound and all the oxidation you're removing. A dirty, caked-up pad is an enemy of shine. It won't cut effectively and can even introduce new swirl marks.
After every couple of sections, take a second to clean your pad on the fly. You can use a stiff pad brush or a blast of compressed air. Just turn the polisher on its lowest speed and run the brush across the face of the spinning pad for a few seconds. This fluffs the fibers back up, knocks out the old gunk, and gets it ready to cut again.
By following these steps—prep, apply, work small, inspect, and keep it clean—you're doing more than just buffing. You're carefully restoring your boat's finish with professional precision. Take your time, enjoy the process, and get ready to be blown away by the reflection staring back at you from the hull.
Common Buffing Mistakes and How to Avoid Them
Alright, let's talk about what can go wrong. Buffing your boat for the first time can feel a bit like performing surgery—you're using a powerful tool on something you love, and one wrong move feels disastrous. But don't sweat it.
Most mistakes are completely avoidable once you know what to look for. Think of this section as your spotter, helping you sidestep the common blunders so you can get that perfect, shimmering finish on the first try.
Mistake 1: Applying Way Too Much Pressure
It’s tempting, I get it. You see a nasty patch of oxidation and your first instinct is to lean into the polisher, thinking more muscle equals better results. It doesn't. In fact, it's one of the worst things you can do.
Your dual-action polisher is engineered to do the work for you. All you need to do is guide it. Pushing down hard creates a ton of friction and heat, which is a fast track to burning your gelcoat. It also chokes the pad, stopping its rotation and leaving you with a mess of holograms and swirls.
Just let the machine's own weight do the work. A light, steady hand is all it takes.
Mistake 2: Burning the Gelcoat
The dreaded gelcoat burn—a permanent, yellowish scorch mark—is every boat owner's number one fear. While it's tougher to do with a modern DA polisher than an old-school rotary, it's absolutely still possible if you get careless.
Here’s how it happens:
- Leaning on the polisher: As we just covered, this creates intense, localized heat.
- Cranking the speed: Running the machine at max speed is rarely necessary and builds heat way too quickly.
- Parking in one spot: If you stop moving the polisher, all that energy gets focused on one tiny area. That's how you get a burn.
The fix is simple: always keep the machine moving in a slow, steady, and overlapping pattern. If the surface ever feels hot to the touch, just stop. Take a break, let it cool down, and then get back to it.
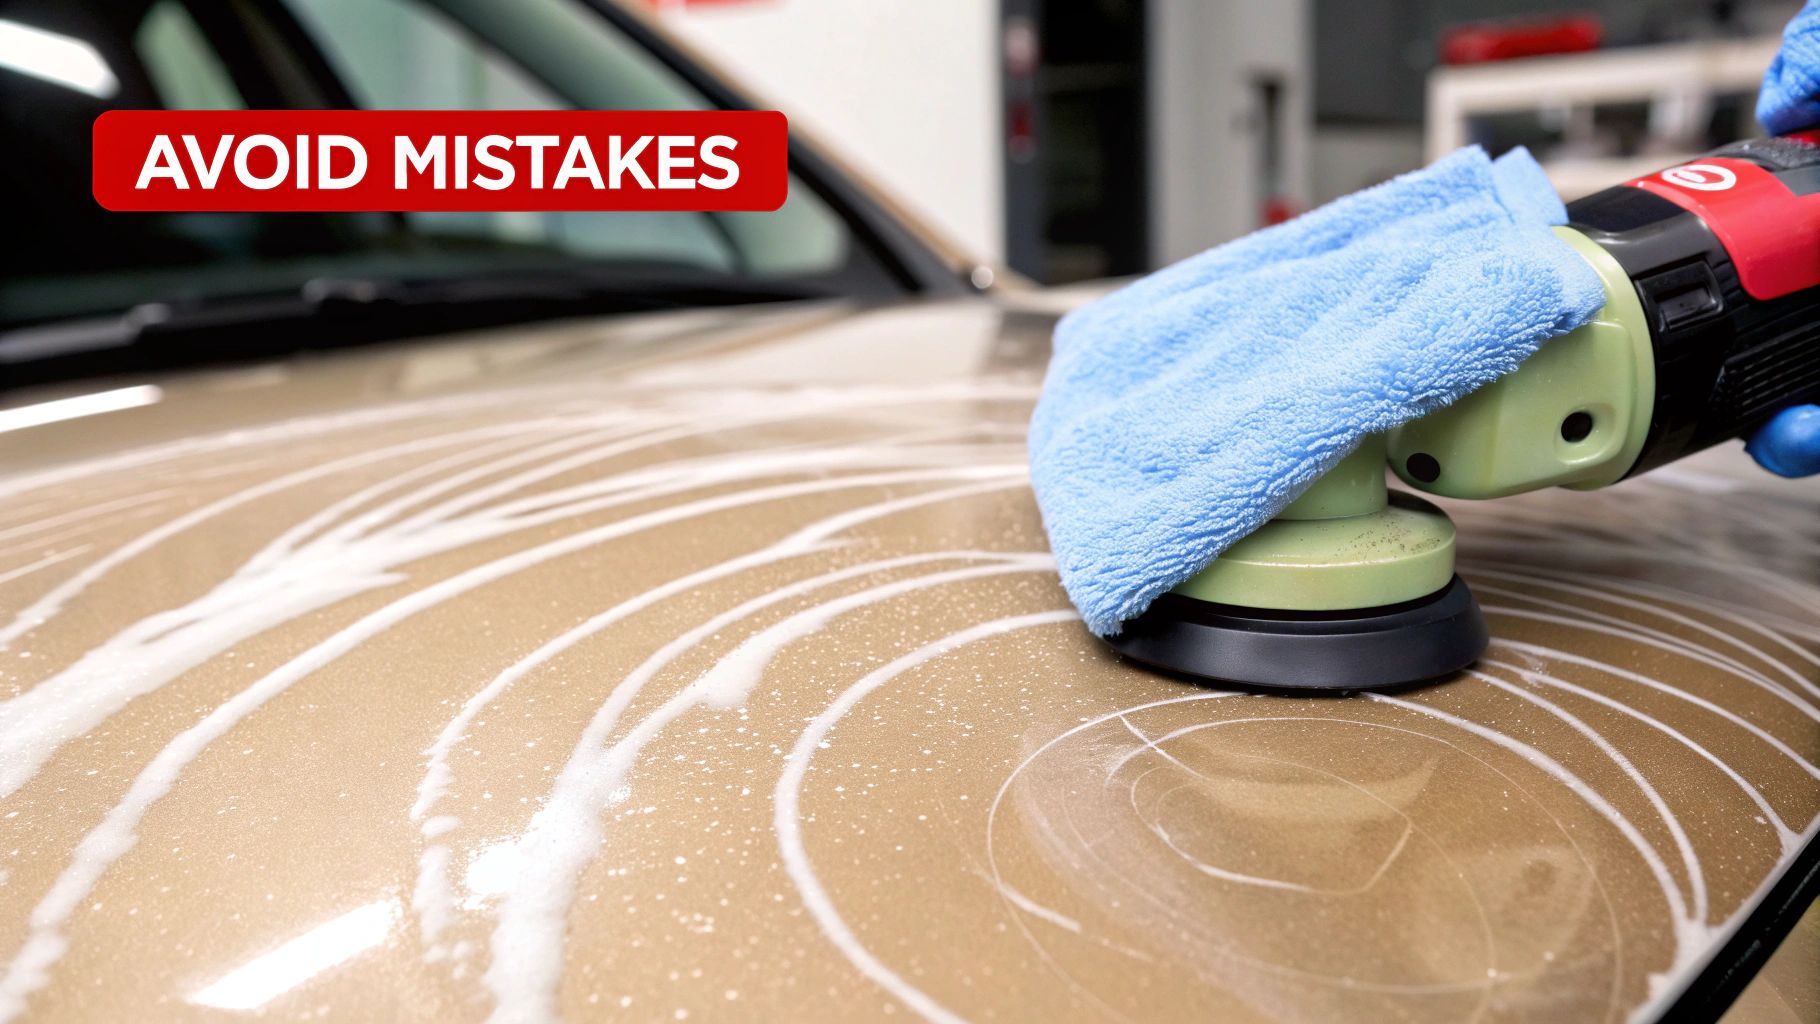
Mistake 3: Creating a Web of Swirl Marks and Haze
You finish a section, wipe it down, and step back to admire your work... only to see a spiderweb of fine scratches under the sun. Those are swirl marks. Sometimes, instead of swirls, the finish just looks cloudy or foggy—that’s haze. It’s frustrating.
A hazy finish or a fresh set of swirl marks is almost always caused by a dirty buffing pad. You're essentially dragging the gunk you just removed back across the surface you're trying to perfect.
Clean your pad constantly. I mean it—after every single 2'x2' section, or every other one at the absolute minimum. You can use a stiff brush or a blast of compressed air to knock out the dried-up compound and old oxidation. And when you wipe, only use a clean, high-quality microfiber towel. A dirty towel will undo all your hard work in seconds.
Mistake 4: Using the Wrong Amount of Product
Finding that "just right" amount of compound is crucial. If you slop on way too much, you’ll just gum up the pad, killing its cutting power and creating a greasy mess that's a nightmare to wipe off. All that extra lubrication also hides what's really happening on the surface until it's too late.
On the flip side, using too little compound starves the pad of lubrication. It'll start to hop and skip across the gelcoat, which creates friction, heat, and new scratches.
Here's a good rule of thumb: start a fresh, dry pad with four or five pea-sized dots of compound. For every section after that, you'll only need two or three dots to keep it primed.
With the recreational boating market growing, it's clear people care about their boats. In fact, 75% of demand is now driven by leisure craft. Watersports enthusiasts and pontoon owners are always fighting oxidation from sun and travel, making good technique vital. A fouled, oxidized hull can increase drag by as much as 15%, so keeping it slick isn't just about looks. You can explore more about these market trends and how they influence the products we use.
Locking In That Shine for Long-Lasting Protection
You did it. You put in the hours, wrestled with the polisher, and brought that incredible, deep gloss back to your boat’s hull. But before you crack open a celebratory drink, there's one final, absolutely critical step: locking in that shine.
Buffing your boat is really only half the job. Think of it like this: after you sand a piece of furniture smooth, you have to apply a finish to protect the raw wood. When you use a boat buffing compound, you're stripping away that old, oxidized layer, but you're also leaving the pores of the gelcoat wide open and vulnerable.
Without a protective layer, those fresh pores are an open invitation for UV rays, salt, and water spots to start the oxidation process all over again. This is where a high-quality boat wax or sealant becomes your best friend, making sure all that hard work actually lasts.
Wax vs. Sealant: Which Is Right for You?
For years, the go-to answer was a traditional carnauba paste wax. And don't get me wrong, these waxes can deliver a beautiful, warm glow that a lot of traditionalists love. The downside? They typically only last a few months at best and require a ton of elbow grease to apply and buff off correctly.
Thankfully, modern synthetic sealants and ceramic-based sprays offer a huge leap forward in both durability and ease of use. Instead of just sitting on top of the surface like a wax, these products create a chemical bond with the gelcoat itself. This bond forms a tough, slick barrier that actively repels water and contaminants.
This is especially important in today's boating world. Recreational boating now fuels 75% of market demand, with more families getting into watersports with surf and ski boats. Those boats are in a constant battle with tough water spots and mildew, making a durable sealant a must-have.
Easy and Durable Protection
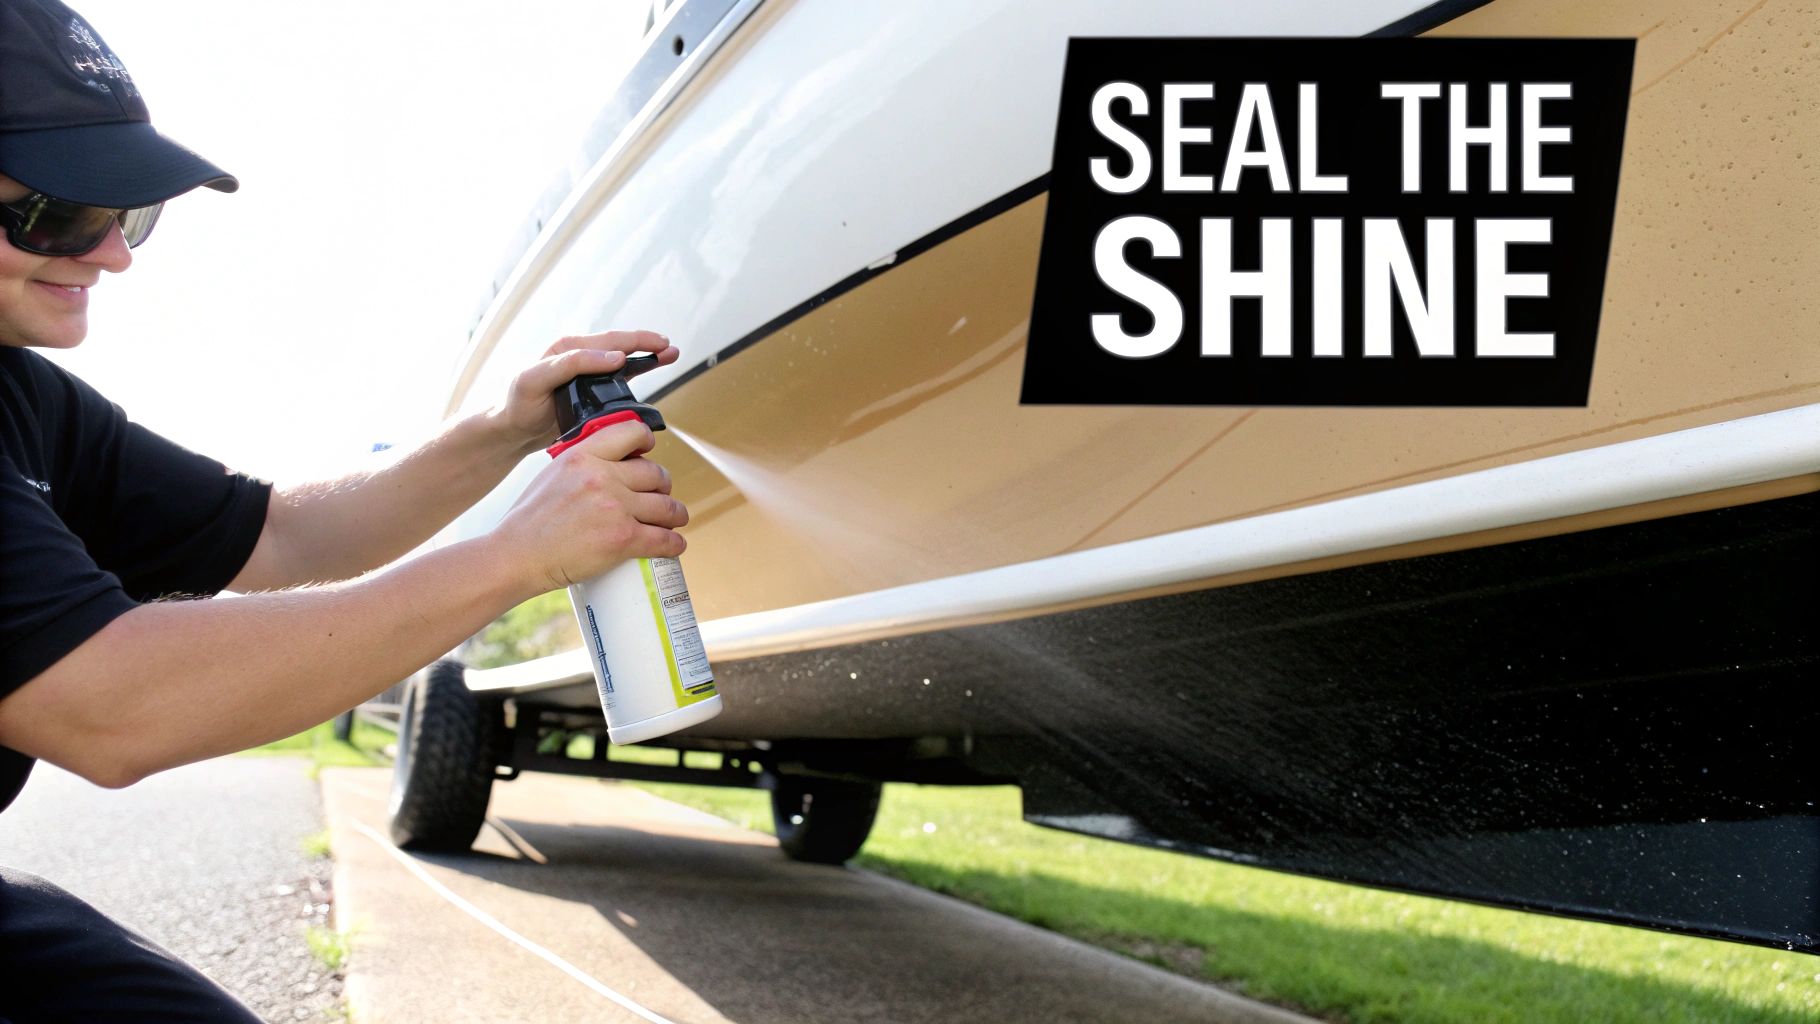
For an easy-to-apply yet incredibly durable option, a modern ceramic-infused spray is the perfect chaser to a good compounding session. A product like Boat Juice Protection Spray is designed for this exact purpose. It creates a powerful hydrophobic barrier that makes water bead up and roll right off the hull, taking dirt and grime with it.
Applying a sealant isn't just about shine; it's about making your life easier. A protected surface stays cleaner for longer and makes the end-of-day wipe-down a quick and satisfying job, not a chore.
This hydrophobic effect dramatically reduces water spotting and makes it much harder for gunk to stick in the first place. When it's time to clean up after a day on the lake, a quick spray and wipe is often all you need to bring back that just-buffed look.
How to Apply Your Protective Sealant
Applying a spray sealant is refreshingly simple, which is exactly what you want after a long day of buffing.
- Work on a clean, cool surface. Make sure the panel you're working on is cool to the touch and out of direct sunlight.
- Spray and spread. Lightly mist a small area (think a 3'x3' section) with the protection spray.
- Wipe with a clean microfiber. Use a clean, dry microfiber towel to gently spread the product evenly across the surface.
- Flip and buff. Flip the towel over to a dry side and lightly buff the area to a brilliant, streak-free shine.
That’s it. You’ll be able to protect the entire boat in a fraction of the time it would take to apply a traditional paste wax. By taking this final step, you're not just adding a pretty shine—you're adding a tough, sacrificial barrier that preserves all the hard work you just put in. Now your boat is truly ready to hit the water, looking its absolute best and protected for the months ahead.
Got Questions About Boat Buffing? We’ve Got Answers.
Even with the best guide in hand, it's totally normal to have a few questions buzzing around before you fire up that polisher. Let's tackle some of the most common things boat owners ask about using a boat buffing compound. Think of this as the final check-in to give you the confidence to get out there and achieve that perfect, professional-looking shine.
How Often Should I Really Be Compounding My Boat?
This is probably the most common question I hear, and for good reason. Compounding is an abrasive process—it physically shaves off a tiny layer of your gelcoat to reveal the fresh surface underneath. Because of this, you only want to do it when it's truly needed.
For most boats, that sweet spot is about once every 1-3 years. The exact timing really depends on its lifestyle. A boat that bakes in the sun all year or lives in the water will need it more often than one that’s garage-kept.
For your regular, season-to-season upkeep, stick to a much gentler fine-cut polish and a top-notch wax or sealant. The whole idea is to protect the finish you've restored so you can go longer between heavy compounding sessions.
Can I Just Use Car Compound on My Boat?
It’s tempting to grab what you have in the garage, but this is a shortcut you absolutely want to skip. Gelcoat is a completely different beast than the clear coat on your car; it's much harder and more porous. Marine-specific compounds are engineered with the right kind of abrasives to cut through that tough, oxidized surface without causing harm.
Using an automotive product on gelcoat is a recipe for frustration. It's usually way too gentle to make a dent in real oxidation. You’ll just end up spending hours of your time for a disappointing result.
What if a Scratch Is Too Deep for a Compound to Fix?
A good boat buffing compound works wonders on surface-level stuff like oxidation, light scuffs, and those faint scratches. Here’s a tried-and-true trick: run your fingernail across the scratch. If your nail gets caught in it, the scratch is probably too deep for a compound alone to erase completely.
For those deeper gouges, you'll need to step up your game. This usually means carefully wet sanding the immediate area first to level it out. Once that's done, you'd follow the same process: hit it with a heavy-cut compound, refine it with a polish, and then lock it all in with a sealant to bring back that gloss and protection.
The demand for these products has exploded right alongside the rise in recreational boating. It’s pretty telling that in 2023, polish compounds owned a massive 62.86% market share, valued at over USD 188 million—easily beating out the more aggressive cutting compounds. This is no accident; it's directly linked to the boom in wake boats, pontoons, and runabouts, where owners are all about keeping that finish looking brand new. You can discover more about the growing boat polish market and see the trends for yourself.
After you've put in all that elbow grease, keeping that shine should be the easy part. Here at Boat Juice, we developed our Protection Spray to be the perfect finishing touch. It creates a tough, slick barrier that makes water bead up and keeps your boat looking like you just pulled it off the showroom floor.
Shop Boat Juice Protection Spray and lock in your shine today!