


· By Boat Juice Team
How to Clean Boat Vinyl Seats and Make Them Look New Again
Keeping your boat seats looking sharp takes more than a quick rinse after a day on the lake. To truly protect your investment, you need a solid routine using products made for the marine world. This guide will show you exactly how to prevent permanent stains, UV damage, and that dreaded cracking from ruining your boat's look and value.
Why a Quick Wipe-Down Just Won't Cut It
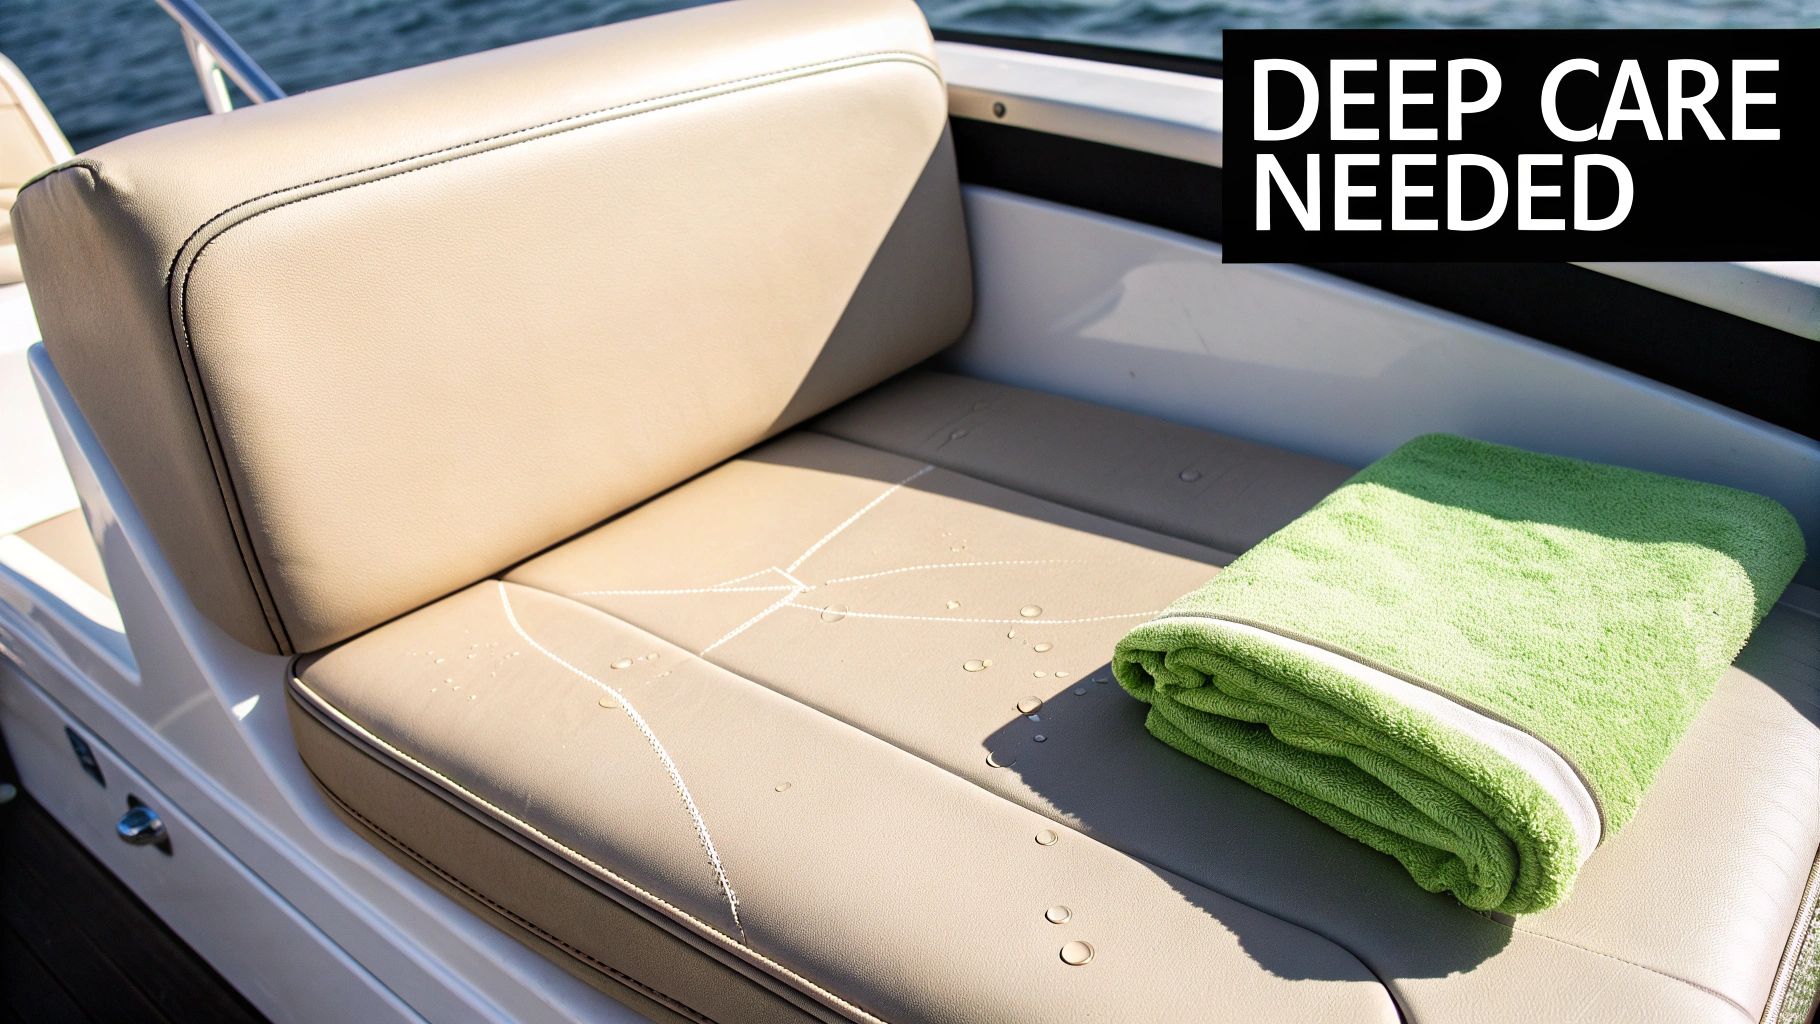
The first thing anyone sees on your boat is the seats, and they put up with a ton—scorching sun, saltwater spray, sunscreen smears, and mildew. A simple splash of water isn't going to cut it. You need a real cleaning strategy to keep them in top shape.
Think of your boat's vinyl like your own skin. It has special ingredients called UV inhibitors and plasticizers that keep it soft and flexible. But without your help, the harsh marine environment constantly attacks these protective elements, causing them to break down over time.
The Hidden Dangers Lurking on Your Vinyl
When you skip regular cleaning, the combination of sun, moisture, and everyday grime creates the perfect storm for upholstery damage. This isn't just about looking a little dirty; it's about stopping a slow decay that’s a nightmare to fix later.
Here's a look at what your seats are really up against:
- UV Radiation: The sun is brutal. It fades colors and literally bakes the essential oils right out of the vinyl, leaving it brittle and prone to cracking.
- Moisture and Mildew: All those little seams and thread holes are perfect hiding spots for moisture. That dampness is an open invitation for ugly mildew stains to take root deep in the fabric.
- Sunscreens and Oils: The lotions protecting your skin often contain chemicals that react poorly with vinyl, causing tough-to-remove yellow or pinkish stains.
Ignoring your vinyl isn't just a cosmetic problem—it's a financial one. A full reupholstery job can cost thousands. Suddenly, spending a little time on cleaning seems like one of the smartest investments you can make in your boat.
Don't Make It Worse with the Wrong Methods
How you clean is just as important as how often. Grabbing the wrong tools or household chemicals can actually speed up the very damage you’re trying to prevent. In fact, studies have shown that a high percentage of vinyl boat seat failures can be traced back to improper cleaning techniques. Even scrubbing too hard can create tiny micro-tears that eventually become big, ugly rips. You can dive deeper into the findings on proper vinyl care from boating experts.
This guide will walk you through cleaning your boat's vinyl seats the right way, so you can sidestep those expensive mistakes. Once you understand the "why" behind each step, you'll be able to keep your seats looking pristine for years. First up, let's build the perfect cleaning toolkit.
Building Your Go-To Boat Vinyl Cleaning Kit
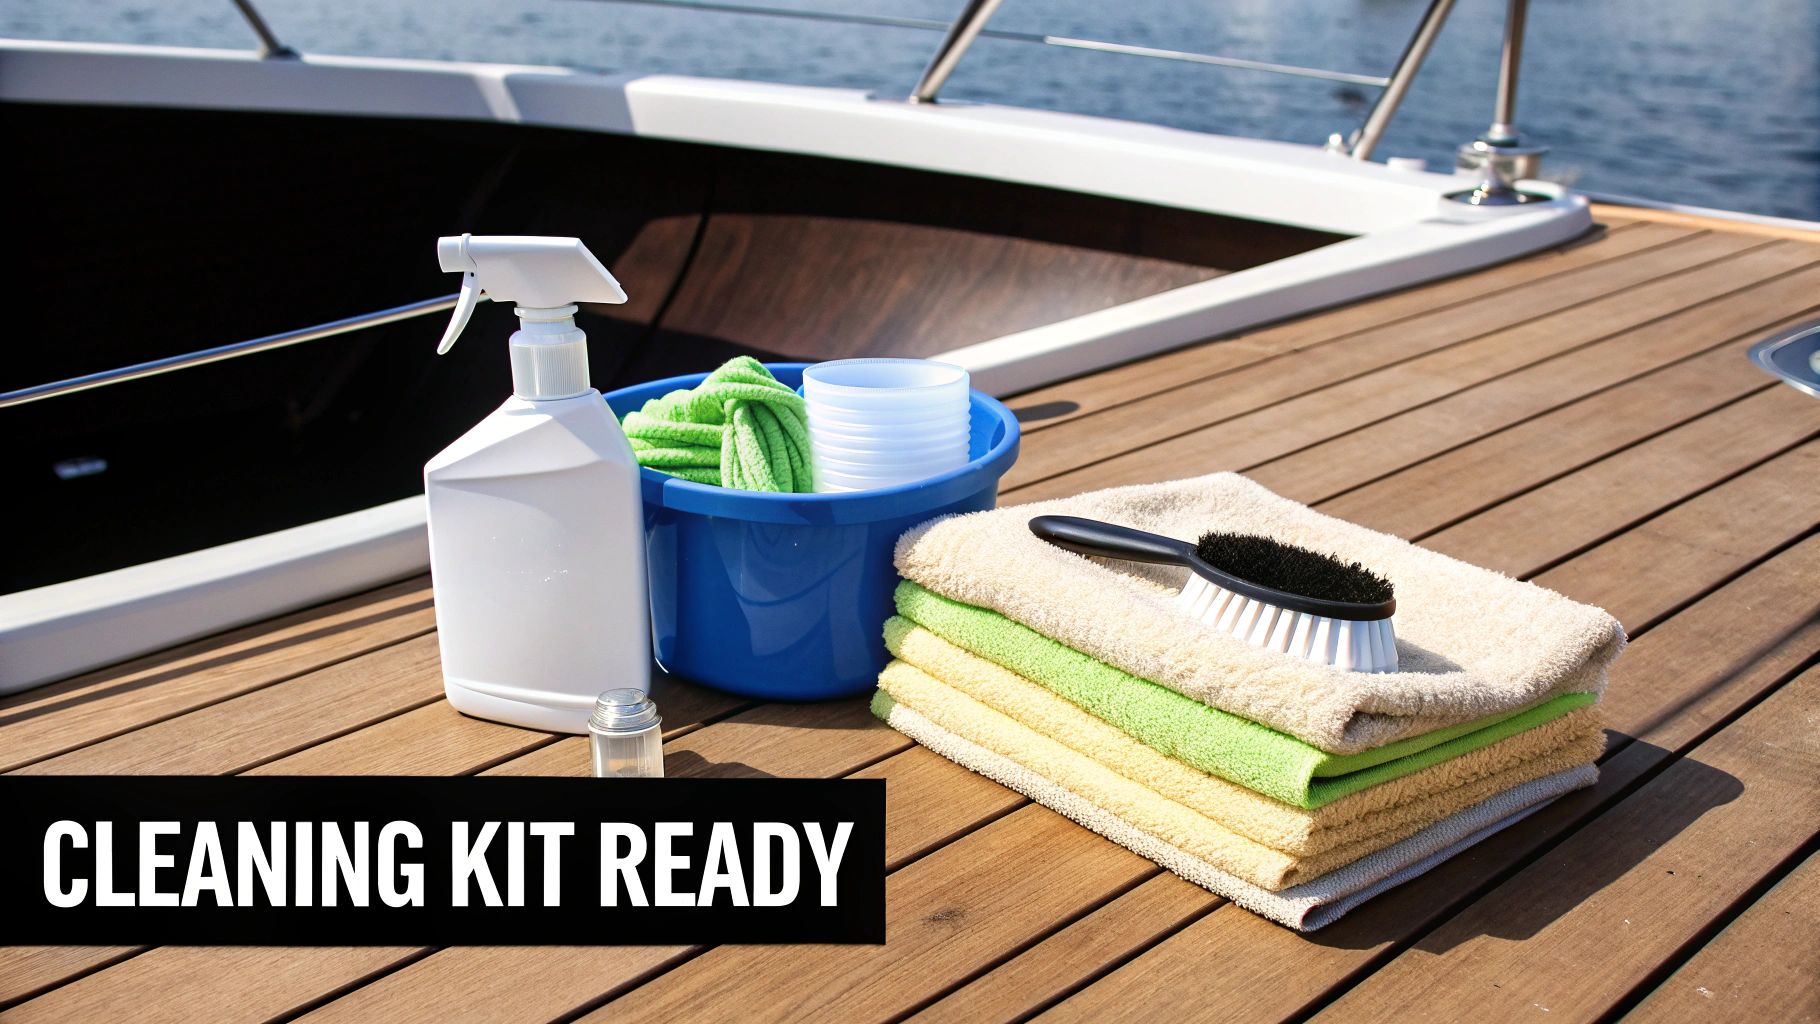
Before you can tackle any grime, you need the right tools. Having a dedicated cleaning kit ready to go makes all the difference, turning a chore into a simple, satisfying routine.
Using the wrong supplies—like an abrasive kitchen sponge or a household cleaner with bleach—is a fast track to permanent damage. This isn't about having a hundred different products; it's about having a smart, effective toolkit for everything from a quick wipe-down to a serious deep clean.
The Tools of the Trade
Your boat’s vinyl is built to be tough, but it still needs a gentle touch. Aggressive tools and harsh chemicals will strip its protective layers and break down the material much faster than the sun and water ever could.
Here’s what you absolutely need to start with:
- Soft-Bristled Brushes: A good soft brush is your secret weapon. Its bristles are strong enough to get into the vinyl’s textured grain to lift out dirt, but gentle enough to prevent scratching the surface.
- Microfiber Towels: Forget old rags. Microfiber's tiny fibers are designed to trap and lift dirt instead of just smearing it around. Grab a decent stack—you’ll want separate ones for cleaning and drying.
The whole point is to lift contaminants off the vinyl, not scrub them into it. That's why soft tools are so critical. They do the heavy lifting without causing the tiny scratches and abrasions that lead to premature cracking and fading.
Choosing Your Cleaner Wisely
This is where many boat owners make a crucial error. The cleaning aisle at your local store is full of products that are way too harsh for marine-grade vinyl. Anything with bleach, acetone, or ammonia is a definite no-go. These chemicals will destroy your upholstery by stripping away the essential plasticizers that keep it soft and flexible.
You need a cleaner specifically formulated for the marine environment. A pH-balanced product like Boat Juice - The Interior Cleaner is tough on grime but completely safe for your vinyl, stitching, and carpet. It's made to break down the stuff you deal with every weekend—sunscreen, body oils, and lake scum—without leaving behind a sticky film that just attracts more dirt.
If you want an all-in-one solution, the Boat Juice Interior Cleaner Bundle is a fantastic starting point. It gives you the right cleaner and the tools you need to use it effectively.
Your Essential Boat Vinyl Cleaning Toolkit
Here's a checklist of our recommended tools and products for cleaning boat vinyl, with simple explanations on why each item is the right choice for the job.
| Tool or Product | Why You Need It | Pro Tip |
|---|---|---|
| Two Buckets | Use one for your cleaning solution and one for clean rinse water. This prevents you from reapplying the dirt you just removed. | Label them! A simple "Soap" and "Rinse" with a permanent marker saves you from mixing them up. |
| Marine Vinyl Cleaner | It safely breaks down sunscreen, oils, and grime without harsh chemicals that damage the material. | Always test a new cleaner on a small, hidden spot first to ensure it's compatible with your vinyl. |
| Soft-Bristled Brushes | These get into the textured grain of the vinyl to gently scrub away embedded dirt without scratching. | An old toothbrush works wonders for getting into tight seams and around seat bases. |
| Microfiber Towels | They're super absorbent and trap dirt effectively. You'll need them for applying cleaner and drying everything completely. | Color-code your towels—for example, blue for cleaning and green for drying—to avoid cross-contamination. |
| A Hose with a Spray Nozzle | Provides a gentle, controlled spray for rinsing seats thoroughly without the damaging force of a pressure washer. | The "shower" or "mist" setting on your nozzle is perfect for this. |
With a kit like this stored on your boat or in the garage, you'll be ready to tackle any mess and keep your seats looking brand new for years to come.
A Practical Guide to Deep Cleaning Your Vinyl Seats
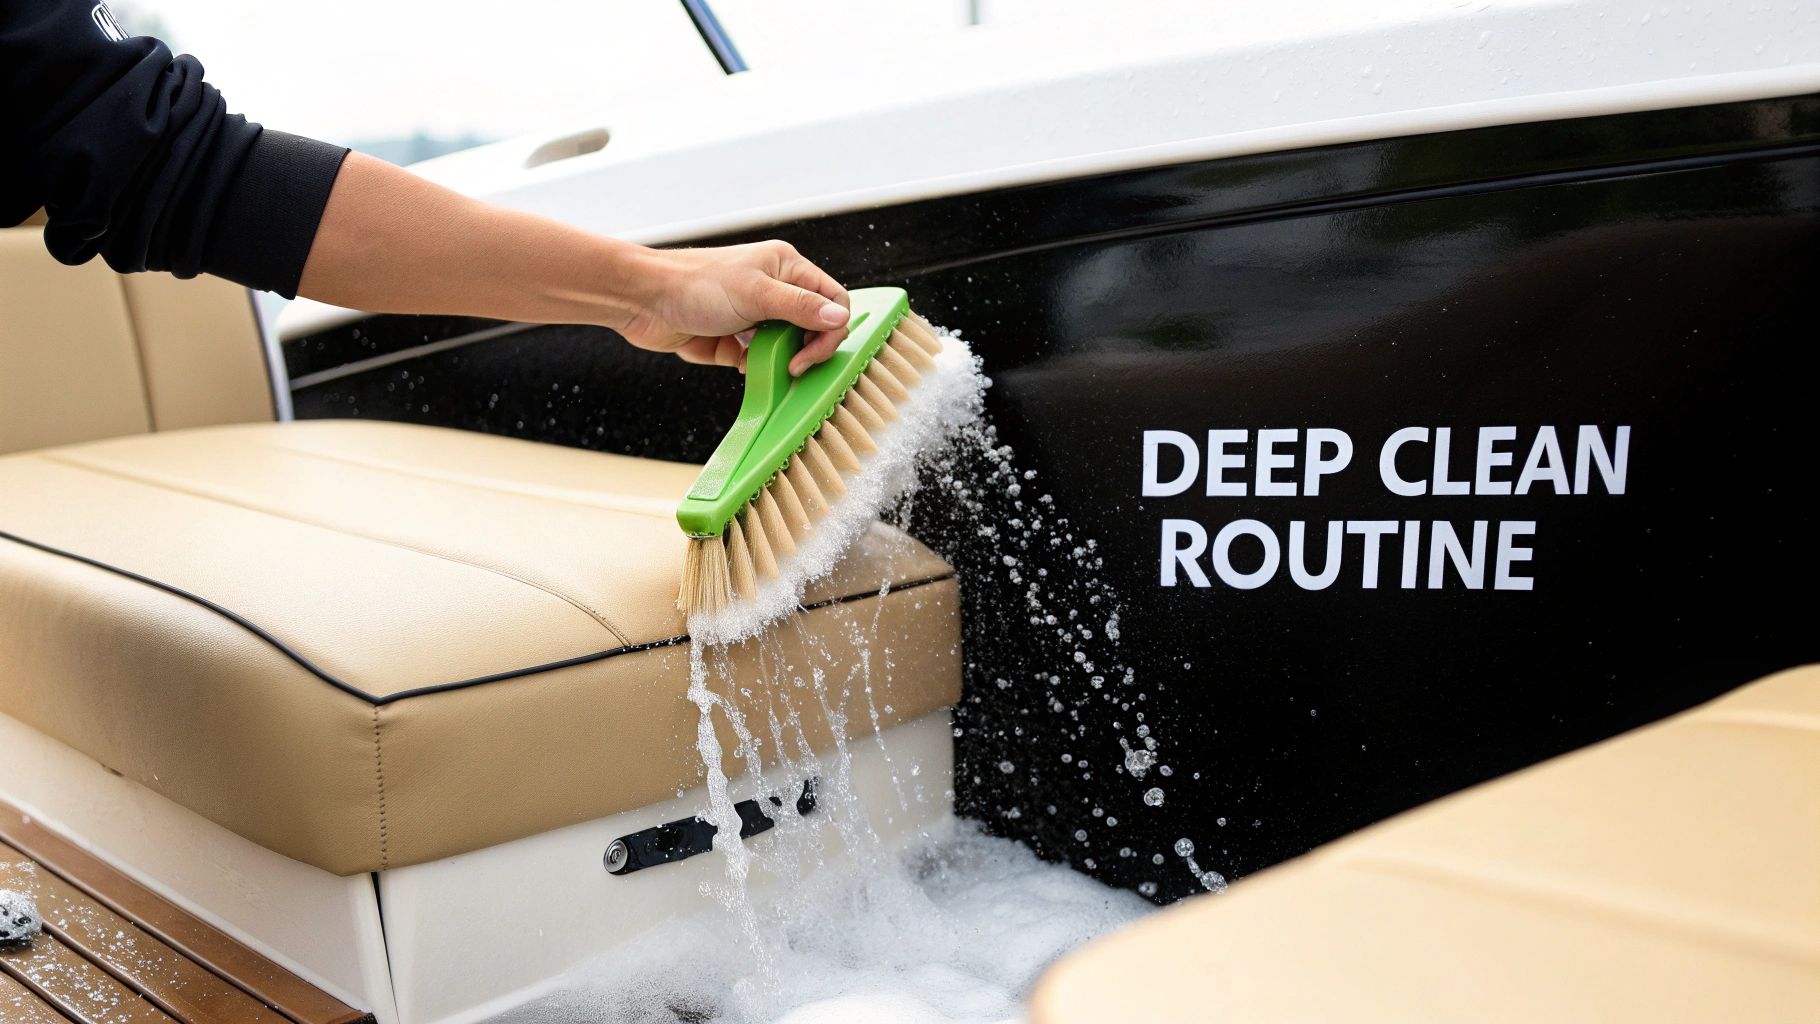
Alright, it's time to bring that boat interior back to life. Think of a deep clean as hitting the reset button on your vinyl. While it's not an every-weekend job, it’s absolutely essential for your spring prep and before you put the boat away for winter.
This process will help you tackle the deep-seated grime that a quick wipe-down can't handle. You don't need to be a professional detailer—just a little patience and the right approach will get you that fresh-from-the-factory look.
Start With a Gentle Pre-Rinse
Before grabbing a brush, use your hose to give all the vinyl a good, gentle rinse. The goal is to wash away all the loose debris first—dust, salt crystals, pollen, and cracker crumbs.
This step is more important than you might think because it prevents you from grinding gritty debris into your seats when you start scrubbing. Use a "shower" setting on your nozzle. And please, do not use a pressure washer. It’s way too aggressive and can easily tear seams or damage the vinyl itself.
Apply Your Cleaner and Let It Dwell
With the seats rinsed and damp, it's time for your marine vinyl cleaner. I recommend working in small, manageable sections, like one cushion at a time. This is especially important on a hot day, as the cleaner can dry before it has a chance to work.
Grab a quality product like Boat Juice - The Interior Cleaner and spray an even coat over the section you’re focusing on. If you’re looking at a particularly grimy spot, don’t be shy with it.
Now, here’s a pro tip: let it sit for a minute or two. This "dwell time" is crucial, as it gives the formula time to penetrate and chemically loosen the grime. This means you'll do a lot less scrubbing, which is always better for the long-term health of your vinyl.
Master the Gentle Scrubbing Technique
Okay, now it’s time for your soft-bristled brush. The technique here is all about finesse, not force. Use gentle, overlapping circular motions to work the cleaner into the vinyl’s texture. This is how you lift out that stubborn, embedded dirt that a cloth just glides over.
Remember, the goal is to agitate the dirt, not obliterate it with brute force. The cleaner has already done the heavy lifting by loosening the grime; your brush is just coaxing it to the surface. Let the product and the tool do the work for you.
Be sure to hit these common problem areas where gunk loves to collect:
- Seams and Stitching: An old toothbrush or the edge of your main brush works wonders here.
- Piping and Welt Cords: Those rounded edges are dirt magnets.
- Underneath Armrests and Headrests: These often-missed spots can get surprisingly grimy.
As you work, you’ll see a nice lather forming and lifting the dirt out. If you hit a really stubborn area, just add another spritz of cleaner and gently scrub again. Resisting the urge to apply more pressure is key—more gentle agitation is far more effective.
The All-Important Final Rinse
Once you’ve scrubbed a section, you need to rinse it thoroughly. Use your hose on a gentle setting to wash away every bit of the cleaner and the dirt it has lifted. This step is non-negotiable, as any soap residue left behind will become a sticky dirt magnet.
Keep rinsing until the water running off is perfectly clear. Take your time to flush out all the nooks and crannies you just detailed.
Finally, grab clean, dry microfiber towels and wipe everything down. Getting the vinyl as dry as possible prevents water spots and—more importantly—stops moisture from sneaking into the foam cushions, which is how mildew gets its start. Let the seats air dry completely before putting on the cover.
Dealing With Stubborn Stains Like Mildew and Sunscreen
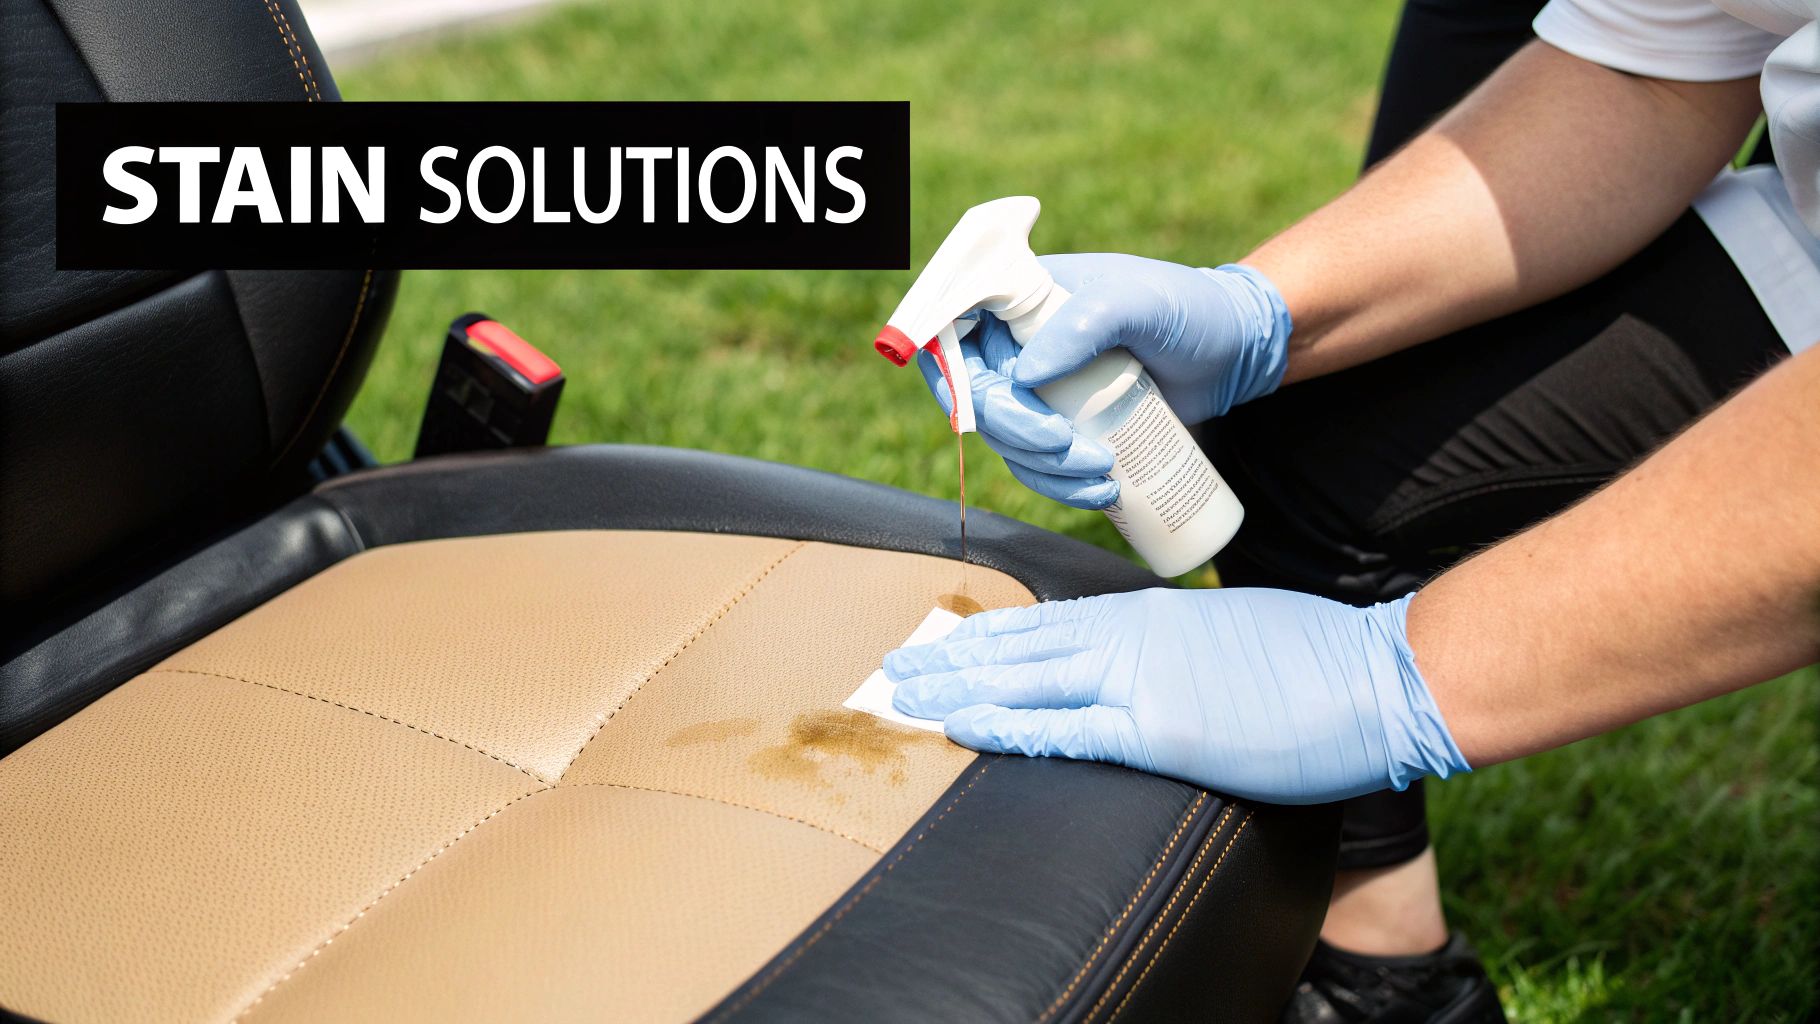
Even with a great cleaning routine, some stains just refuse to leave, like mildew, sunscreen, and ink. A tough stain doesn't mean your vinyl is ruined, it just means you need to shift your strategy from general cleaning to targeted spot treatment. The secret isn’t to scrub harder; it’s about using the right product to solve the specific problem.
Conquering the Dreaded Mildew Stains
Mildew isn’t just a stain; it’s a living fungus. Those awful black spots are colonies that have rooted themselves in your vinyl, usually thriving in the damp, dark environment under a boat cover. This is why your everyday cleaner doesn't stand a chance; you need a product designed to kill the fungus at its source. Mildew is an incredibly common problem, you can dig into these findings on mildewed boat seats yourself.
Here's how to get rid of it for good:
- Prep the Area: First, wash the cushion with your regular marine cleaner. This clears away surface grime and lets the mildew treatment get right to work on the fungus.
- Bring in the Specialist: Grab a dedicated product like Boat Juice - The Mildew Remover. It’s formulated to kill mildew without harsh chemicals like bleach, which can destroy your vinyl and stitching.
- Give It Time to Work: Spray the remover liberally over the mildew spots and let it sit for a few minutes. You might even see the stains begin to fade right before your eyes as the product works.
- Gentle Agitation and a Final Rinse: After a few minutes, use a soft-bristled brush to gently agitate the area. Finish up by rinsing the seat thoroughly with fresh water and drying it completely.
One of the worst mistakes you can make is reaching for a bottle of bleach. It might look like it’s working at first, but bleach is incredibly corrosive to the plasticizers in vinyl and the thread in your seams, causing it to become brittle and crack.
Tackling Greasy Sunscreen and Ink Marks
Sunscreen is a must-have on the water, but its oily residue can leave behind stubborn yellow stains. For these, and for stray ink marks, the key is to act fast.
- Spot Treat with Care: Apply a small amount of a safe vinyl cleaner or a highly diluted isopropyl alcohol solution (try a 70% alcohol, 30% water mix) to a microfiber cloth—never directly onto the vinyl.
- Blot, Don't Rub: Gently blot the stain, working from the outside edge toward the center. Rubbing can spread the stain and grind it deeper into the material.
- Clean and Neutralize: As soon as you're done, clean the area with your regular marine vinyl cleaner to remove any alcohol residue, which can dry out the vinyl if left to sit. Always test your solution on a hidden spot first.
The Mystery of "Pink Stains"
Ever found a mysterious pinkish stain on your seats, often after your boat has been covered? That’s not a spill. It's caused by a dye-producing bacteria that lives deep inside the vinyl's backing and foam cushions, secreting a dye that wicks its way to the surface.
Unfortunately, because this stain comes from inside the material, it is often impossible to remove completely. Prevention is the only real cure. The best way to keep this bacteria dormant is by keeping your seats clean, protected, and ensuring they are 100% dry before you put the boat cover on.
If mildew is a constant battle for you, getting the right tool can make all the difference. See how a dedicated mildew stain remover can become an essential part of your cleaning toolkit.
Don't Just Clean It, Protect It for the Long Haul
Getting your seats looking new is a great feeling, but the job's not finished. The final step is all about proactive protection, turning your clean vinyl into a fortress against the sun and stains. This crucial step makes it much harder for all that gunk to come back, saving you time and elbow grease later on.
Why UV Protection Is Not Optional
The sun is, without a doubt, your vinyl’s number one enemy. Its powerful UV rays are constantly breaking down the chemistry that keeps your upholstery soft and flexible. Without a solid defense, that exposure leads directly to the fading, brittleness, and cracking that can ruin a boat's interior. You can read more about the high cost of sun damage on betterboat.com. A quality protectant is your best insurance policy against this damage.
Applying a Marine-Grade Vinyl Protectant
Once your seats are totally clean and bone-dry, it's time to lock in that freshness with a high-quality marine vinyl protectant. The goal is to create an invisible barrier that blocks damaging UV rays and prevents new stains from taking hold.
A product like Boat Juice Interior Cleaner with UV Protectant is made specifically for this. It conditions the vinyl to replenish what the sun takes out without leaving a greasy, slippery mess behind. That non-greasy finish is crucial—sticky protectants can actually attract more dirt and dust.
Applying it is simple. Just follow these steps for a perfect finish:
- Find some shade. Always apply protectant out of direct sunlight to prevent it from drying too fast.
- Spray and spread. Lightly mist one section of vinyl at a time. A little goes a long way.
- Wipe it in. Use a clean, dry microfiber towel to gently work the product into the vinyl with even, overlapping strokes.
- Buff it out. Grab a second clean microfiber and give the area a light buff to remove any excess, leaving a clean, factory-like finish.
Pay extra attention to the areas that get blasted by the sun all day, like the tops of your seatbacks and the engine cover. Giving these spots a slightly more generous coat provides an extra layer of defense right where you need it most.
Set Up a Simple Maintenance Schedule
Protection isn't a "one and done" deal; it needs to become part of your regular boating routine. How often you'll need to reapply depends on your climate and how much you use your boat.
A good rule of thumb is to reapply your UV protectant every 3-4 months during the peak season. If you're in a high-intensity sun area like Florida or your boat lives uncovered, you might want to bump that up to once a month. This simple, proactive step adds years to the life of your vinyl.
You can check out the Boat Juice Interior Cleaner with UV Protectant to make your routine even easier by cleaning and protecting in one step.
Got Questions About Boat Vinyl Care?
You're not alone. Even the most seasoned boaters run into tricky situations with their vinyl. Let's tackle some of the most common questions so you can feel confident you're doing the right thing for your upholstery.
Can I Use a Magic Eraser on My Boat Seats?
Tread very carefully. A Magic Eraser might seem like a quick fix, but it's basically a micro-abrasive—think of it as incredibly fine sandpaper. It works by sanding away the top layer of the surface.
While it might remove a scuff, it will also strip the protective topcoat right off your vinyl, leaving a dull, vulnerable finish that's prone to cracking. It's much safer to stick with a soft brush and a dedicated marine vinyl cleaner. If you feel you must try it, use it only for a tiny scuff with almost zero pressure, and test it on a hidden spot first.
How Often Should I Really Clean and Protect My Vinyl Seats?
This comes down to how you use your boat. The best habit is to give the seats a quick wipe-down with a gentle interior cleaner after every trip. This five-minute task is a game-changer, removing fresh sunscreen, sweat, and salt before they can bake in and cause real trouble.
For more intensive care, here’s a good rhythm to follow:
- Deep Clean: Do a thorough cleaning at the beginning and end of your boating season.
- Protect: Apply a quality UV protectant every 3-4 months during the season. If your boat bakes in the sun in a place like Florida or Arizona, you'll want to increase that to a monthly application. Consistency is key.
What’s the Secret to Keeping Mildew from Coming Back?
Moisture control is the entire game. If you do only one thing, make it this: ensure your seats are bone dry before you snap that boat cover on. Trapping even a little dampness underneath is like rolling out the welcome mat for mildew.
Make it a habit to pull the cover off and let everything air out after a rainstorm. If you ever shop for a new cover, look for one with built-in vents. That little bit of air circulation makes a huge difference in cutting down the humidity that mildew thrives on.
Is It Okay to Use Household Cleaners Like Bleach on My Boat Vinyl?
Please, don't do it. This is the single fastest way to destroy your boat's upholstery. Harsh chemicals like bleach, ammonia, or acetone are brutal on marine vinyl. They strip out the essential oils, known as plasticizers, that are engineered into the material to keep it soft and flexible.
Once those plasticizers are gone, the vinyl becomes brittle, cracks, and fades. These aggressive cleaners can even dissolve the stitching in your seams. Always stick to products specifically made for the marine environment; they’re designed to clean effectively without causing expensive, irreversible damage.
Ready to build a simple, effective cleaning routine that protects your investment and keeps your boat looking incredible? The Boat Juice Interior Kit has everything you need to clean, protect, and maintain your vinyl seats season after season. Make this the year you get ahead of the grime.
Get Your Complete Interior Cleaning Kit Today at shopboatjuice.com
Article created using Outrank